How To Fix a Leaky Bathroom Mixer Tap
A leaky bathroom mixer tap is a common household problem, resulting in wasted water, increased water bills, and potential damage to surrounding surfaces. While calling a plumber is always an option, many homeowners can successfully repair a dripping tap themselves with the right tools, knowledge, and patience. This article provides a comprehensive guide to diagnosing the cause of a leak and implementing the appropriate repair.
Before embarking on any plumbing repair, it is crucial to prioritize safety. The water supply must be shut off to the affected tap to prevent flooding during the repair process. This is typically achieved by locating the isolation valves beneath the sink. Turn both the hot and cold water valves clockwise until fully closed. Once the water is off, turn the tap on to release any remaining pressure in the system. Place a cloth or bucket beneath the tap to catch any residual water.
The required tools for repairing a leaky bathroom mixer tap vary depending on the tap's design and the cause of the leak. However, a basic toolkit should include: adjustable wrench, flathead screwdriver, Phillips head screwdriver, pliers, a set of Allen keys (hex keys), penetrating oil (such as WD-40), replacement O-rings and washers (a mixed pack is useful), plumber's grease (silicone-based), and a clean cloth. Having a small container to store removed parts will also prove helpful to prevent losing small screws and components.
Identifying the Source of the Leak
The first step in fixing a leaky mixer tap is to accurately pinpoint the source of the leak. Common leak locations include: around the tap handle, from the spout, or from the base of the tap where it meets the sink. Each location suggests a different underlying problem.
A leak around the tap handle often indicates worn-out O-rings or a loose packing nut. O-rings are small rubber seals that prevent water from escaping around the tap stem. Over time, these rings can become brittle, cracked, or flattened, losing their effectiveness. The packing nut is a threaded collar that tightens around the stem, compressing the O-rings and creating a watertight seal. If the packing nut is loose, water can seep past the O-rings.
A drip from the spout, even when the tap is fully closed, is typically caused by worn-out or damaged cartridges or valve seats. Mixer taps use cartridges or valve seats to control the flow of hot and cold water. These components contain rubber seals that wear down over time due to constant use and exposure to water minerals. A damaged or corroded valve seat can also prevent a proper seal, leading to a persistent drip. This is more prevalent in older taps.
A leak from the base of the tap is often the result of a loose connection between the tap body and the sink or a damaged base O-ring or seal. The tap is typically secured to the sink with mounting nuts and washers. If these nuts are loose, the tap can shift, creating a gap through which water can leak. Also, there is generally a rubber seal or O-ring between the base of the tap and the sink, if this degrades it may allow water to seep through with each faucet usage.
Replacing O-Rings and Tightening the Packing Nut
If the leak is around the tap handle, the most likely solution is to replace the O-rings or tighten the packing nut. Here is a step-by-step guide to doing so:
1.
Isolate the Water Supply:
As previously mentioned, shut off the hot and cold water supply valves beneath the sink.2.
Remove the Tap Handle:
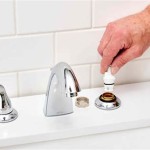
The handle is usually secured with a screw, which may be concealed beneath a decorative cap. Use a small flathead screwdriver to carefully pry off the cap. Once the screw is exposed, use the appropriate screwdriver (Phillips or flathead) to remove it. Gently pull the handle off the tap stem.3.
Locate the Packing Nut:
Once the handle is removed, the packing nut will be visible. It is a threaded collar that surrounds the tap stem.4.
Tighten the Packing Nut (First Attempt):
Use an adjustable wrench to gently tighten the packing nut. Be careful not to overtighten, as this can damage the tap stem or the nut itself. Turn the water supply back on briefly to check if the leak has stopped. If the leak persists, proceed to the next step.5.
Remove the Packing Nut:
If tightening the nut does not resolve the issue, use the adjustable wrench to completely remove the packing nut. Note the position and orientation of any washers or spacers beneath the nut.6.
Remove and Inspect the O-Rings:
Once the packing nut is removed, the O-rings will be visible on the tap stem. Use a small, pointed tool (or a dental pick) to carefully remove the old O-rings. Inspect the O-rings for signs of wear, cracking, or flattening.7.
Replace the O-Rings:
Select replacement O-rings that are the same size and thickness as the originals. Apply a small amount of plumber's grease to the new O-rings before sliding them onto the tap stem. This will help them create a watertight seal and prevent them from drying out. Ensure the O-rings are seated properly in their grooves.8.
Reassemble the Tap:
Reinstall the packing nut, washers, and spacers in the correct order. Tighten the packing nut with the adjustable wrench, but do not overtighten. Replace the tap handle and secure it with the screw and decorative cap.9.
Test for Leaks:
Turn the water supply back on and check for leaks around the tap handle. If necessary, slightly tighten the packing nut until the leak stops. Avoid overtightening.Replacing the Cartridge or Valve Seat
If the leak is dripping from the spout, replacing the cartridge (in newer mixer taps) or the valve seat (in older taps) is usually necessary. This requires identifying the specific type of cartridge or valve seat used in the tap.
1.
Determine the Tap Type:
Mixer taps typically use either ceramic disc cartridges or compression valves with valve seats. Ceramic disc cartridges are common in newer taps, while compression valves are more prevalent in older taps.2.
Isolate the Water Supply:
Shut off the hot and cold water supply valves beneath the sink.3.
Remove the Tap Handle:
Remove the tap handle as described in the previous section.4.
Remove the Cartridge or Valve Assembly:
The method for removing the cartridge or valve assembly varies depending on the tap type. Some taps have a retaining clip or nut that must be removed first. Consult the tap manufacturer's instructions or search online for specific instructions for your tap model.5.
Inspect the Cartridge or Valve Seat:
Once the cartridge or valve seat is removed, inspect it for signs of wear, damage, or corrosion. Look for cracks in the ceramic disc of a cartridge or corrosion on the valve seat. Also, check the rubber components for any splits or degradation.6.
Purchase a Replacement:
Take the old cartridge or valve seat to a plumbing supply store to ensure you purchase a compatible replacement. It is critical to match the exact model and dimensions to ensure a proper fit and seal.7.
Install the Replacement:
Install the new cartridge or valve seat in the reverse order of removal. Be sure to align the cartridge or valve seat correctly and tighten any retaining clips or nuts securely, but do not overtighten.8.
Reassemble the Tap:
Reinstall the tap handle and secure it with the screw and decorative cap.9.
Test for Leaks:
Turn the water supply back on and check for leaks from the spout. If the drip persists, double-check the installation and ensure that all components are properly seated.Tightening the Base and Replacing Base Seals
If the leak is coming from the base of the tap, tighten the mounting nuts or replace the base O-ring or seal. The following are the steps:
1.
Access the Underside of the Sink:
Access the underside of the sink where the tap is mounted. This may require clearing out any items stored in the cabinet.2.
Locate the Mounting Nuts:
Locate the mounting nuts that secure the tap to the sink. There are usually one or two nuts depending on the tap design.3.
Tighten the Mounting Nuts (First Attempt):
Use an adjustable wrench to gently tighten the mounting nuts. Be careful not to overtighten, as this can damage the sink or the tap. Check for stability during tightening. The tap should not wiggle excessively.4.
Isolate the Water Supply:
Shut off the hot and cold water supply valves beneath the sink.5.
Disconnect Water Supply Lines:
Disconnect the hot and cold water supply lines from the tap. Place a bucket underneath to catch any residual water.6.
Remove Mounting Nuts:
Completely remove the mounting nuts and any associated washers or brackets.7.
Lift the Tap:
Carefully lift the tap from the sink. Be mindful of any remaining hoses or connections.8.
Inspect the Base Seal or O-Ring:
Examine the base of the tap and the surrounding area for any signs of damage or degradation to the existing seal or O-ring. If present, remove the old seal or O-ring.9.
Install a New Seal or O-Ring:
Install a new base seal or O-ring of the correct size and material. Apply a small amount of plumber's grease to the seal or O-ring to create a better seal and prevent future drying out.10.
Reinstall the Tap:
Reposition the tap on the sink, ensuring that it is properly aligned. Reinstall the mounting nuts, washers, and brackets in the correct order. Tighten the nuts securely, but do not overtighten.11.
Reconnect Water Supply Lines:
Reconnect the hot and cold water supply lines to the tap.12.
Test for Leaks:
Turn the water supply back on and check for leaks around the base of the tap and the water supply line connections. If any leaks are present, slightly tighten the mounting nuts or the supply line connections until the leaks stop.By following these steps, a leaky bathroom mixer tap can often be repaired without the need for professional assistance. Remember to prioritize safety by shutting off the water supply and using the correct tools. When in doubt, consult a qualified plumber.

Bath Shower Mixer Diverter Maintenance And Replacement

How To Change A Washer On Mixer Tap Living By Homeserve

How To Fix A Dripping Tap Admiral

Bath Shower Mixer Ceramic Disc Flow Valve Maintenance And Replacement

How To Fix A Dripping Tap Living By Homeserve

How To Fix A Leaking Mixer Tap 6 Steps Guide Tunnel Vision

Here S Why Your New Bathroom Tap Is Leaking And How To Fix It Plumber Hills District

How To Fix A Leaking Mixer Tap From The Base 8 Easy Steps

How To Fix A Leaking Bathtub Faucet Diy Family Handyman

Replacing A Cartridge In Mixer Tap The
Related Posts