How To Remove a Nutone Bathroom Exhaust Fan Cover
Removing a Nutone bathroom exhaust fan cover is a task frequently encountered during cleaning, maintenance, or replacement of the fan unit. While the specific mechanism for cover removal can vary slightly depending on the Nutone model, the fundamental principles remain consistent. Understanding these principles and following a systematic approach can ensure the cover is removed safely and efficiently, preventing damage to the cover, the fan unit, or surrounding fixtures.
This article provides comprehensive instructions on how to remove a Nutone bathroom exhaust fan cover. It delineates the typical mechanisms used to secure the cover, explains the necessary precautions to take, and offers detailed steps for a successful removal. Prior to commencing the removal process, it is crucial to identify the specific Nutone model in question and any distinguishing features of its cover attachment system. This preliminary assessment can streamline the removal process and mitigate the risk of encountering unforeseen complications.
Identifying the Cover Attachment Mechanism
Nutone exhaust fan covers are typically secured using one of several methods. The most common include spring-mounted clips, torsion springs, or friction-fit mechanisms. Spring-mounted clips are generally located on either side of the cover, holding it firmly against the fan housing. Torsion springs operate similarly, but often involve a twisting or rotating motion to disengage. Friction-fit covers, on the other hand, rely on a tight fit within the fan housing and might require a gentle but firm pulling action for removal.
A visual inspection of the fan cover is often sufficient to identify the attachment mechanism. Look for visible clips or springs along the edges of the cover. If the cover appears to be flush with the ceiling and lacks any visible hardware, it is likely secured by a friction-fit system. Consulting the Nutone owner's manual for the specific model can provide definitive confirmation of the attachment method and any model-specific instructions for cover removal. Online resources, such as Nutone's website or home improvement forums, can also offer valuable insights and visual aids.
Understanding the type of attachment mechanism is paramount to preventing damage to the cover or the surrounding ceiling. Applying excessive force or using the wrong technique can lead to broken clips, cracked covers, or even damage to the fan housing. Careful observation and a thoughtful approach are essential for a successful and damage-free removal.
Safety Precautions and Preparatory Steps
Prior to commencing any work on an electrical appliance, it is crucial to prioritize safety. The first and most important step is to disconnect the power supply to the bathroom exhaust fan. This can be accomplished by turning off the corresponding circuit breaker in the electrical panel. Confirm the power is off by testing the fan switch with a non-contact voltage tester. This device will indicate the presence of electrical current and confirm that the circuit is indeed de-energized.
Once the power is safely disconnected, gather the necessary tools and materials. These typically include a stepladder or sturdy platform to reach the fan, a screwdriver (either flathead or Phillips head, depending on the model), cleaning supplies (such as a vacuum cleaner with a brush attachment, a damp cloth, and mild detergent), and potentially a pair of work gloves to protect your hands. Having all the necessary tools readily available will streamline the removal process and prevent unnecessary interruptions.
Protecting the surrounding area is another important consideration. Spread a drop cloth or old sheet on the floor beneath the fan to catch any dust or debris that may fall during the removal process. This will prevent the spread of dirt and simplify the cleanup afterwards. Ensuring adequate lighting is also crucial. If the bathroom lighting is insufficient, use a work light to illuminate the fan area and provide a clear view of the cover and its attachment mechanism.
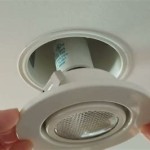
Removing a Cover with Spring-Mounted Clips
If the Nutone exhaust fan cover is secured with spring-mounted clips, the removal process is typically straightforward. Begin by positioning the stepladder or platform directly beneath the fan, ensuring a stable and secure footing. Gently grasp the cover with both hands, applying light pressure to the sides where the clips are located. In many designs, you will need to gently push the cover upwards slightly to relieve the pressure on the clips.
Locate the spring clips on either side of the cover. These clips are usually visible from the edge of the cover. Use your fingers or a flathead screwdriver to gently disengage the clips from the fan housing. To disengage the clip, you may need to gently push it inwards towards the center of the cover or lever it downwards, depending on the specific design. Applying excessive force can damage the clip or the cover, so proceed with caution.
Once both clips are disengaged, the cover should be free to detach from the fan housing. Carefully lower the cover, being mindful of any dust or debris that may fall. If the cover is especially dirty, consider vacuuming it off while it is still partially attached to minimize the spread of dust. Set the cover aside on a clean surface for cleaning or further inspection.
Removing a Cover with Torsion Springs
Nutone exhaust fan covers secured with torsion springs require a slightly different approach. These springs typically involve a twisting or rotating motion to disengage the cover. As with spring-mounted clips, begin by positioning the stepladder or platform directly beneath the fan and ensuring a stable footing. Grasp the cover with both hands and carefully inspect the attachment points to understand the spring mechanism.
Torsion springs are often located in recessed areas on the cover or the fan housing. They may be visible as small, coiled springs that are engaged with slots or tabs. To disengage the springs, you typically need to either twist the cover slightly or push it upwards while simultaneously rotating it. The specific motion required will depend on the design of the torsion spring mechanism.
Apply gentle pressure and rotation to the cover, carefully observing the torsion springs. If you encounter resistance, do not force the cover. Instead, try a different angle or direction of rotation. Once the torsion springs are disengaged, the cover should be free to detach from the fan housing. Lower the cover carefully and set it aside for cleaning or examination.
Removing a Friction-Fit Cover
Friction-fit Nutone exhaust fan covers rely on a tight fit within the fan housing to stay in place. Removing these covers requires a gentle but firm pulling action. As with the other types of covers, start by positioning the stepladder or platform beneath the fan and ensuring a stable footing. Grasp the cover firmly with both hands, ensuring a secure grip.
Apply gentle and even pressure to the cover, pulling it straight down from the fan housing. Avoid twisting or tilting the cover, as this can increase the friction and make it more difficult to remove. If the cover is particularly tight, you may need to use a rocking motion, gently pulling down on one side and then the other. This can help to gradually loosen the cover's grip on the housing.
If the cover remains stubbornly in place, try using a flathead screwdriver to gently pry it loose. Insert the screwdriver between the edge of the cover and the fan housing, and apply gentle pressure to separate the two. Be careful not to damage the cover or the surrounding ceiling. Once the cover is loose, carefully lower it and set it aside for cleaning or inspection.
It is important to note that friction-fit covers can sometimes be difficult to remove, especially if they have been in place for a long time. Dust and debris can accumulate between the cover and the housing, creating additional friction. Patience and persistence are key to successfully removing these covers without causing damage.
After the cover is removed, the interior of the fan housing can be cleaned, and any necessary maintenance or repairs can be performed. When reinstalling the cover, ensure that it is properly aligned with the fan housing and that all clips or springs are securely engaged. This will ensure that the cover remains firmly in place and that the fan operates safely and efficiently.

How To Remove Nutone Bathroom Fan Light Cover 2024 Guide Home Inspector Secrets

How To Remove Nutone Bathroom Fan Light Cover 2024 Guide Home Inspector Secrets

Remove Install A Bathroom Fan Grille In 1 Min

How To Remove Nutone Bathroom Fan Light Cover 2024 Guide Home Inspector Secrets

How To Remove Clean Bathroom Ceiling Fan Nutone

Can T Get The Grill Off Nutone Fan Light Doityourself Com Community Forums

Broan Nutone Bath Fan Model 765h80l Disassembly Repair Help

How To Remove A Nutone Bathroom Fan Light Cover Quora

How To Clean Replace Light Broan Model 678 Exhaust Fan

How To Remove Nutone Bathroom Fan Light Cover 2024 Guide Home Inspector Secrets