How To Replace a Kohler Bathroom Sink Faucet Cartridge
A dripping faucet is more than just an annoyance. It wastes water, increases water bills, and can eventually lead to more significant plumbing issues such as mineral buildup and fixture damage. A common cause of a dripping single-handle Kohler bathroom sink faucet is a worn or damaged cartridge. Replacing the cartridge is a relatively straightforward DIY project that can save money on plumber's fees and resolve the dripping problem. This article provides a detailed guide on how to replace a Kohler bathroom sink faucet cartridge, ensuring a successful and leak-free result.
Before starting any plumbing repair, safety is paramount. The first crucial step is to turn off the water supply to the faucet. This usually involves locating the shut-off valves under the sink. Most bathroom sinks have two separate valves, one for hot water and one for cold water. Turn both valves clockwise until they are completely closed. If shut-off valves are not present beneath the sink, the main water supply to the house must be turned off. This is typically located in a basement, utility room, or near the water meter. After shutting off the water supply, turn on the faucet to relieve any residual pressure in the lines. Have towels and a bucket readily available to catch any remaining water.
After ensuring the water supply is completely shut off, the next step is to gather the necessary tools and materials. Having everything on hand before disassembling the faucet will streamline the process and prevent unnecessary delays. The required tools typically include:
- A new Kohler faucet cartridge (ensure it is the correct replacement for the specific faucet model)
- A flathead screwdriver
- A Phillips head screwdriver
- An Allen wrench set (specific size may vary depending on the faucet model)
- Adjustable pliers or a basin wrench
- Penetrating oil (optional, for stubborn parts)
- A flashlight
- Clean cloths or rags
- Safety glasses
Having the proper tools and a clear workspace is crucial for a successful cartridge replacement. The specific tools required may vary slightly depending on the model of the Kohler faucet, so consulting the faucet's documentation or Kohler's website can be beneficial.
Identifying the Faucet Model and Obtaining the Correct Cartridge
Kohler offers a wide range of bathroom sink faucets, and each model may use a different cartridge. Therefore, accurately identifying the faucet model is essential to ensure the correct replacement cartridge is purchased. The faucet model number is often found on the original installation instructions, the product packaging, or sometimes stamped on the faucet body itself, usually underneath the sink or near the faucet base. If the documentation is unavailable, taking clear pictures of the faucet and comparing them to images on Kohler's website or contacting Kohler customer service can help identify the model.
Once the faucet model is identified, purchase the correct replacement cartridge. Kohler cartridges are readily available at most hardware stores, plumbing supply stores, and online retailers. When purchasing the cartridge, double-check the product number to ensure it matches the faucet model. Using the wrong cartridge can result in leaks or improper faucet operation. Some cartridges come with specific installation tools or grease, so keep any included components for later use.
It is advisable to purchase genuine Kohler replacement parts. While aftermarket cartridges may be less expensive, they may not meet Kohler's quality standards and could lead to premature failure or leaks. Investing in a genuine Kohler cartridge ensures proper fit and reliable performance.
Disassembling the Faucet to Access the Cartridge
With the proper tools and the correct replacement cartridge on hand, the next step is to disassemble the faucet to access the old cartridge. The disassembly process varies slightly depending on the faucet model, but the general principles remain the same. This section provides a generalized guide, but always refer to the specific instructions for the determined faucet model if available.
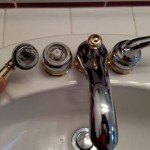
Start by removing the handle. Most Kohler bathroom sink faucets have a small set screw that secures the handle to the faucet body. This set screw is typically located on the side or back of the handle and is concealed by a decorative cap or button. Use a small flathead screwdriver or an Allen wrench (depending on the screw type) to remove the cap or button and loosen the set screw. Once the set screw is loose, the handle should pull straight off the faucet body. If the handle is stuck, gently wiggle it back and forth while pulling. Avoid using excessive force, as this can damage the handle or the faucet body.
After removing the handle, the next step is to remove any decorative escutcheons or sleeves that cover the cartridge. These are usually held in place by screws or O-rings. Carefully unscrew or pull off any escutcheons or sleeves to expose the cartridge retaining nut or clip. If the escutcheons or sleeves are difficult to remove, apply a small amount of penetrating oil to help loosen them. Allow the penetrating oil to sit for a few minutes before attempting to remove the parts again.
Once the cartridge retaining nut or clip is visible, use an adjustable wrench or pliers to loosen and remove the nut. Some faucets may have a clip instead of a nut. If there is a clip it can generally be removed with a flathead screwdriver gently prying at the clip until it is free. Carefully remove the old cartridge. It may be necessary to gently rock the cartridge back and forth to loosen it. If the cartridge is stuck, try using pliers to grip the stem and gently pull it out. Avoid using excessive force, as this could break the cartridge and make it more difficult to remove. Be sure to note the orientation of the old cartridge before removing it, as the new cartridge must be installed in the same way. This will ensure proper hot and cold water control.
Installing the New Cartridge and Reassembling the Faucet
With the old cartridge removed, the next step is to install the new cartridge. Before installing the new cartridge, inspect the faucet body for any debris or mineral buildup. Clean the inside of the faucet body with a clean cloth or brush to remove any dirt or scale. This will ensure a proper seal between the new cartridge and the faucet body.
Place the new cartridge into the faucet body, ensuring it is oriented in the same way as the old cartridge. Align any markings or notches on the cartridge with corresponding features inside the faucet body. Gently push the cartridge into place until it is fully seated. If the cartridge does not fit easily, double-check the orientation and ensure that there is no debris obstructing the installation. It is often helpful to apply a small amount of silicone grease to the O-rings on the new cartridge before installation. This helps to create a watertight seal and eases installation.
Once the new cartridge is in place, resecure it with the retaining nut or clip. Tighten the nut with an adjustable wrench, but avoid over-tightening, as this could damage the cartridge or the faucet body. If the faucet uses a clip, ensure that the clip is properly seated and secured. After securing the cartridge, replace any decorative escutcheons or sleeves that were removed earlier. Tighten any screws or snap the escutcheons into place. Finally, reattach the handle and tighten the set screw. Ensure that the handle is properly aligned and secure.
After reassembling the faucet, slowly turn the water supply back on. Check for any leaks around the faucet body, the cartridge, and the handle. If any leaks are present, tighten the retaining nut or check the O-rings on the cartridge. If the faucet still leaks, the cartridge may not be properly seated, or the cartridge itself may be defective. Turn the water supply back off and repeat the installation process.
Once the faucet is properly reassembled and there are no leaks, test the faucet to ensure that it is functioning correctly. Turn the handle to the hot and cold positions and check the water flow and temperature. If the water flow is restricted or the temperature is not correct, double-check the cartridge orientation and ensure that the hot and cold water lines are properly connected.
Replacing a Kohler bathroom sink faucet cartridge is a manageable task for most homeowners. By following these steps carefully, the faucet should be restored to proper working order, eliminating any annoying drips and saving water. Always consult the manufacturer's instructions for the specific faucet model for the most accurate guidance. If unsure about any aspect of the repair, contacting a qualified plumber is always the best course of action.

Kohler Bathroom Faucet Cartridge Replacement Repair

Kohler Wide Spread Taboret Lavatory Faucet Stems Replaced

Kohler Bathroom Faucet Cartridge Replacement

Kohler Bathroom Faucet Cartridge Replacement

Kohler Faucet Repair Valve Stem Replacement To Stop Dripping

Kohler Faucet Repair Valve Stem Replacement To Stop Dripping

Kohler Forte 4 In Centerset 2 Handle Low Arc Water Saving Bathroom Faucet Polished Chrome With Sculpted Lever Handles K 10270 Cp The Home Depot

Diy Kohler Bathroom Sink Widespread Faucet Installation Diyprojectsbydave

Kohler Mistos Battery Powered Touchless Single Hole Bathroom Faucet In Matte Black K R32930 4d Bl The Home Depot

Kohler Sundae 4 In Centerset 2 Handles Bathroom Faucet Matte Black K R28796 4d Bl The Home Depot
Related Posts


