How to Replace a Single Bathroom Floor Tile
Replacing a single bathroom floor tile can be a daunting task, but it is a manageable project for those willing to put in the effort. It requires patience, precision, and the right tools. This article will guide you through the process, breaking it down into manageable steps to ensure a smooth and successful repair.
1. Gather the Necessary Tools and Materials
Before starting, make sure you have all the necessary tools and materials at hand. These include:
- New tile: Choose a tile that matches the existing tiles as closely as possible. If the exact match is unavailable, consider using a complementary tile.
- Grout: Select a grout that is compatible with the tile material and matches the existing grout color.
- Tile adhesive: Choose a strong, moisture-resistant adhesive specifically designed for bathroom tile applications.
- Grout sealant: This will protect the grout from moisture and staining.
- Chisel: A chisel will be used to loosen the existing tile.
- Hammer: A hammer is needed to strike the chisel.
- Utility knife: This will be used to cut the grout around the tile.
- Bucket: This will be used to mix the grout and adhesive.
- Sponge: A sponge will be used to clean the grout.
- Level: A level will ensure the new tile is installed evenly.
- Gloves: Protect your hands from the adhesive and grout.
- Safety glasses: Protect your eyes from debris.
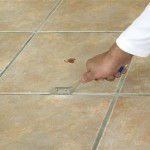
2. Prepare the Area
Begin by clearing the area around the damaged tile. Remove any furniture, rugs, or other items that may obstruct the work area. Next, use the utility knife to carefully cut the grout around the damaged tile, removing it completely. This will allow you to access the tile and remove it without damaging surrounding tiles.
3. Remove the Damaged Tile
With the grout removed, place the chisel on the edge of the damaged tile. Use a hammer to gently tap the chisel, breaking the bond between the tile and the floor. Once the tile is loosened, lift it carefully and discard it.
4. Clean and Prepare the Subfloor
After removing the damaged tile, thoroughly clean the area to remove any debris or adhesive residue. Ensure the subfloor is smooth and even. If there are any cracks or uneven surfaces, use a patching compound to fill them in. Allow sufficient drying time before proceeding.
5. Apply Tile Adhesive
With the subfloor prepared, apply a thin layer of tile adhesive to the back of the new tile. Use a notched trowel to spread the adhesive evenly, creating grooves that will help the tile bond securely to the floor.
6. Install the New Tile
Position the new tile in the hole created by the removed tile. Using a level, ensure that the tile is even with surrounding tiles. Gently press down on the tile to ensure good adhesion. Allow the adhesive to set according to the manufacturer's instructions.
7. Apply Grout
Once the adhesive has set, mix the grout according to the manufacturer's instructions. Use a grout float to apply a thin layer of grout over the tile and surrounding area. Ensure the grout is evenly distributed and fills all gaps.
8. Clean Excess Grout
After applying the grout, use a damp sponge to clean up any excess grout and remove any haze from the tile's surface. Repeat this process as needed until all grout is cleaned and the tile surface is smooth.
9. Seal the Grout
Once the grout has completely dried, apply a grout sealant to the grout lines. This will protect the grout from staining and moisture, extending its lifespan. Allow the sealant to dry according to the manufacturer's instructions.
Replacing a single bathroom floor tile requires careful planning and execution. By following these steps, you can successfully complete this project without the need for professional help. Remember, patience and attention to detail are crucial for achieving a seamless and long-lasting repair.

How To Remove Replace One Bathroom Tile Ceramic Repair

How To Remove A Tile Floor

How To Lay Bathroom Tile 5 Easy Steps Rubi Blog Usa

How To Replace A Ed Tile
.png?strip=all "How To Fix Loose Or Broken Ceramic Floor Tiles")
How To Fix Loose Or Broken Ceramic Floor Tiles

How To Upgrade Bathroom Tile Without Replacing

How To Upgrade Bathroom Tile Without Replacing

How To Replace A Broken Tile

Laying Floor Tiles In A Small Bathroom Houseful Of Handmade

Subfloor For Tile Installation Everything You Need To Know
Related Posts