How to Rough In Bathroom Plumbing on a Concrete Slab
Rough-in plumbing refers to the installation of the initial plumbing system before the walls and floor are finished. For a bathroom on a concrete slab, this process involves carefully planning and executing the placement of pipes, drains, and other components. This guide will provide a detailed explanation of how to rough in bathroom plumbing on a concrete slab, covering the key steps and important considerations.
Planning and Preparation
Proper planning is crucial for successful bathroom plumbing rough-in. The following steps should be taken before any work begins:
1.
Review the Bathroom Layout:
Carefully analyze the bathroom's design. Consider the placement of fixtures like the toilet, sink, shower, and bathtub. The location of these fixtures will determine the placement of plumbing components. 2.Determine the Plumbing System:
Establish the type of plumbing system to be used, such as PVC, copper, or PEX piping. Each material has its advantages and disadvantages, which should be carefully considered. 3.Gather Necessary Tools and Materials:
Ensure all the required tools and materials are readily available. These might include: * Plumbing pipes (PVC, copper, PEX) * Fittings (elbows, tees, unions, etc.) * Solvent cement (for PVC) or flux (for copper) * Pipe cutters * Pipe wrench * Channel locks * Level * Measuring tape * Marker * Safety gear (gloves, goggles) 4.Check Local Codes:
Consult local plumbing codes and regulations to ensure compliance. Codes vary by location and may specify pipe sizes, materials, and installation methods.Installation of Pipes and Drains
Once the planning is complete, the next step is to install the pipes and drains. The following steps will guide this process:
1.
Locate the Drain Lines:
Identify the locations for the drain lines for the toilet, sink, and bathtub. Depending on the building's plumbing system, the drain lines may connect to a primary drain in the basement or a sewer line. 2.Mark and Cut Pipes:
Measure the lengths of pipe needed to connect the fixtures to the drain lines. Use a pipe cutter or saw to cut the pipes to the required lengths. 3.Install Drain Lines:
Connect the drain lines to the fixtures. The drain lines should be sloped correctly to ensure proper drainage. Generally, a slope of ¼ inch per foot is recommended for gravity-fed systems. 4.Install Waste and Vent Pipes:
The waste pipes carry wastewater away from the fixtures, while vent pipes allow air to flow into the plumbing system, preventing sewer gases from entering the bathroom. Install both waste and vent pipes according to local codes and the building's plumbing design. 5.Install Supply Lines:
Supply lines carry fresh water to the fixtures. These lines are typically installed after the drain lines are complete. Measure and cut the supply lines to the appropriate lengths and connect them to the fixtures. 6.Secure Pipes:
Ensure all pipes are secured in place using clamps, brackets, or straps. The pipes should be firmly fixed to prevent movement or leaks. 7.Check for Leaks:
After all pipes and fittings are installed, conduct a thorough check for leaks. Allow the pipes to sit for a period of time to ensure there are no leaks before moving to the next step.Final Steps and Considerations
After the initial plumbing installation is completed, there are some final steps to ensure a smooth and properly functioning bathroom plumbing system:
1.
Isolate the Plumbing:
Consider using isolation valves to shut off water supply to individual fixtures. This is helpful for maintenance or repairs. 2.Pressure Testing:
Conduct a pressure test on the plumbing system to ensure it can withstand the pressure of the water supply. This is crucial for identifying any leaks or weak points in the system before the final stages of construction. 3.Backflow Prevention:
Install backflow prevention devices as necessary. These devices prevent contaminated water from flowing back into the clean water supply system.Here are some important considerations when roughing in bathroom plumbing on a concrete slab:
1.
Access Panels:
Install access panels in strategic locations to facilitate easy access to the plumbing system for future repairs or maintenance. This can be particularly helpful for areas behind walls where reaching the pipes would be difficult. 2.Future Expansion:
When planning the rough-in, consider any future expansion plans for the bathroom. Design the system with flexibility to accommodate potential additions or modifications. 3.Accessibility:
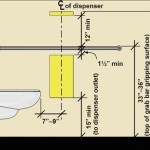
For bathrooms intended for use by individuals with disabilities, consider accessibility requirements. This may influence the placement of fixtures and may require specific adaptations in the plumbing system. 4.Water Conservation:
Explore using water-efficient fixtures and appliances to minimize water consumption. The selection of faucets, toilets, and showerheads can significantly impact water usage.Roughing in bathroom plumbing on a concrete slab is a complex process that requires careful planning, attention to detail, and adherence to local codes. By following the steps outlined in this guide, homeowners and professionals can ensure a properly functioning, safe, and efficient plumbing system for their bathroom.

Rough In Plumbing Before Concrete Slab Pole Barn House Ep 4

Plumbing Rough In For Slab Inspections Internachi Forum

Plumbing In A Concrete Slab

Plumbing In A Concrete Slab

Plumbing In A Concrete Slab

Slab Under Plumbing Solutions Llc

Plumbing Rough In For Slab Inspections Internachi Forum

Plumbing Under A Concrete Floor Fine Homebuilding

For Rough In Plumbing Am I Burying It Underneath The Soil That S Under My Slab Or Does Lie On Top Of Level With Rest And

A Guide On Doing Rough In Bathroom Plumbing Advanced Gas
Related Posts