How to Build a Bathroom Vanity with Legs
A bathroom vanity is a crucial element in any bathroom, providing storage and a surface for essential tasks like washing and grooming. While pre-made vanities are readily available, building your own allows for customization, matching your unique style and space requirements. This guide will walk you through the process of constructing a bathroom vanity with legs, providing step-by-step instructions and helpful tips.
Choosing Materials and Design
Before embarking on the building process, selecting the right materials and design is essential. The following factors should be considered:
1. Material Selection:
- Cabinet Material: Plywood is a popular choice for vanity construction due to its stability, affordability, and ease of working with. MDF (Medium-Density Fiberboard) can also be used, but it is less moisture-resistant.
- Countertop Material: Options range from traditional granite and marble to more affordable materials like laminate or engineered stone. Consider your budget, desired aesthetic, and resistance to water and stains.
- Sink Type: Select a sink that complements the vanity style and fits the designated space. Vessel sinks and integrated sinks are popular choices for contemporary vanities.
2. Vanity Design:
- Size: Determine the desired width, depth, and height of the vanity based on the available space and functional needs.
- Style: The style of the vanity should align with your bathroom's overall aesthetic. Consider contemporary, traditional, rustic, or farmhouse styles.
- Leg Design: Choose a leg design that complements the vanity style. Options include simple straight legs, tapered legs, or more elaborate designs.
Construction Process
Once you've chosen the materials and design, you can begin the construction process. This involves the following steps:
1. Building the Cabinet:
- Cut cabinet pieces: Cut the plywood or MDF to the desired dimensions using a table saw or circular saw.
- Assemble the frame: Assemble the cabinet frame using wood glue and screws. Ensure that the corners are square and the sides are flush.
- Add shelves or drawers: If desired, add shelves or drawers to the cabinet for storage.
- Sand and finish: Sand the cabinet smooth and apply a stain, paint, or sealant to achieve the desired look.
2. Constructing the Legs:
- Cut leg pieces: Cut the chosen wood for the legs to the desired length.
- Shape the legs: If necessary, shape the legs using hand tools or a router.
- Attach legs to cabinet: Secure the legs to the cabinet using screws and wood glue. Make sure they are evenly spaced and level.
- Reinforce the legs: If needed, add additional support to the legs using corner braces or cross pieces.
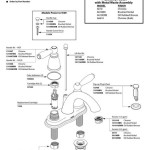
3. Installing the Countertop and Sink:
- Install the countertop: Secure the countertop to the cabinet using screws or brackets. Ensure the countertop is level and flush with the cabinet.
- Cut the sink cutout: If using a vessel sink, cut a hole in the countertop to accommodate the sink. For an integrated sink, the countertop will typically come with a pre-cut hole.
- Install the sink: Secure the sink to the countertop according to the manufacturer's instructions.
- Caulk around the sink: Caulk around the sink and countertop to create a waterproof seal.
Additional Tips
Here are some valuable tips to enhance your bathroom vanity building experience:
1. Plan and measure carefully: Accurate planning and measuring are crucial for a successful project. Sketch out your design, take precise measurements, and double-check them before cutting any materials.
2. Use appropriate tools: Invest in quality tools, such as a table saw, circular saw, drill, and sander, to ensure precise cuts and a professional finish.
3. Consult the manufacturer's instructions: Pay close attention to the manufacturer's instructions for installing the sink, faucets, and other components.
4. Safety first: Always wear safety glasses, hearing protection, and gloves when working with power tools and wood.
Building a bathroom vanity with legs is a rewarding project that allows you to create a unique and functional centerpiece for your bathroom. By following these steps and incorporating these tips, you can enhance your DIY skills and enjoy a customized vanity that complements your personal style.

Diy Bathroom Vanity With Turned Legs Part 1 Addicted 2 Decorating

How I Built A 60 Diy Bathroom Vanity For My Master

48 Turned Leg Vanity Ana White

The Cascadia Vanity A Diy Turned Leg Double Created Home

48 Turned Leg Vanity Ana White

Diy Bathroom Vanity Plans Houseful Of Handmade

How To Build A Diy Bathroom Vanity Angela Marie Made

The Cascadia Vanity A Diy Turned Leg Double

Diy Butcher Block Vanity Beneath My Heart

How To Build A Diy Bathroom Vanity Angela Marie Made
Related Posts