How to Replace a Bathroom Faucet Screen
A bathroom faucet screen, also known as an aerator, is a small, removable component that sits at the end of your faucet spout. It mixes air with water to create a smooth, even flow and reduces splashing. Over time, mineral deposits and debris can build up on the screen, restricting water flow and even causing the faucet to leak. Replacing the screen is a simple task that can restore your faucet to its original functionality.
Gather the Necessary Tools and Materials
Before starting, gather the necessary tools and materials. You will need:
- A new faucet screen compatible with your faucet model
- Adjustable pliers or a wrench
- A small screwdriver (if necessary)
- A rag or towel
- White vinegar or a commercial descaling solution (optional)
It is crucial to consult your faucet's user manual or find the model number and search for a compatible replacement screen online. The new screen should have the same thread size and design as the old one.
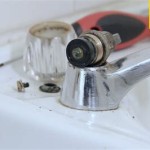
Remove and Clean the Old Screen
The first step is to remove the old screen. Follow these steps:
- Turn off the water supply to the faucet. Locate the shut-off valve under the sink or on the wall behind the faucet.
- Open the faucet to release any remaining water pressure.
- Use adjustable pliers or a wrench to grip and unscrew the old screen from the faucet spout. If the screen is difficult to remove, try gently wiggling it back and forth while tightening the pliers or wrench.
- Once the screen is removed, inspect it for any debris or mineral deposits.
- If the screen is simply dirty, you can try cleaning it with white vinegar or a commercial descaling solution. Soak the screen in the solution for several hours or overnight, then rinse it thoroughly with water and let it air dry. After cleaning, you can try re-installing the screen to see if its performance improves.
Install the New Screen
Once you’ve removed the old screen, you’re ready to install the new one. Follow these steps:
- Align the new screen with the faucet spout, ensuring the threads align properly.
- Hand-tighten the new screen onto the faucet spout, making sure it's snug but not overtightened.
- Turn the water back on and check for leaks. Tighten the screen further if needed.
- Run the faucet for a few minutes to flush out any debris or air bubbles.
Troubleshooting Common Problems
If you encounter problems while replacing the faucet screen, consider the following:
Screen doesn't fit:
Ensure you have the correct replacement screen for your faucet model. The thread size and design should match the old screen.Leaking:
If the faucet leaks after installing the new screen, check for any misalignments or loose connections. Tighten the screen slightly or try re-installing it to ensure a snug fit.Water pressure issues:
If the water pressure is weak or inconsistent after replacing the screen, check for obstructions in the faucet supply lines or the shut-off valve.
By following these steps, you can successfully replace a bathroom faucet screen and restore the optimal water flow and function of your faucet. Regularly cleaning or replacing the screen can help prevent future buildup and ensure the longevity of your faucet.

How To Remove The Faucet Aerator Ozone Microbubble Clean Systems For Bathroom Kitchen Manufacturer Strongco

Fixing A Faucet Aerator You Can Be Diy R Too The Kim Six Fix

How To Replace A Faucet Aerator Repair And

How To Replace A Cache Aerator

How To Replace A Sink Aerator

How To Install A Faucet Aerator Dte Energy

How To Remove Faucet Aerator That Is Stuck With Pliers Pliersman

Cache Aerators Recessed Or Faucet Faqs

How To Clean Faucet Aerator Simpson Plumbing Llc

How To Clean And Replace An Aerator On A Faucet Or Filer Screen Shower Head Plumbing Electric Wonderhowto
Related Posts