Replacing a Bathroom Sink Waste Plug Hole
The waste plug hole in a bathroom sink is a vital component of the drainage system. It allows water to drain away from the sink while preventing debris and hair from entering the pipes. Over time, the plug hole can become corroded, damaged, or simply worn out. This can lead to leaks, slow drainage, and even clogs. If your bathroom sink waste plug hole is showing signs of deterioration, replacing it is a relatively straightforward DIY project that can improve the functionality and aesthetics of your sink.
Understanding the Components of a Waste Plug Hole
Before embarking on the replacement process, it's essential to grasp the different components of a typical bathroom sink waste plug hole. These include:
- Waste Pipe: This is the main pipe that carries wastewater away from the sink.
- Waste Plug: The stopper that seals the plug hole, preventing water from draining. It can be a push-up or pop-up style.
- Plug Hole: The opening in the sink where the waste plug sits.
- Waste Plug Assembly: The complete unit, including the plug hole, waste pipe, and plug.
- Washer: A rubber or plastic ring that sits between the waste plug and the plug hole, creating a watertight seal.
When replacing a waste plug hole, you'll typically replace the entire waste plug assembly, ensuring all components are new and compatible.
Steps to Replace a Bathroom Sink Waste Plug Hole
Replacing a bathroom sink waste plug hole is a relatively simple task that can be completed using basic tools and supplies. Here's a step-by-step guide:
- Turn off the water supply. Locate the shut-off valve for the bathroom sink and turn it off completely. If unsure, consult a plumber or homeowner's manual.
- Drain the sink. Remove any remaining water in the basin. If the plug hole is clogged, you may need to use a plunger or drain cleaner to clear it before proceeding.
- Remove the old waste plug assembly. Depending on the style of your existing assembly, you may need to:
- Unscrew the plug: Some assemblies have a threaded plug that can be unscrewed by hand or with a wrench.
- Remove the retaining nut: Other assemblies have a retaining nut that holds the plug in place. Use a wrench to loosen and remove this nut.
- Remove the waste pipe: Once the plug is removed, the waste pipe may also need to be unscrewed from the sink.
- Clean the sink and surrounding area. Use a cleaning solution to wipe away any residue or dirt that may have accumulated around the old plug hole and waste pipe.
- Install the new waste plug assembly. Follow the installation instructions provided with the new assembly. Typically, this involves:
- Connecting the waste pipe: Screw the new waste pipe into the sink's drain hole.
- Installing the waste plug: Screw the new plug into the waste pipe, ensuring that the washer is properly positioned between the plug and the sink.
- Tightening the retaining nut: If required, tighten the retaining nut to secure the plug in place.
- Test for leaks. Turn the water supply back on and check for any leaks around the new waste plug assembly. If you see any leaks, tighten the connection or replace the washer.
Tips for Successful Waste Plug Hole Replacement
Here are some additional tips to ensure a successful replacement:
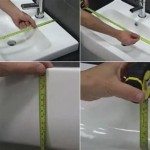
- Choose the right size and type of waste plug assembly. Measure the diameter of the existing plug hole and ensure that the new assembly is compatible with your sink's design. You may choose a push-up, pop-up, or other style of plug depending on your preferences.
- Wear protective gear. Use gloves and safety glasses to protect your hands and eyes from potential hazards.
- Use plumbers tape. Apply plumber's tape to the threads of the waste pipe and plug to prevent leaks.
- Don't overtighten the connections. It's important to tighten the connections securely but not overtighten them, as this can damage the components.
- Consult a professional if needed. If you're not comfortable with DIY plumbing projects, it's always advisable to consult a licensed plumber for assistance.
Replacing a bathroom sink waste plug hole is a relatively simple task that can be completed with a few basic tools and supplies. By following the steps outlined in this guide, you can easily replace your old plug hole and restore the functionality and aesthetic appeal of your bathroom sink.

How To Fix Pop Up Drain Waste Plug

How To Fix A Bathroom Sink Drain Stopper 4 Easy Solutions

How To Fit A Bathroom Sink Waste Plug Basin

Vanity Basin Plug Hole Bunnings Work Community

Replacing A Leaking Bathroom Sink Drain The Carpenter S Daughter

How To Get A Bathroom Sink Plug Removed When It Won T Un Quora

Bathroom Plug Hole And Chain Basin Sink Metal Slotted Waste Chrome Traditional Diy At B Q

Is It Possible To Replace Sink Plug Hole Cover Mumsnet

How To Replace A Sink Stopper Quick And Simple Home Repair

Metal Basin Sink Kitchen Replacement Strainer Waste Drain Poly Plug Hole 63mm
Related Posts