How To Tile Above a Bathroom Vanity
Tiling above a bathroom vanity adds a touch of elegance and protects the wall from water damage. This seemingly complex task is achievable for DIY enthusiasts with careful planning and execution. This article provides a step-by-step guide for successfully tiling above a bathroom vanity.
Planning and Preparation
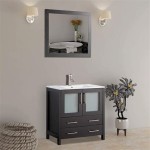
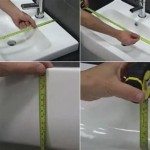
Accurate measurements are crucial for determining the required number of tiles and other materials. Measure the width and height of the area to be tiled. Consider the tile size and spacing when calculating the total area. Include a small overage (around 10%) to account for cuts and breakages.
Choosing the right tile is an aesthetic and practical decision. Ceramic and porcelain tiles are popular choices for their durability and water resistance. Consider the existing bathroom decor when selecting tile color, size, and pattern. Smaller tiles offer more design flexibility but require more grout lines, increasing installation time. Larger tiles create a more streamlined look but require more precise cutting.
Gathering the necessary tools and materials beforehand streamlines the tiling process. Essential tools include a tile cutter or wet saw, notched trowel, grout float, level, measuring tape, and safety glasses. Materials include tiles, thin-set mortar, grout, spacers, and backer board (if necessary).
Preparing the Wall Surface
A properly prepared surface is critical for successful tile adhesion. If the existing wall is painted or wallpapered, remove the covering to expose the drywall or plaster beneath. Clean the wall thoroughly to remove any dust, debris, or grease. Repair any imperfections or damage to the wall surface before tiling.
Installing a backer board provides a stable, water-resistant base for the tiles, especially in areas prone to moisture. Cut the backer board to fit the area above the vanity and attach it securely to the wall studs using screws. Ensure the backer board is level and flush with the surrounding wall surface. Apply a thin layer of thin-set mortar over the backer board joints to create a smooth, even surface.
Installing the Tiles
Begin tiling from the center outward, ensuring a symmetrical design. This approach minimizes the visibility of cut tiles at the edges. Mix the thin-set mortar according to the manufacturer's instructions. Using a notched trowel, apply a consistent layer of thin-set mortar to a small section of the wall, covering an area manageable within the mortar's working time.
Carefully place each tile onto the mortar bed, pressing firmly to ensure proper adhesion. Use spacers between tiles to maintain consistent grout lines. Periodically check the levelness of the tiles to avoid uneven surfaces. Cut tiles as needed to fit the edges and corners using a tile cutter or wet saw. For intricate cuts, consider using a tile nipper.
Grouting and Finishing
After the thin-set mortar has cured (typically 24 hours), remove the spacers and begin grouting. Mix the grout according to the manufacturer's instructions. Apply the grout using a grout float, pressing it diagonally into the grout lines to fill them completely. Remove excess grout from the tile surface with a damp sponge. Allow the grout to dry according to the manufacturer's instructions.
Once the grout is dry, apply a sealant to protect the grout from staining and moisture. This helps maintain the appearance and longevity of the tiled surface. Choose a sealant appropriate for the type of grout used. Follow the manufacturer's instructions for application and drying time.
Considerations for Outlets and Fixtures
When tiling around electrical outlets and fixtures, turn off the power supply for safety. Carefully measure and cut the tiles to fit around the outlets and fixtures. Use outlet extenders if necessary to bring the outlets flush with the new tile surface. For light fixtures, ensure the fixture base is compatible with the tile thickness.
Maintenance and Cleaning
Regular cleaning helps maintain the appearance and hygiene of the tiled surface. Wipe down the tiles with a damp cloth and a mild tile cleaner. Avoid using abrasive cleaners that can scratch the tile surface or damage the grout. Periodically reapply grout sealant to maintain its protective properties.

Backsplash Advice For Your Bathroom Would You Tile The Side Walls Too Designed

62 Bathroom Backsplash Ideas For A Stylish Makeover Remodel Tile Vanity

Neutral Mosaic Feature Tiling Above Vanity The Oxford Display Home Aussieliving Shower Niche Luxury Furniture Homes

How To Drill Into Tile Hang Things Maison De Pax

Light Blue Bathroom Vanity Tile Above Double Mirrors And Neutral Our Interior Inspiration Design

How Much Of Your Bathroom Should You Tile

Backsplash Advice For Your Bathroom Would You Tile The Side Walls Too Designed

Tiling Bathroom Wall Above Sinks Ceramic Tile Advice Forums John Bridge

Backsplash Advice For Your Bathroom Would You Tile The Side Walls Too Designed

Backsplash Advice For Your Bathroom Would You Tile The Side Walls Too Designed
Related Posts