How To Make A Bathroom Vanity From Dresser Drawers
Repurposing furniture offers a creative and cost-effective way to update a home. Transforming an old dresser into a bathroom vanity is a popular DIY project that combines functionality with personalized style. The existing structure of the dresser provides a solid foundation and built-in storage, while the drawers offer convenient organization for bathroom essentials. This article outlines the steps involved in converting a dresser into a functional and aesthetically pleasing bathroom vanity.
Before embarking on this project, careful planning and preparation are crucial. This involves selecting the right dresser, gathering the necessary tools and materials, and understanding the plumbing requirements for sink installation. A well-executed plan will streamline the process and minimize potential complications.
Selecting and Preparing the Dresser
The first step involves choosing a suitable dresser. The ideal dresser should be made of solid wood or a durable material capable of withstanding moisture. Consider the size and style of the dresser in relation to the bathroom's dimensions and overall design aesthetic. Assess the condition of the dresser. Check for structural integrity, damage, and signs of pests. A dresser with significant damage might require extensive repairs or might not be suitable for conversion.
Once a suitable dresser is selected, preparation involves cleaning and sanding the piece. Remove all hardware, such as knobs and pulls. Thoroughly clean the dresser with a mild detergent and water to remove dirt and grime. Allow the dresser to dry completely before proceeding to the next step. Sand the entire surface of the dresser with medium-grit sandpaper to create a smooth surface for painting or staining. Pay particular attention to areas with imperfections or existing finishes. After sanding, wipe down the dresser with a tack cloth to remove any remaining dust. This ensures proper adhesion of the paint or stain.
Reinforcement may be necessary to strengthen the dresser and ensure it can support the weight of a sink and countertop. This can be achieved by adding internal support beams or reinforcing the existing structure with wood glue and screws. Focus on reinforcing the top of the dresser, where the sink will be installed.
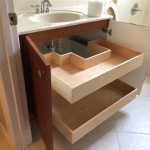
Modifying Drawers for Plumbing
Accommodating plumbing is a critical aspect of converting a dresser into a vanity. This usually involves modifying one or more of the drawers to create space for the sink drain and water supply lines. Measure the dimensions of the sink and the plumbing fixtures to determine the necessary cutout locations within the drawers.
Carefully mark the areas of the drawers that need to be cut away. Use a jigsaw or a similar cutting tool to create the necessary openings. Ensure the cuts are clean and precise to prevent any structural weakness in the drawers. After cutting, sand the edges of the cutouts to smooth them and prevent splintering.
To protect the inside of the drawers from moisture, apply a waterproof sealant or varnish to the exposed wood surfaces. This will prevent water damage and prolong the lifespan of the vanity. Consider lining the drawer bottoms with a waterproof material for added protection.
Drawer slides may need to be adjusted or modified to accommodate the plumbing. Ensure the drawers can still open and close smoothly after the modifications. If necessary, reinforce the drawer boxes with additional wood supports to maintain their structural integrity.
Installing the Countertop and Sink
The countertop serves as the visible surface of the vanity and houses the sink. There are several countertop materials to choose from, each with its own advantages and disadvantages. Popular options include granite, quartz, marble, wood, and laminate. Select a countertop material that complements the style of the bathroom and provides the desired level of durability and water resistance.
Measure the dimensions of the dresser to determine the size of the countertop. Consider adding a slight overhang to the front and sides of the dresser for aesthetic appeal. If purchasing a pre-made countertop, ensure it is the correct size and has the appropriate sink cutout.
If creating a custom countertop, cut the material to size and create the sink cutout according to the sink manufacturer's instructions. Use a template to ensure the cutout is accurate and properly aligned. Smooth the edges of the countertop with sandpaper or a router to prevent chipping or cracking.
Before installing the countertop, apply a bead of silicone caulk to the top of the dresser to create a waterproof seal. Carefully position the countertop on top of the dresser and ensure it is level. Secure the countertop to the dresser using screws or adhesive, depending on the material and construction. Follow the manufacturer's instructions for proper installation.
Install the sink into the countertop cutout according to the manufacturer's instructions. Apply a bead of silicone caulk around the rim of the sink to create a watertight seal. Connect the plumbing fixtures, including the drain and water supply lines, ensuring all connections are tight and leak-free. Test the sink to ensure it drains properly and there are no leaks.
Once the sink and plumbing are installed, inspect all connections for leaks and make any necessary adjustments. Allow the silicone caulk to cure completely before using the sink.
Finishing Touches and Sealing
After completing the main construction, add finishing touches to enhance the vanity's appearance and functionality. This includes painting or staining the dresser, installing new hardware, and applying a protective sealant.
If desired, paint or stain the dresser to match the bathroom's decor. Apply multiple coats of paint or stain, allowing each coat to dry completely before applying the next. Use a high-quality paint or stain that is designed for use in bathrooms and is resistant to moisture. Apply a clear topcoat to protect the finish and enhance its durability. This will also make the vanity easier to clean.
Install new hardware, such as knobs and pulls, to complement the style of the vanity. Choose hardware that is durable and resistant to corrosion. Consider the size and style of the hardware in relation to the dresser's overall design. Secure the hardware tightly to the drawers and doors.
Apply a waterproof sealant to all exposed wood surfaces to protect the vanity from moisture. Pay particular attention to areas around the sink and plumbing. Use a high-quality sealant that is designed for use in bathrooms and is resistant to mold and mildew. Apply the sealant according to the manufacturer's instructions. Allow the sealant to dry completely before using the vanity.
Inspect the completed vanity for any imperfections or areas that need further attention. Make any necessary adjustments or repairs. Clean the vanity thoroughly and remove any dust or debris. The transformed dresser now serves as a unique and functional bathroom vanity, offering storage and style.
Converting a dresser into a bathroom vanity requires careful planning, precise execution, and attention to detail. By following these steps, individuals can create a custom vanity that reflects their personal style and enhances the functionality of their bathroom.

How To Turn A Dresser Into Bathroom Vanity
/103058794-9279662b921c41259cb908f3cb19acd9.jpg?strip=all "How To Turn An Old Dresser Into A Beautiful Bathroom Vanity")
How To Turn An Old Dresser Into A Beautiful Bathroom Vanity

A Pro Renovator S 6 Tips For Turning Dresser Into Bathroom Vanity

How To Convert A Dresser Into Bathroom Vanity The Little By Home

How To Make A Bathroom Vanity From Vintage Furniture Upcycgirl

Can We Transform This Old Dresser Into A Bathroom Vanity Diy Home Reno Project Furniture Flipping

How To Build A Faux Drawer Bathroom Vanity Maximize Storage Space

How To Turn A Dresser Into Bathroom Vanity What You Really Need Know Diy Repurposed

Diy Bathroom Vanity Ideas Perfect For Repurposers

How To Build A Diy Vanity With Drawers Free Plans And
Related Posts