Painting Bathroom Countertops and Sink
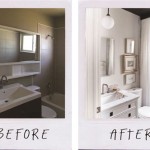
Bathroom renovations can be costly and time-consuming. However, painting bathroom countertops and sinks offers a budget-friendly alternative for updating the look of a bathroom without extensive demolition. While this method offers a significant cost savings, it requires careful preparation and the correct materials to ensure a durable and attractive finish.
Several factors contribute to the overall success of this project, including proper surface preparation, primer selection, and the use of a durable topcoat designed for high-traffic and wet environments. Careful consideration of these elements will result in a more professional-looking finish and extended lifespan of the painted surface.
The first step in painting bathroom countertops and sinks is thorough cleaning. This involves removing all traces of soap scum, mildew, and mineral deposits. A combination of warm water and a mild detergent is usually sufficient for initial cleaning. A degreaser can be used for stubborn greasy residues. After cleaning, the surfaces should be rinsed thoroughly with clean water and allowed to dry completely.
Once the surfaces are dry, any existing caulk around the sink and backsplash should be carefully removed. A utility knife or caulk removal tool can be used for this purpose. Removing old caulk allows for a cleaner, more professional-looking finish when new caulk is applied later in the process. Imperfections, chips, or cracks in the countertop or sink should be repaired using an appropriate filler. Allow the filler to dry completely and then sand it smooth with fine-grit sandpaper.
Sanding is a crucial step in preparing the surfaces for paint adhesion. Sanding creates a slightly roughened surface that allows the primer to bond effectively. Start with a medium-grit sandpaper (around 120-grit) and then progress to a finer grit (220-grit) for a smoother finish. Sanding should be done thoroughly, covering the entire surface of the countertop and sink. After sanding, remove all sanding dust with a tack cloth or a damp microfiber cloth.
Priming is essential for ensuring proper paint adhesion and durability. Choose a high-quality primer specifically designed for bonding to surfaces like laminate, ceramic, or porcelain. An oil-based primer is generally recommended for its superior adhesion and moisture resistance. Apply the primer evenly in thin coats, allowing each coat to dry completely before applying the next. Follow the manufacturer's instructions for drying times and application methods.
Choosing the right paint for bathroom countertops and sinks is critical for longevity and aesthetics. Epoxy paints are a popular choice due to their exceptional durability, hardness, and resistance to chemicals and moisture. These paints are specifically formulated to withstand the wear and tear of daily use in a bathroom environment. Another suitable option includes acrylic urethane paints, known for their high gloss and durability.
When applying the paint, use a high-quality brush or roller designed for smooth finishes. Apply thin, even coats, avoiding drips and runs. Multiple thin coats are preferable to one thick coat, as this allows for better drying and a more durable finish. Allow each coat to dry completely before applying the next. Follow the manufacturer's instructions regarding drying times and recoating intervals.
After the final coat of paint has dried completely, a clear sealant can be applied to provide additional protection and enhance the finish's durability. This sealant acts as a barrier against water, stains, and scratches. Choose a sealant compatible with the paint used, such as a water-based polyurethane sealer for acrylic urethane paints or a specialized epoxy sealer for epoxy paints. Apply the sealant in thin, even coats, following the manufacturer's instructions.
Once the sealant has cured completely, new caulk can be applied around the edges of the sink and backsplash to create a watertight seal. Choose a high-quality silicone caulk specifically designed for bathroom use. Apply the caulk smoothly and evenly, using a caulk gun and smoothing tool for a professional finish. Allow the caulk to cure completely before using the sink or countertop.
Proper ventilation is crucial throughout the entire painting process. Open windows and doors to ensure adequate airflow and help dissipate fumes from the primer, paint, and sealant. If proper ventilation is not possible, consider using a respirator or mask designed for organic vapors. Following the manufacturer's safety recommendations for the specific products used is also essential.
While painting bathroom countertops and sinks can provide a cost-effective update, it's important to acknowledge that painted surfaces may not be as durable as professionally refinished or replaced countertops. Painted surfaces are more susceptible to chipping, scratching, and wear over time, especially in high-use areas. Regular maintenance and touch-ups may be required to maintain the appearance and extend the lifespan of the painted finish.

Paint Bathroom Vanity Countertop Sink So Easy A Piece Of Rainbow

How To Easily Spray Paint Bathroom Countertops My Homier Home
:strip_icc()/101922779-2cbc45e123c34827afb4f601723b03ca.jpg?strip=all)
How To Paint Bathroom Countertops

Paint Bathroom Vanity Countertop Sink So Easy A Piece Of Rainbow

Paint Bathroom Vanity Countertop Sink So Easy A Piece Of Rainbow

How To Easily Spray Paint Bathroom Countertops My Homier Home

How To Paint A Countertop Don T Make These Mistakes Blessed Beyond Crazy

Should You Be Painting Your Bathroom Countertops Caesarstone
.jpg?strip=all)
Painting A Bathroom Vanity Again Dream Green Diy

How To Paint Tile Countertops And Our Modern Bathroom Reveal Bright Green Door
Related Posts


