Replacing a Bathroom Exhaust Fan Without Attic Access
Replacing a bathroom exhaust fan can be a relatively simple DIY project, even without attic access. While accessing the fan from the attic is often the easiest method, there are alternative approaches that can be employed, allowing homeowners to effectively replace the fan without needing to navigate cramped attic spaces. This article will guide you through the process of replacing a bathroom exhaust fan without attic access, outlining the necessary steps and considerations.
Understanding the Challenges
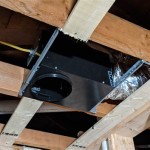
The primary challenge associated with replacing a bathroom exhaust fan without attic access lies in reaching and disconnecting the existing fan. Often, the fan is mounted to the ceiling joists from below, making it difficult to access the wiring and ductwork connections. Additionally, removing the old fan and installing the new one can be physically demanding, as you'll be working in a confined space.
However, with careful planning and a few tools, you can overcome these hurdles and successfully replace your bathroom exhaust fan.
Steps for Replacing the Fan
Here's a step-by-step process for replacing a bathroom exhaust fan without attic access: 1.
Turn Off the Power:
Before starting any work, ensure that the power to the bathroom fan is completely disconnected. Locate the circuit breaker controlling the fan and switch it to the "off" position. To confirm the power is off, test with a non-contact voltage tester. 2.Prepare the Area:
Clear the area around the fan, removing any obstacles that might hinder your work. You may want to cover the floor with a drop cloth or plastic sheeting to prevent debris from falling. 3.Remove the Existing Cover:
The fan cover typically detaches by unscrewing a few screws holding it in place. Carefully remove the cover and set it aside. 4.Disconnect the Wiring:
Inside the fan housing, you'll find the electrical connections. Carefully identify the wires leading to the fan. Take note of the wire colors to ensure you reconnect them correctly. Use a wire stripper to remove a small amount of insulation from the ends of the wires. Disconnect the wires from the fan motor terminals. 5.Disconnect the Ductwork:
The exhaust duct is typically connected to the fan housing using screws or clips. Remove the ductwork connection to free the fan from the ceiling. 6.Remove the Fan:
If the fan is mounted on a metal plate, it may need to be unscrewed from the plate before removing the entire unit. Carefully remove the fan from the ceiling, being cautious of any potential damage to the surrounding area. 7.Install the New Fan:
Before mounting the new fan, carefully align the ductwork. Attach the new fan to the ceiling using the screws provided in the installation kit. Secure the fan mounting plate to the ceiling joists. 8.Reconnect the Wiring:
Connect the wires from the new fan to the corresponding terminals on the ceiling wiring, matching the colors you noted earlier. Ensure all connections are secure and properly insulated. 9.Reconnect the Ductwork:
Attach the exhaust duct to the new fan, ensuring a snug fit and secure connection. 10.Test the Fan:
Turn the power back on at the circuit breaker. Check that the new fan is working properly and exhausting air from the bathroom efficiently. Also, ensure that there are no leaks in the ductwork.Additional Considerations
Here are some additional considerations when replacing a bathroom fan without attic access: *
Type of Fan:
Consider the size, airflow capacity, and noise level of the new fan. Look for a model that meets your specific needs and is compatible with your existing ductwork. *Professional Installation:
If you are not comfortable with electrical wiring or working in confined spaces, it's always best to contact a licensed electrician to handle the fan installation. *Safety Precautions:
Always prioritize safety during the installation process. Wear appropriate eye protection, gloves, and non-slip footwear. Be aware of your surroundings and take care not to damage any electrical components.By carefully following these steps and considering the necessary safety precautions, you can successfully replace your bathroom exhaust fan without attic access. This simple project can significantly improve air quality in your bathroom and help prevent moisture-related issues.

How To Replace A Bathroom Exhaust Fan Without Attic Access 12 Step Guide Home Inspector Secrets

How To Replace A Bathroom Exhaust Fan Without Attic Access 12 Step Guide Home Inspector Secrets

How To Replace A Bathroom Exhaust Fan Without Attic Access 12 Step Guide Home Inspector Secrets

How To Install A Bathroom Fan Diy Family Handyman

How To Replace A Bathroom Exhaust Fan Without Attic Access 12 Step Guide Home Inspector Secrets

How To Replace A Bathroom Exhaust Fan Without Attic Access

How To Install A Bathroom Exhaust Fan Lowe S

How To Choose The Right Bathroom Exhaust Fan Make It

What Parts Do I Need To Install An Inline Fan In My Bathroom

Tips For Installing Or Replacing A Bathroom Fan Forbes Home
Related Posts