How To Remove a Delta Bathroom Sink Stopper Stuck Shut
A bathroom sink stopper stuck in the closed position can be a frustrating inconvenience. Water accumulates, potentially leading to unpleasant odors, bacterial growth, and even minor flooding if left unattended. While calling a plumber is an option, many homeowners can resolve this issue themselves with a few simple tools and methodical steps. This article provides a detailed guide on how to remove a Delta bathroom sink stopper that is stuck in the shut position, covering common causes, necessary tools, and step-by-step instructions for different types of Delta stopper mechanisms.
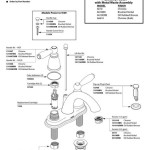
Before beginning, it’s crucial to understand the basic components of a Delta bathroom sink stopper assembly. The primary components typically include the stopper itself, the lift rod (or pop-up rod), the pivot rod, the clevis strap, and the retaining nut that secures the pivot rod. Understanding how these parts interact will significantly aid in diagnosing the cause of the blockage and effectively removing the stopper.
Understanding the Common Causes of a Stuck Stopper
Several factors can contribute to a Delta bathroom sink stopper becoming stuck in the closed position. Identifying the root cause is the first step in determining the appropriate removal method. Here are some of the most common culprits:
Debris Accumulation: This is the most frequent reason for a stuck stopper. Hair, soap scum, toothpaste, and other debris tend to accumulate around the stopper and within the drainpipe. This buildup can create a physical barrier, preventing the stopper from moving freely.
Corrosion: Over time, corrosion can develop on the metallic components of the stopper assembly, particularly in areas exposed to water and moisture. This corrosion can cause the pivot rod to seize within its housing, or the stopper itself to become fused to the drain opening.
Misalignment: The lift rod, pivot rod, and clevis strap need to be properly aligned for the stopper to function correctly. If any of these components are misaligned or have become disconnected, the stopper may become stuck.
Hard Water Deposits: In areas with hard water, mineral deposits can accumulate around the stopper and within the drainpipe. These deposits can harden over time, effectively gluing the stopper in place.
Damage to the Stopper Mechanism: Physical damage to any part of the stopper mechanism, such as a bent pivot rod or a broken clevis strap, can impede the stopper's movement and cause it to become stuck.
Gathering the Necessary Tools and Materials
Before attempting to remove the stuck stopper, gather the following tools and materials. Having these on hand will streamline the process and prevent unnecessary delays:
Pliers: A pair of pliers, preferably slip-joint pliers, is essential for gripping and manipulating various components of the stopper assembly.
Adjustable Wrench: An adjustable wrench will be needed to loosen and tighten the retaining nut that secures the pivot rod.
Screwdriver: A Phillips head or flathead screwdriver may be required to detach the clevis strap from the lift rod.
Penetrating Oil: A penetrating oil, such as WD-40 or Liquid Wrench, can help to loosen corroded or stuck parts of the stopper mechanism.
Small Brush or Toothbrush: A small brush or toothbrush can be used to clean away debris and grime from the stopper and drainpipe.
Flashlight or Headlamp: A flashlight or headlamp will provide adequate illumination for working in the confined space under the sink.
Bucket or Basin: Place a bucket or basin under the sink to catch any water or debris that may fall during the removal process.
Gloves: Wearing gloves will protect hands from dirt, grime, and potential exposure to bacteria.
Eye Protection: Safety glasses or goggles will protect eyes from debris and splashes.
Step-by-Step Instructions for Removing Different Types of Delta Stoppers
Delta offers several types of bathroom sink stoppers, each with a slightly different removal process. These instructions cover the most common types of Delta stopper mechanisms and offer a detailed breakdown of the removal steps.
1. Standard Lift Rod Stopper: This is the most common type of Delta stopper, operated by a lift rod located behind the faucet.
Step 1: Disconnect the Lift Rod: Locate the lift rod behind the faucet and gently pull it upwards to its highest position. This will raise the stopper as much as possible. Then, locate the clevis strap underneath the sink, which connects the lift rod to the pivot rod. Use a screwdriver to loosen the screw that secures the clevis strap to the lift rod. Disconnect the lift rod from the clevis strap.
Step 2: Loosen the Pivot Rod Nut: Locate the pivot rod, which extends horizontally from the drainpipe. Use an adjustable wrench to loosen the retaining nut that secures the pivot rod to the drainpipe. Do not remove the nut completely at this stage.
Step 3: Remove the Pivot Rod: Carefully pull the pivot rod out from the drainpipe. As the pivot rod is removed, the stopper should either come out along with it or become loose enough to be removed from above.
Step 4: Remove the Stopper: If the stopper does not come out with the pivot rod, reach into the sink drain and gently wiggle the stopper until it is free from any obstructions. If the stopper is still stuck, try using pliers to grip the stopper and gently pull it upwards. Avoid excessive force, as this could damage the stopper or the drainpipe.
Step 5: Clean the Stopper and Drainpipe: Once the stopper is removed, clean it thoroughly with a small brush or toothbrush to remove any accumulated debris. Also, clean the inside of the drainpipe to remove any remaining buildup.
2. Push-Button or Pop-Up Stopper: This type of stopper is operated by pressing down on the stopper itself. These stoppers often have a different mechanism that requires a slightly different approach.
Step 1: Attempt to Unscrew the Stopper Cap: Many Delta push-button stoppers have a decorative cap on top that can be unscrewed. Try gently twisting the cap counterclockwise. If it unscrews, proceed to Step 2. If it does not unscrew easily, do not force it, as this could damage the cap or the stopper mechanism. In this case, skip to Step 3.
Step 2: Remove the Internal Stopper Mechanism: If the cap unscrewed, you should be able to access the internal stopper mechanism. Carefully remove the mechanism, which may consist of a spring, a plunger, and a rubber gasket. Clean these parts thoroughly.
Step 3: Locate the Stopper Body: If the cap does not unscrew, the entire stopper body may need to be removed from below. Locate the point where the stopper assembly connects to the drainpipe. This may involve a nut or a series of connections.
Step 4: Loosen the Connecting Nut: Use an adjustable wrench to loosen the nut that secures the stopper assembly to the drainpipe. Be prepared for water to drain out once the nut is loosened.
Step 5: Remove the Stopper Assembly: Once the nut is loosened, carefully remove the entire stopper assembly from the drainpipe. The stopper should now be free to be removed from above.
Step 6: Clean the Stopper and Drainpipe: Clean the stopper and drainpipe thoroughly to remove any debris or buildup.
3. Delta Universal Stopper: Delta offers universal stoppers that utilize a different mechanism, often involving a simple twist-and-lift operation or a simple drop-in design. These are generally easier to remove.
Step 1: Twist and Lift (if applicable): Some Delta universal stoppers require a slight twist to unlock them. Try twisting the stopper counterclockwise and then gently lifting it upwards. If the stopper unlocks and lifts easily, proceed to Step 3.
Step 2: Grip and Pull: If the stopper does not twist and lift, try gripping the stopper firmly with pliers and gently pulling it upwards. Apply steady pressure and avoid twisting, as this could damage the stopper or the drainpipe.
Step 3: Inspect and Clean: Once the stopper is removed, inspect it for any signs of damage or wear. Clean the stopper and the drainpipe thoroughly to remove any accumulated debris.
Troubleshooting Stubborn Stoppers
In some cases, the stopper may remain stubbornly stuck despite following the above steps. If this happens, consider these additional troubleshooting tips:
Apply More Penetrating Oil: Generously apply penetrating oil to the point where the stopper connects to the drainpipe, as well as to any visible parts of the pivot rod assembly. Allow the oil to soak for at least 30 minutes before attempting to remove the stopper again.
Use Heat: Applying gentle heat to the stopper area can help to loosen corrosion and mineral deposits. Use a hairdryer on a low setting, directing the heat at the drainpipe and stopper area for a few minutes. Avoid using a heat gun, as this could damage the plastic components of the drainpipe.
Gently Tap the Stopper: Use a small hammer or the handle of a screwdriver to gently tap around the stopper to help loosen any built-up debris or corrosion. Avoid striking the stopper with excessive force, as this could damage it.
Check for Obstructions in the Drainpipe: Use a small wire or a pipe cleaner to probe the drainpipe for any obstructions that may be preventing the stopper from moving freely.
Consider Using a Drain Snake: If debris buildup is the suspected cause, a small drain snake can be used to break up and remove the blockage.
If all else fails, consulting a qualified plumber is recommended. Forcefully removing a stuck stopper can potentially damage the drainpipe or the sink itself, leading to more costly repairs.

Bathroom Repair How To A Pop Up Tub Drain Stopper

The Pop Up Drain Stopper For My Sink Is Stuck Hunker

How To Fix Stopper In Bathroom Sink Faucet Quick And Easy

How To Install A Bathroom Sink Pop Up Stopper Hunker

Bathroom Sink Popup And Stopper Problems

How To Get A Bathroom Sink Plug Removed When It Won T Un Quora

How To Rebuild A Delta Single Handle Faucet

How To Get A Bathroom Sink Plug Removed When It Won T Un Quora

Install A Drain Stopper So The Is Removable

How To Remove A Bathtub Drain Stopper Mr Rooter
Related Posts