How to Take Off a Bathroom Faucet Handle
Removing a bathroom faucet handle is a common task that homeowners often encounter during repairs, replacements, or simply when attempting to clean hard-to-reach areas. Understanding the process can save time and money by avoiding the need to call a professional plumber for a relatively straightforward job. The method for removing a faucet handle can vary depending on the type of faucet, but the general principles remain consistent. This article provides a detailed guide on how to safely and effectively remove various types of bathroom faucet handles.
Before beginning any plumbing work, it is crucial to prioritize safety. The first step is to turn off the water supply to the faucet. This prevents potential flooding or water damage during the removal process. Typically, shut-off valves are located directly beneath the sink, one for hot water and one for cold water. Turn both valves clockwise until they are completely closed. After closing the valves, turn on the faucet to relieve any residual pressure in the lines. If water continues to flow, the shut-off valves may not be functioning correctly, and it might be necessary to shut off the main water supply to the house.
Once the water supply is safely turned off, gather the necessary tools. These tools commonly include a screwdriver set (both Phillips head and flathead), an Allen wrench set (also known as hex keys), pliers, a utility knife, penetrating oil, and a clean cloth or towel. Having the right tools readily available ensures a smoother and more efficient removal process. The cloth or towel will protect the sink surface from scratches and potential damage from dropped tools.
Identifying the Faucet Handle Type
The first critical step in removing a faucet handle is to correctly identify the type of faucet. There are several common types of bathroom faucet handles, each requiring a slightly different approach for removal. The most common types include single-handle faucets, double-handle faucets, and faucets with lever or knob-style handles. Single-handle faucets typically control both hot and cold water with a single lever or knob, while double-handle faucets have separate handles for hot and cold water.
Single-handle faucets often feature a set screw that secures the handle to the faucet stem. This set screw is usually located on the side or front of the handle and may be concealed by a decorative cap. Double-handle faucets can have various attachment mechanisms, including screws, set screws, or simple friction fittings. Lever handles are characterized by their elongated, lever-style design, while knob handles are typically rounded and may have a decorative finish.
Careful observation of the faucet handle is essential to identify any visible screws, caps, or other attachment mechanisms. Examining the handle from different angles and using a bright light can help to reveal hidden fasteners. Understanding the faucet type and its specific attachment method is the foundation for a successful and damage-free removal.
Removing Handles Secured with Set Screws
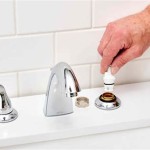
Many modern bathroom faucets, particularly single-handle models, use set screws to secure the handle to the faucet stem. The set screw is a small, headless screw that tightens against the stem, preventing the handle from slipping. To remove a handle secured with a set screw, the first step is to locate the set screw itself. It is often concealed beneath a decorative cap or button on the handle. This cap can usually be pried off carefully using a small flathead screwdriver or a utility knife.
Once the cap is removed, the set screw should be visible. Set screws typically require an Allen wrench (hex key) for loosening. Select the appropriate size Allen wrench that fits snugly into the set screw. Insert the wrench and turn it counterclockwise to loosen the screw. It may be necessary to apply penetrating oil to the set screw if it is corroded or stuck. Allow the penetrating oil to soak for a few minutes before attempting to loosen the screw again.
After the set screw is sufficiently loosened, the faucet handle should be able to be pulled off the stem. If the handle is still stuck, gently wiggle it back and forth while pulling upwards. Avoid excessive force, as this could damage the faucet stem or the handle itself. Once the handle is removed, inspect the set screw and the faucet stem for any signs of damage or wear. This is an opportune time to clean the area around the faucet stem and address any corrosion or mineral buildup.
Removing Handles Secured with Screws or Friction
Some faucets, especially older models or double-handle designs, may use a standard screw to secure the handle. The screw is usually visible on the top or front of the handle and may be hidden beneath a decorative cap. Similar to removing set screws, the cap must first be carefully pried off using a small flathead screwdriver or utility knife. Be gentle to avoid scratching or damaging the surrounding finish.
Once the screw is exposed, use a screwdriver of the appropriate type (Phillips head or flathead) to loosen and remove it. Turn the screwdriver counterclockwise until the screw is completely removed. Keep the screw in a safe place to prevent it from being lost. After removing the screw, the faucet handle should be able to be pulled off the stem. If the handle is stuck, gently rock it back and forth while pulling upwards. If the handle remains difficult to remove, apply penetrating oil around the base of the handle and allow it to soak for a few minutes before attempting again.
In some rare cases, faucet handles may be held in place solely by friction. This is more common in older faucets where the handle has become tightly fitted to the stem over time. To remove a friction-fitted handle, grip the handle firmly and gently rock it back and forth while pulling upwards. Avoid using excessive force, as this could damage the faucet or the surrounding plumbing. Applying penetrating oil around the base of the handle may help to loosen it. Patience and persistence are key when dealing with friction-fitted handles.
Once the handle is removed, inspect the faucet stem and handle interior for any signs of wear or corrosion. Clean the area thoroughly to remove any debris or mineral buildup. This is a good time to assess the condition of the faucet's internal components and determine if any further repairs or replacements are necessary.
After the faucet handle has been successfully removed, any necessary repairs or replacements can be carried out. When reassembling the faucet, ensure that all components are properly aligned and tightened. Avoid overtightening screws or set screws, as this can damage the faucet or the handle. Before restoring the water supply, double-check that all connections are secure and that there are no leaks. Slowly turn the water supply back on and monitor the faucet for any signs of leaks. If leaks are detected, immediately turn off the water supply and address the issue before proceeding.
Proper maintenance and care of bathroom faucets can help to prevent future problems and extend their lifespan. Regularly cleaning the faucet handles and surrounding areas can prevent mineral buildup and corrosion. Avoid using abrasive cleaners or scouring pads, as these can damage the finish. Periodically check for leaks and address them promptly to prevent water damage. By following these simple tips, homeowners can maintain their bathroom faucets in good working order and avoid the need for frequent repairs or replacements.

How Do I Replace Bathroom Sink Faucet Handles Cleaning More

How To Remove Moen Bathroom Faucet Handle In 2 Steps

How To Remove And Install A Bathroom Faucet

Tips Tricks Remove Delta 2 Handle 4 In Bathroom Sink Faucet With Bar 5 21 18

Replacing A Bathroom Faucet Fine Homebuilding

Diy How To Replace A Bathroom Sink Faucet Remove Install

Help Removing Bathroom Faucet Handle Doityourself Com Community Forums

How To Tighten Faucet Handle Homeserve Usa

How To Remove Kitchen Bathroom Faucet Handle Without S

How To Fix A Leaking Faucet Without In The Handle Moen
Related Posts