Single Handle Bathroom Sink Faucet Repair: A Comprehensive Guide
A dripping or malfunctioning single handle bathroom sink faucet can be more than just an annoyance; it can lead to wasted water, higher water bills, and potential damage to the sink and surrounding areas. Understanding the common causes of faucet problems and how to address them is essential for maintaining a functional and efficient bathroom. This article provides a detailed guide to single handle bathroom sink faucet repair, covering common issues, necessary tools, and step-by-step instructions to resolve many typical problems.
Single handle faucets are favored for their ease of use and sleek design. They control both water flow and temperature with a single lever, making them convenient for users. However, this simplified design also means that all the working components are compacted into a relatively small space, increasing the likelihood of wear and tear over time. Regular maintenance and timely repairs are crucial to extending the lifespan of these faucets.
Identifying Common Problems
Before attempting any repairs, accurate diagnosis is paramount. Understanding the specific symptoms of the faucet issue will guide the repair process and ensure that the correct components are addressed. Here are some of the most frequently encountered problems with single handle bathroom sink faucets:
Dripping Faucet: This is perhaps the most common complaint. A constant drip, even a small one, can waste a significant amount of water over time. Dripping is often caused by worn-out or damaged O-rings, cartridges, or valve seats. Mineral buildup can also contribute to dripping by preventing a tight seal.
Low Water Pressure: If the water flow from the faucet is significantly reduced, there are several potential causes. Mineral deposits in the aerator or cartridge can restrict water flow. Clogs in the water supply lines or a partially closed shut-off valve can also lead to low pressure. In some cases, issues with the plumbing system beyond the faucet itself may be the root cause.
Stiff or Difficult Handle Movement: A handle that is hard to move or makes grinding noises often indicates a problem with the cartridge. Mineral buildup or corrosion can accumulate around the cartridge, hindering its smooth operation. In some cases, the handle itself may be damaged or worn.
Leaks Around the Base of the Faucet: Water leaking from the base of the faucet usually signifies a problem with the O-rings or seals that connect the faucet to the sink. These components can dry out or crack over time, causing leaks.
No Hot or Cold Water: If the faucet dispenses only one temperature of water, the cartridge may be malfunctioning. Blockages in the hot or cold water supply lines can also cause this issue.
Noisy Faucet: Squealing, screeching, or hammering sounds coming from the faucet can be caused by loose components, high water pressure, or mineral buildup in the pipes. Identifying the source of the noise can help pinpoint the cause and determine the appropriate repair.
Essential Tools and Materials
Having the right tools and materials on hand will streamline the repair process and ensure a successful outcome. Before starting any repair work, gather the following items:
Adjustable Wrench: An adjustable wrench is necessary for loosening and tightening nuts and bolts that secure the faucet components.
Basin Wrench: A basin wrench, also known as a sink wrench, is designed to reach hard-to-access nuts underneath the sink. This tool is particularly useful for disconnecting water supply lines and removing the faucet from the sink.
Screwdrivers (Phillips and Flathead): Screwdrivers are required for removing screws that hold the faucet handle and other components in place.
Pliers: Pliers can be used to grip and manipulate small parts, such as O-rings and cartridges.
Allen Wrench Set (if applicable): Some faucet handles are secured with Allen screws, requiring an Allen wrench to remove them.
Penetrating Oil: Penetrating oil can help loosen corroded or stuck nuts and bolts, making them easier to remove.
White Vinegar or Descaling Solution: White vinegar or a commercial descaling solution can be used to remove mineral deposits from faucet components.
Replacement Parts (O-rings, Cartridges, Valve Seats): Having replacement parts on hand will allow for immediate repair of worn or damaged components. Identify the specific faucet model and purchase compatible parts from a reputable supplier.
Plumber's Grease: Plumber's grease is used to lubricate O-rings and cartridges, ensuring smooth operation and preventing premature wear.
Clean Rags or Towels: Rags or towels are essential for cleaning up spills and drying components.
Bucket: A bucket is needed to catch any water that may leak from the supply lines during the repair process.
Flashlight: A flashlight is useful for illuminating hard-to-see areas under the sink.
Step-by-Step Repair Procedures
Once the problem has been identified and the necessary tools and materials have been gathered, the repair process can begin. The following steps provide a general guide to repairing common single handle bathroom sink faucet issues. Always consult the faucet manufacturer's instructions for specific guidance related to the particular model.
Step 1: Shut Off the Water Supply: Locate the shut-off valves under the sink and turn them clockwise to completely shut off the water supply to the faucet. If shut-off valves are not present, the main water supply to the house must be turned off.
Step 2: Protect the Sink: Place a towel or cloth over the sink to protect it from scratches and damage during the repair process.
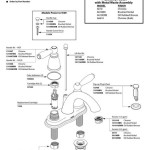
Step 3: Remove the Faucet Handle: The method for removing the faucet handle varies depending on the model. Some handles are secured with a setscrew, which can be loosened with an Allen wrench. Other handles may be held in place by a decorative cap that conceals a screw. Remove the cap with a small flathead screwdriver and then unscrew the screw. Once the screw is removed, the handle should lift off.
Step 4: Disassemble the Faucet: After removing the handle, carefully disassemble the faucet body. This usually involves removing a retaining nut or clip that secures the cartridge in place. Use an adjustable wrench or pliers to loosen the nut or remove the clip. Note the order of the components as they are removed to facilitate reassembly.
Step 5: Inspect and Replace the Cartridge: Once the cartridge is exposed, carefully remove it from the faucet body. Inspect the cartridge for signs of damage, such as cracks, chips, or mineral buildup. If the cartridge is damaged or worn, replace it with a new one of the same type. Before installing the new cartridge, apply a thin layer of plumber's grease to the O-rings to ensure smooth operation and prevent leaks.
Step 6: Clean the Faucet Body: Use white vinegar or a descaling solution to remove mineral deposits from the faucet body and valve seats. A small brush or cloth can be used to scrub away stubborn buildup. Rinse all components thoroughly with clean water.
Step 7: Inspect and Replace O-Rings and Seals: Examine all O-rings and seals for signs of wear or damage. Replace any worn or damaged O-rings and seals with new ones. Apply a thin layer of plumber's grease to the O-rings before installation.
Step 8: Reassemble the Faucet: Carefully reassemble the faucet in the reverse order of disassembly. Ensure that all components are properly aligned and securely fastened. Tighten all nuts and bolts, but avoid overtightening, which can damage the faucet body or components.
Step 9: Reattach the Faucet Handle: Reattach the faucet handle and secure it with the setscrew or screw. Make sure the handle is properly aligned and moves smoothly.
Step 10: Turn On the Water Supply: Slowly turn on the water supply by opening the shut-off valves under the sink. Check for leaks around the faucet base, handle, and spout. If any leaks are detected, tighten the appropriate nuts or bolts until the leaks stop. If leaks persist, disassemble the faucet and re-examine the components for proper installation and damage.
Step 11: Test the Faucet: Test the faucet by turning it on and off and adjusting the water temperature. Observe the water flow and pressure. Listen for any unusual noises. If the faucet is functioning properly, the repair is complete.
Addressing Specific Problems: While the general steps outlined above apply to many faucet repairs, specific problems may require additional attention.
Specific Issues and Solutions
Fixing a Dripping Faucet: For a dripping faucet, focus on replacing the cartridge and O-rings. Make sure the valve seats are clean and free of mineral deposits. If the dripping persists after replacing these components, the faucet body itself may be damaged, requiring replacement of the entire faucet.
Restoring Low Water Pressure: To restore low water pressure, begin by cleaning the aerator at the end of the faucet spout. Remove the aerator and soak it in white vinegar to dissolve mineral deposits. Also, check the water supply lines for kinks or clogs. If the problem persists, the cartridge may be clogged and require cleaning or replacement.
Easing Stiff Handle Movement: For a stiff handle, apply plumber's grease to the cartridge and the surrounding areas. This will lubricate the moving parts and allow for smoother operation. If the handle remains stiff, the cartridge may be damaged and require replacement.
Repairing Leaks at the Base of the Faucet: Leaks at the base of the faucet are usually caused by worn or damaged O-rings. Replace the O-rings that seal the faucet to the sink. Ensure that the faucet is properly tightened to the sink surface.
Restoring Hot or Cold Water Flow: If the faucet only dispenses one temperature of water, check the water supply lines for blockages. Flush the lines with water to remove any debris. If the problem persists, the cartridge may be malfunctioning and require replacement.
Quieting a Noisy Faucet: Noisy faucets can be caused by several factors. Check for loose components and tighten them. Install water hammer arrestors on the supply lines to reduce noise caused by high water pressure. Clean the inside of the pipes to remove mineral buildup that can cause whistling or screeching sounds.
By understanding the common problems associated with single handle bathroom sink faucets and following the step-by-step repair procedures outlined in this article, many faucet issues can be resolved without the need for professional assistance. Regular maintenance and timely repairs will help extend the lifespan of the faucet and prevent more costly problems from developing.

How To Fix Moen Single Handle Faucets

How To Fix A Leaky Bathroom Sink Faucet

Bathroom My Single Handle Faucet Is Leaking Or Dripping

Bathroom Faucet Cartridge Replacement

Valley Single Handle Bathroom Faucet Repair Parts

How To Fix A Leaky Single Handle Sink Faucet

Moen Adler 4 Inch Centerset Single Handle Bathroom Faucet Replacement Ifixit Repair Guide

How To Fix A Leaky Single Handle Sink Faucet

How To Fix Moen Single Handle Faucets

How To Repair A Single Handle Kitchen Faucet Diy Family Handyman
Related Posts