How to Remove a Bathroom Sink Stopper
Bathroom sink stoppers are essential for retaining water, but they can become clogged with hair, soap scum, and other debris over time. Removing the stopper for cleaning or replacement is a common maintenance task. While the process can seem daunting, it generally involves a few simple steps that can be accomplished with basic tools and a bit of patience. This article provides a comprehensive guide on how to remove various types of bathroom sink stoppers.
Before commencing any work on the plumbing, it is advisable to take necessary precautions. Start by gathering the required tools, which may include pliers, a small bucket or bowl, a flashlight, and possibly a screwdriver. A pair of disposable gloves can also be beneficial for hygiene purposes. Turning off the water supply to the sink is also a prudent step to prevent accidental flooding during the removal process. Locate the shut-off valves beneath the sink, one for hot water and one for cold water. Turn both valves clockwise until they are completely closed. It is also advisable to place a towel or cloth beneath the work area to protect the cabinet and catch any drips.
Identifying the Type of Stopper
The first step in removing a bathroom sink stopper is identifying the type of stopper installed. There are several common stopper designs, each with its own removal procedure. Recognizing the type of stopper enables a targeted approach, minimizing the risk of damage or frustration. Some of the most common types include pop-up stoppers, lift-rod stoppers, push-and-seal stoppers, and twist-and-turn stoppers. Each of these mechanisms operates differently and requires a slightly different approach to removal.
Pop-up stoppers are among the most prevalent. They are characterized by a lever or knob located behind the faucet that, when lifted or lowered, causes the stopper to rise or fall, respectively. Lift-rod stoppers are similar to pop-up stoppers, however, the stopper is controlled with a vertical rod that is located usually behind the faucet. Push-and-seal stoppers operate by pressing down on the stopper itself to seal or release the drain. Twist-and-turn stoppers are equipped with a cap that rotates to open or close the drain. Examining the sink setup carefully will reveal the type of stopper that is installed.
Removing the Pop-Up Stopper
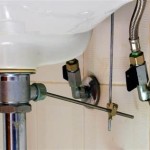
Removing a pop-up stopper generally involves disconnecting the horizontal pivot rod located beneath the sink. This rod is connected to the vertical lift rod, which extends upward to the lever behind the faucet. The initial step is to locate the pivot rod and the clevis strap; the clevis strap connects the lift rod to the pivot rod. Disconnect the clevis strap from the lift rod by loosening the screw that secures them together. This will allow the lift rod to be separated from the pivot rod assembly.
Next, locate the pivot rod nut. This nut secures the pivot rod to the drainpipe. Carefully unscrew the pivot rod nut by hand. Once the nut is loose, gently pull the pivot rod out of the drainpipe. As the pivot rod is removed, the stopper should also come out of the drain from above. If the stopper does not come out easily, gently wiggle it while pulling upward. Avoid using excessive force, as this could damage the stopper or the drainpipe. If the stopper is particularly stubborn, a small amount of lubricant, such as penetrating oil, can be applied to the area where the stopper sits in the drain. Allow the lubricant to sit for several minutes before attempting to remove the stopper again.
Once the stopper is removed, it is advisable to clean it thoroughly. Use an old toothbrush or a small brush to remove any accumulated debris from the stopper and the surrounding drain area. This will help prevent future clogs. After cleaning, the stopper can be reinstalled by reversing the removal process. Ensure that the pivot rod is securely connected to the drainpipe and the lift rod. Test the stopper's functionality to ensure that it opens and closes properly.
Removing the Lift-Rod Stopper
Lift-rod stoppers, while similar in operation to pop-up stoppers, might have slight variations in their removal process. The basic procedure remains the same, as the pivot rod and its connection to the lift rod are integral to the mechanism. Begin by locating the pivot rod beneath the sink. Disconnect the clevis strap that connects the lift rod to the pivot rod by loosening the appropriate screw. This will detach the lift rod from the pivoting mechanism.
Next, unscrew the pivot rod nut that secures the pivot rod to the drainpipe. A pair of pliers might be necessary if the nut is too tight to loosen by hand. Once the nut is loose, carefully pull the pivot rod out of the drainpipe. As the pivot rod is removed, the stopper should come out from the drain opening above. Gentle wiggling may be required to dislodge the stopper if it’s stuck due to accumulated debris. Avoid forcing the stopper, as this may cause damage.
Upon removal, inspect the stopper and the drain opening for any obstructions. Clean both thoroughly to remove any hair, soap scum, or other debris. Reinstall the stopper by carefully reversing the removal process. Ensure that the pivot rod is properly aligned and secured to the drainpipe with the pivot rod nut. Reconnect the clevis strap to the lift rod and tighten the screw. Test the lift-rod mechanism to ensure the stopper functions correctly, opening and closing the drain as intended.
The presence of corrosion around the pivot rod nut can complicate the removal process. If the nut is heavily corroded, it might be difficult to loosen. In such cases, applying penetrating oil to the nut can help loosen the corrosion. Allow the oil to soak in for several minutes before attempting to unscrew the nut. If the nut remains stuck, a pipe wrench may be necessary to provide additional leverage, taking care not to damage the nut or the drainpipe.
Removing the Push-and-Seal Stopper
Push-and-seal stoppers, also known as touch-and-seal stoppers, typically require a different approach compared to pop-up or lift-rod stoppers. These stoppers usually do not have external linkages or pivot rods beneath the sink. Instead, they operate by pressing down on the stopper itself. The removal process usually involves twisting and lifting the stopper. In some instances, the top part of the stopper can be unscrewed, revealing screws that hold the base of the stopper in place.
To remove a push-and-seal stopper, start by firmly gripping the stopper. Rotate the stopper counterclockwise while simultaneously pulling upward. Some stoppers have a locking mechanism that requires a specific amount of force to overcome. If the stopper does not come out easily, apply gentle but firm pressure while continuing to twist and pull. Avoid using excessive force, as this could damage the stopper or the drainpipe.
If the stopper has a removable top, attempt to unscrew it. This might reveal screws that secure the base of the stopper to the drain. Use a screwdriver to remove these screws. Once the screws are removed, the base of the stopper should come out easily. Ensure that all parts of the stopper are accounted for to prevent them from falling down the drain.
After removal, clean both the stopper and the drain opening thoroughly to remove any accumulated debris. Reinstall the stopper by reversing the removal process, ensuring that all screws are securely tightened. Test the functionality of the stopper by pressing down on it to seal and release the drain. If the stopper does not function correctly, verify that all parts are properly aligned and securely fastened.
Removing the Twist-and-Turn Stopper
Twist-and-turn stoppers, also known as turn-and-close stoppers, are equipped with a cap or knob that rotates to open or close the drain. The removal of these stoppers generally involves unscrewing the cap and then lifting the stopper assembly out of the drain. The mechanism is relatively simple, but accumulated debris can sometimes make the process more challenging.
Begin by gripping the cap or knob of the stopper. Rotate it counterclockwise until it is fully unscrewed. Once the cap is unscrewed, gently lift the entire stopper assembly out of the drain. Some twist-and-turn stoppers have a threaded base that screws into the drainpipe. In such cases, continue to rotate the stopper counterclockwise until the threaded base is completely unscrewed.
If the stopper is stuck, apply a small amount of lubricant to the area where the stopper meets the drain. Allow the lubricant to soak in for several minutes before attempting to remove the stopper again. Gentle wiggling while pulling upward can also help dislodge the stopper if it is stuck due to accumulated debris. Avoid using excessive force, as this could damage the stopper or the drainpipe.
After removing the stopper, thoroughly clean both the stopper and the drain opening to remove any hair, soap scum, or other debris. Reinstall the stopper by reversing the removal process, ensuring that the cap or knob is securely tightened. Test the functionality of the stopper by rotating the cap or knob to open and close the drain. If the stopper does not function correctly, verify that all parts are properly aligned and securely fastened.
The different methods described above provide a comprehensive guide to removing various types of bathroom sink stoppers. Careful identification of the stopper type, combined with the appropriate removal technique, ensures a smooth and efficient process. Regular cleaning of the stopper and drain can prevent future issues and maintain optimal drain performance.

How To Remove A Stopper From The Bathroom Sink Family Handyman

How To Replace A Sink Stopper Quick And Simple Home Repair

In My Sink Pop Up Stopper The Tip Of Pivot Rod Is Broken How Do I Fix It Home Improvement Stack Exchange

How To Remove A Bathroom Sink Pop Up Stopper

Bathroom Sink Drain Stopper Not Working

Quick Tip 26 Pop Up Stopper Sticks Misterfix It Com

Simple Maintenance Tips How To Remove A Pop Up Sink Stopper

How Do Sink Stoppers Work 1 Tom Plumber

How To Fix A Stuck Sink Stopper Fast Easy Diy Solutions

The Best Way To Remove A Sink Stopper Bell Brothers
Related Posts


