How to Remove a Hunter Ellipse Bathroom Fan Light Cover
The Hunter Ellipse bathroom fan is a common fixture in many homes, known for its combined ventilation and lighting functionality. A crucial part of its maintenance is periodically cleaning the light cover to ensure optimal brightness and air circulation. However, the design of the Ellipse light cover can sometimes make its removal seem challenging. This article provides a detailed, step-by-step guide on safely and effectively removing the light cover from a Hunter Ellipse bathroom fan.
Prior to initiating the removal process, safety should be the utmost priority. Turning off the power to the bathroom fan at the circuit breaker is essential. This measure minimizes the risk of electrical shock during the procedure. Confirming that the power is off by testing the light switch is also advisable. Additionally, having a stable platform, such as a step ladder or sturdy chair, is necessary to comfortably and safely reach the fan unit.
Identifying the Ellipse Light Cover Attachment Mechanism
The Hunter Ellipse light cover is typically secured using one of a few common mechanisms. Understanding which mechanism your specific model employs is crucial for a smooth removal process. The most prevalent attachment methods involve either torsion springs, metal clips (also sometimes described as retaining clips), or in rare cases, screws.
Torsion springs usually involve two spring-loaded arms that apply pressure to the light cover, holding it in place against the fan housing. Metal clips, on the other hand, are typically located around the perimeter of the light cover and clip onto the housing. Screws, if present, would be visible and easily identifiable.
Carefully examine the edges of the light cover where it meets the fan housing. Look for small openings or slots where the springs or clips might be located. Also, thoroughly inspect the entire surface of the cover for recessed screw heads. Understanding the attachment style avoids forcing the cover and potentially damaging it or the fan housing.
Removing a Light Cover Secured by Torsion Springs
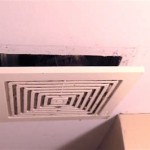
If the Hunter Ellipse light cover is secured by torsion springs, the removal process requires a specific technique. Locate the spring arms, which are typically visible through slots on opposite sides of the light cover. These arms are often made of metal and are curved or angled.
Using both hands, gently push the light cover upwards towards the ceiling. While maintaining upward pressure, use a thin, flat tool like a putty knife or a flathead screwdriver, wrapped in a cloth to prevent scratching, to gently depress the spring arms inward towards the center of the light cover. This action releases the tension holding the cover in place.
It's important to depress both spring arms simultaneously, or as close to simultaneously as possible. If only one arm is depressed, the cover will remain secured by the other. Once both arms are released, slowly lower the light cover. Be prepared to support the cover as it disengages from the housing to prevent it from falling.
If encountering resistance, avoid excessive force. Re-examine the position of the spring arms and ensure that they are fully depressed. Sometimes, slight adjustments to the upward pressure on the light cover can help to release the springs more easily.
Removing a Light Cover Secured by Metal Clips
For models that use metal clips, the removal procedure differs. Locate the clips, which are generally found spaced around the perimeter of the light cover. They typically clip onto the edge of the fan housing.
Start by gently pulling downwards on one side of the light cover. Apply only moderate force. If the cover remains firmly in place, visually inspect the area where you are pulling for a metal clip. If a clip is present, use your fingers or a small, flat tool to gently pry the clip outwards away from the fan housing.
Continue this process, working your way around the perimeter of the light cover, releasing each clip individually. Avoid pulling too hard on one section, as this can put undue stress on the remaining clips and potentially break them or damage the cover. Once all of the clips are disengaged, the light cover should easily detach from the housing.
As with the torsion spring method, support the cover as it detaches to prevent it from falling. Pay close attention to the location and orientation of the clips when removing the cover. This will be helpful when reinstalling the cover later.
Addressing Light Covers Secured by Screws
In the less common scenario where the Hunter Ellipse light cover is secured by screws, the removal process is more straightforward. Identify the location of all the screws securing the cover to the fan housing. These are usually located on the surface of the cover itself or around its edges.
Using an appropriately sized screwdriver, typically a Phillips head, carefully unscrew each screw. It is recommended to keep the screws in a safe place to avoid losing them; a small bowl or container is useful for this purpose.
As you remove the last screw, support the light cover with your other hand to prevent it from falling. Once all the screws are removed, the light cover should easily detach from the fan housing.
Before reinstalling the cover, it is crucial to inspect the mounting area for any debris or obstructions. Ensure that the screw holes are clear and aligned. This will facilitate a smooth and secure reinstallation.
Cleaning and Maintenance After Removal
Once the light cover is removed, taking the opportunity to clean it thoroughly is highly recommended. Dust, dirt, and grime can accumulate on the cover, reducing the brightness of the light and potentially hindering airflow. Use a mild soap and water solution to clean the cover. Avoid using harsh chemicals or abrasive cleaners, as these can damage the plastic or finish.
If the light cover has a textured surface, use a soft brush or sponge to gently scrub away any stubborn dirt. Rinse the cover thoroughly with clean water and allow it to air dry completely before reinstalling it. While the light cover is drying, consider vacuuming out the fan housing to remove any accumulated dust or debris. This will improve the fan's performance and extend its lifespan.
Inspect the light bulb while the cover is removed. If the bulb is nearing the end of its life, consider replacing it with a new one. This is a convenient time to do so, as access to the bulb is much easier with the cover removed. Choose a bulb with the appropriate wattage and color temperature for your needs.
In addition to cleaning the light cover, it's also beneficial to inspect the fan blades for any signs of dust buildup. If necessary, carefully wipe down the fan blades with a damp cloth. Ensure that the blades are completely dry before reassembling the fan.
Reinstalling the Light Cover
After cleaning and performing any necessary maintenance, the next step is to reinstall the light cover. The reinstallation process is essentially the reverse of the removal process. Begin by aligning the light cover with the fan housing. Ensure that the cover is properly oriented and that any spring arms, clips, or screw holes are aligned correctly.
For torsion spring models, push the light cover upwards towards the ceiling and simultaneously depress the spring arms inward until they engage with the fan housing. Ensure that both arms are securely engaged before releasing the cover. If the cover feels loose or unstable, re-examine the spring arms and ensure that they are properly positioned.
For models with metal clips, align the light cover with the fan housing and gently push the cover into place, one clip at a time. Ensure that each clip is securely engaged before moving on to the next. If a clip is damaged or broken, it may need to be replaced before the cover can be properly secured.
For models with screws, align the light cover with the fan housing and carefully insert the screws into the screw holes. Tighten the screws until the cover is securely in place, but avoid over-tightening them, as this can damage the plastic or strip the screw threads.
Once the light cover is reinstalled, double-check that it is securely attached and that there are no gaps or loose areas. Turn the power back on at the circuit breaker and test the light and fan to ensure that they are functioning properly.

Hunter Ellipse 100 Cfm Ceiling Exhaust Bath Fan With Light And Night

Hunter 90064 Instructions Assembly Free Borrow And Streaming Internet Archive

Repairing A Hunter Ellipse Exhaust Fan

Hunter Ellipse Bathroom Ventilation Fan With Light Filter Monster

Hunter Ellipse 90064 Owner S Manual Manualslib

Bathroom Fan With Light Aazon Co Hunter Ellipse 100 Cf Ceiling Exhaust Bath Bulb Replacement

Fans For Home Hunte Ellipse Bathoom Ventilation Fan With Light 90064 Replacement Parts

Ellipse Decorative Bathroom Ventilation Fan With Light And Night In Brushed Nickel

How To Remove The Light Cover On A Bathroom Fan

Good Housekeeping Buckingham 100 Cfm Decorative Bathroom Fan Sylvane
Related Posts