Add a Sink to an RV Bathroom Vanity
Adding a sink to an RV bathroom vanity can significantly enhance both the functionality and aesthetic appeal of the space. Whether replacing an old, worn-out sink or installing one in a vanity that previously lacked one, this upgrade offers several benefits. This article will guide you through the process, highlighting key considerations and providing helpful tips for a successful installation.
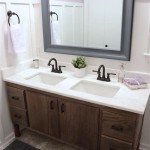
Choosing the Right Sink
Selecting the appropriate sink is the first crucial step. RVs often have limited space, so dimensions are a primary concern. Measure the existing vanity cutout carefully to ensure the new sink fits comfortably. Consider the depth of the sink as well, as a deeper basin can be more practical but might require modifications to the plumbing.
Material selection impacts both durability and appearance. Common options include stainless steel, porcelain, and acrylic. Stainless steel sinks are robust and easy to clean but can be noisy. Porcelain sinks offer a classic look and are resistant to scratches and stains, but are more susceptible to chipping. Acrylic sinks are lightweight and affordable, but may be less durable than other options. Consider the overall aesthetic of the RV's interior when choosing the sink material.
Sink style also contributes to the overall design. Drop-in sinks are the most common type for RV vanities, as they are relatively easy to install and offer a clean, integrated look. Undermount sinks, while more challenging to install, provide a seamless appearance and make cleaning the countertop easier. Vessel sinks, which sit on top of the counter, offer a modern and stylish option but may not be practical in a space-constrained RV.
Preparing for Installation
Proper preparation is essential for a smooth installation. Before beginning, gather all the necessary tools and materials, including the sink, faucet, plumbing fixtures, sealant, and safety equipment. Turn off the water supply to the RV to prevent leaks during the installation process.
If replacing an existing sink, carefully disconnect the old plumbing, including the water supply lines and drain pipe. Clean the area thoroughly to remove any debris or old sealant. If installing a sink in a new vanity, ensure there is adequate space for the plumbing and that the vanity is securely mounted.
Dry-fit the new sink into the vanity cutout to confirm proper fitment. Mark the location of the faucet and drain on the countertop. If necessary, use a hole saw or jigsaw to create the appropriate openings. Follow the manufacturer's instructions for the specific sink and faucet being installed.
Installing the Sink and Plumbing
Once the preparatory steps are complete, begin installing the sink. Apply a bead of sealant around the edge of the sink flange or the cutout in the countertop, depending on the sink type. Carefully lower the sink into place and press firmly to create a watertight seal. Secure the sink to the countertop using the appropriate mounting hardware, following the manufacturer's instructions.
Install the faucet and drain assembly according to the manufacturer's instructions. Connect the water supply lines to the faucet and ensure all connections are tight. Connect the drain pipe to the sink drain and P-trap. Test the plumbing for leaks by turning the water supply back on and running the faucet. Check all connections for drips or leaks and tighten as needed.
Finishing Touches
After confirming the plumbing is leak-free, apply a bead of sealant around the base of the sink where it meets the countertop to create a finished look and prevent water from seeping underneath. Clean any excess sealant and allow it to cure completely before using the sink. Consider adding accessories such as a soap dispenser or toothbrush holder to enhance the functionality of the vanity.
Maintenance and Care
Regular cleaning and maintenance will ensure the longevity and appearance of the RV bathroom sink. Use a mild cleanser and a soft cloth or sponge to clean the sink basin. Avoid abrasive cleaners or scouring pads, as these can damage the finish. Periodically check the plumbing connections for leaks and tighten as needed. Inspect the sealant around the sink and reapply if necessary to maintain a watertight seal.

How To Squeeze More Space Out Of A Tiny Rv Bathroom Artofrv Com

How To Squeeze More Space Out Of A Tiny Rv Bathroom Artofrv Com

Adding A Sink To Bathroom The Rv Forum Community

Small Rv Trailers Bathroom The Fold Down Sink Now That S A Clever Idea For Utilizing Space Toilet Remodel

How To Squeeze More Space Out Of A Tiny Rv Bathroom Artofrv Com

Ultimate List Of 17 Rv Bathroom Storage Ideas Let S Travel Family

Ultimate List Of 17 Rv Bathroom Storage Ideas Let S Travel Family

Rv Bathroom Makeover On A Budget Our Diy Camper The Mommy

Light Bright Rv Bathroom Remodel Reveal Sinkology

Rv Bathroom Renovation Part 1 Reno
Related Posts