Attaching a Bathroom Sink to the Wall: A Step-by-Step Guide
Installing a bathroom sink is a common home improvement project that can enhance both the functionality and aesthetics of the space. Attaching a sink to the wall requires careful planning and execution to ensure proper support, stability, and watertight connections. This article will guide you through the process of attaching a bathroom sink to the wall, providing step-by-step instructions and essential tips for a successful installation.
1. Gather the Necessary Tools and Materials
Before embarking on the installation, it is crucial to gather all the necessary tools and materials. This will ensure a smooth and efficient process. The following list outlines the essential items:
- Bathroom sink and its accompanying hardware (faucet, drain, pop-up stopper, etc.)
- Wall-mounted sink bracket or pedestal
- Stud finder
- Level
- Tape measure
- Pencil
- Drill with appropriate drill bits
- Screwdriver
- Wrench
- Pliers
- Pipe cutters (if necessary)
- Plumbing tape
- Silicone sealant
- Safety glasses
- Work gloves
2. Prepare the Wall and Install the Bracket
The next step involves preparing the wall and installing the mounting bracket for the sink. This ensures a secure platform for the sink and prevents any potential sagging or instability.
- Locate the studs in the wall using the stud finder. Ensure that the bracket is mounted directly onto the studs for optimal support.
- Mark the desired location for the bracket on the wall using a pencil and level. Ensure the height is suitable for your needs and that the bracket is positioned correctly.
- Drill pilot holes in the wall at the marked locations to ensure a clean and precise fit for the wall anchors. If using plastic anchors, ensure they are appropriate for the wall material.
- Secure the bracket to the wall using appropriate screws. Ensure that the screws are long enough to penetrate through the drywall and into the studs.
3. Connect the Plumbing
Connecting the plumbing is a crucial step in the installation process. It involves connecting the sink's drain and water supply lines to the existing plumbing system.
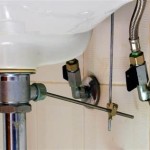
- Connect the drainpipe to the sink's drain outlet. Ensure a tight and secure connection using appropriate plumbing tape. If using a P-trap, ensure it is properly installed and secured to the wall.
- Connect the water supply lines to the faucet's inlets. Use plumbing tape to ensure a leak-proof connection. It is important to follow the proper connection sequence for hot and cold water lines.
- Turn on the water supply to the sink and check for any leaks. Tighten any loose connections if necessary.
4. Mount the Sink and Secure the Faucet
With the plumbing connections completed, the next step is to mount the sink to the bracket and secure the faucet.
- Carefully lift the sink and position it onto the bracket. Ensure that the sink is level and centered before securely attaching it to the bracket using the provided hardware.
- Install the faucet on the sink, following the manufacturer's instructions. Ensure that the faucet is properly aligned and securely attached to the sink.
- Connect the faucet's spout to the drainpipe. This connection should be tight and secure to prevent leaks.
5. Apply Silicone Sealant and Final Touches
The final step in attaching a bathroom sink to the wall involves applying silicone sealant and making any necessary adjustments.
- Apply a bead of silicone sealant around the perimeter of the sink where it meets the wall. This creates a watertight seal and prevents water from seeping behind the sink.
- Allow the silicone sealant to cure completely before using the sink. This typically requires 24 hours.
- Once the sealant has cured, make any necessary adjustments to the sink's position or the faucet's height. Ensure that everything is functioning properly and that the sink is level and aesthetically pleasing.
By following these steps and taking necessary precautions, you can successfully attach a bathroom sink to the wall and enjoy a functional and stylish addition to your space.

Serene Valley 24 In Wall Mount Solid Surface Bathroom Sink With Built Towel Bar Matte White Svws604 24wh The Home Depot

Wall Mount Sinks Mounted Bathroom Signature Hardware

Bathroom Sink Wall Mount Or Countertop Install 24 Solid Surface In Serene Valley

All Bathroom Sinks Whitehaus Collection

Bathroom Sink Wall Mount Or Countertop Install 24 Composite Materia Serene Valley

Stone Wall Mounted Bathroom Sink Model Wt 04 D Gry Badeloft Usa

Serene Valley 32 In Wall Mount Or Countertop Bathroom Vanity With Flat Top And Storage Space Matte White Svws615 32wh The Home Depot

24 Epsey Vitreous China Wall Mount Bathroom Sink

Sumter 200 Vitreous China Wall Mount Sink

Wall Mount Bathroom Sinks A Diy Homeowner S Guide Hunker
Related Posts


