Bathroom Faucet Handle Stuck: Troubleshooting and Solutions
A stuck bathroom faucet handle is a common plumbing problem that can range from a minor annoyance to a significant inconvenience. It can prevent proper water flow, hinder the ability to adjust water temperature, and even lead to water wastage. Understanding the potential causes and implementing the appropriate solutions is crucial for resolving this issue effectively and preventing further damage to the faucet or plumbing system.
The functionality of a bathroom faucet relies on the smooth operation of its internal components, including cartridges, stems, and valve seats. Over time, mineral buildup, corrosion, and general wear and tear can impede the movement of these parts, resulting in a handle that is difficult to turn, completely frozen in place, or spins freely without affecting water flow. This article provides a comprehensive overview of the potential causes of a stuck bathroom faucet handle and details several troubleshooting steps and repair methods.
Mineral Buildup and Corrosion
One of the primary culprits behind a stuck faucet handle is the accumulation of mineral deposits, primarily calcium and magnesium, from hard water. Over time, these minerals can solidify within the faucet's internal components, effectively gluing them together. This buildup is particularly common in areas with hard water, but it can occur in nearly any location over an extended period. The mineral deposits can restrict the movement of the cartridge or stem, preventing the handle from turning. Corrosion, particularly in older faucets made of brass or other susceptible materials, can also contribute to the issue. Corrosion weakens the components, leading to seizing and restricted movement. The corrosion products can also act as an abrasive, further hindering the movement of internal parts.
Identifying mineral buildup or corrosion often involves inspecting the faucet's internal components after disassembly. White or greenish deposits are indicative of mineral buildup, while rust-colored or flaky materials suggest corrosion. The presence of these signs necessitates thorough cleaning and, in some cases, the replacement of affected parts.
Addressing mineral buildup and corrosion requires a systematic approach. The first step involves shutting off the water supply to the faucet to prevent flooding. This is usually accomplished by closing the shut-off valves located under the sink. Once the water supply is off, the faucet can be disassembled to access the affected components. A penetrating oil lubricant, specifically designed for plumbing fixtures, can be applied to the stuck parts. Allow the lubricant to soak for several minutes to help loosen the mineral deposits or corrosion. Avoid using excessive force when attempting to turn the handle or remove components, as this can lead to further damage.
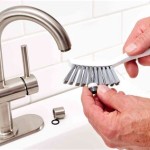
After allowing the lubricant to penetrate, gently try to move the handle or remove the affected parts. If the parts remain stuck, repeated applications of lubricant and gentle manipulation may be necessary. Once the parts are accessible, they can be cleaned with a specialized descaling solution or a mixture of vinegar and water. A small brush or scrub pad can be used to remove stubborn mineral deposits or corrosion. After cleaning, thoroughly rinse the parts with water and dry them before reassembling the faucet. In cases of severe corrosion, replacing the affected parts may be the only viable solution.
Worn or Damaged Cartridge or Stem
Another common cause of a stuck faucet handle is a worn or damaged cartridge or stem. The cartridge or stem is the core component that controls the flow of water. Over time, the rubber seals and internal mechanisms within the cartridge or stem can deteriorate, leading to friction and restricted movement. A damaged cartridge or stem can also cause leaks or inconsistent water flow, further exacerbating the problem. The internal components can break, crack, or become deformed, preventing the handle from operating smoothly.
Diagnosing a worn or damaged cartridge or stem typically involves observing the faucet's functionality. If the handle is difficult to turn, produces unusual noises, or provides inconsistent water flow, it is likely that the cartridge or stem is compromised. Inspecting the cartridge or stem for visible signs of damage, such as cracks, breaks, or deformed seals, can confirm the diagnosis. A visual inspection is often sufficient, though sometimes the damage is internal and not easily visible.
Replacing a worn or damaged cartridge or stem is a relatively straightforward process, but it requires careful attention to detail. First, shut off the water supply to the faucet. Then, remove the faucet handle by loosening the set screw or unscrewing the handle. Once the handle is removed, the cartridge or stem can be accessed. The specific method for removing the cartridge or stem varies depending on the faucet model, but it usually involves unscrewing a retaining nut or clip. Ensure the correct replacement part is selected based on the faucet manufacturer and model number. Incorrect parts may not fit properly or function correctly.
Once the old cartridge or stem is removed, carefully install the new one, ensuring that it is properly aligned and secured. Tighten the retaining nut or clip to the manufacturer's specifications. Replace any worn or damaged O-rings or seals to prevent leaks. After installing the new cartridge or stem, reassemble the faucet handle and turn on the water supply. Check for leaks and ensure that the handle operates smoothly and controls the water flow and temperature correctly. If leaks persist, double-check the installation and ensure that all connections are secure. In some cases, a small amount of plumber's grease can be applied to the cartridge or stem to facilitate smooth operation and prevent future problems.
Valve Seat Issues
The valve seat is the part of the faucet that the cartridge or stem presses against to control the flow of water. Over time, the valve seat can become corroded, damaged, or encrusted with mineral deposits, preventing the cartridge or stem from sealing properly. This can lead to leaks, difficulty turning the handle, and even a completely frozen handle. While not directly connected to the handle itself, a malfunctioning valve seat can indirectly cause the handle to stick if it prevents the stem or cartridge from moving freely.
Identifying valve seat issues involves inspecting the valve seat for signs of damage or buildup. This requires disassembling the faucet and accessing the valve seat. Look for corrosion, cracks, or mineral deposits on the valve seat's surface. A rough or uneven surface indicates a problem with the valve seat. The best way to assess the valve seat's condition is to remove it and examine it closely under good lighting. Remember that the valve seat is often located deep within the faucet body, requiring specialized tools for removal in some instances.
Repairing or replacing a damaged valve seat can be more challenging than replacing a cartridge or stem, as it often requires specialized tools and techniques. If the valve seat is only slightly corroded or has minor mineral deposits, it may be possible to clean it with a valve seat dressing tool. This tool is used to smooth and resurface the valve seat, removing imperfections and ensuring a proper seal. However, if the valve seat is severely damaged or corroded, it will need to be replaced. To remove the valve seat, a valve seat wrench or extractor is typically required. These tools are designed to grip the valve seat and allow it to be unscrewed from the faucet body.
When installing a new valve seat, it is crucial to select the correct replacement part based on the faucet manufacturer and model number. Apply a small amount of pipe dope or Teflon tape to the threads of the new valve seat to ensure a watertight seal. Carefully screw the new valve seat into place, using the valve seat wrench or extractor. Tighten the valve seat to the manufacturer's specifications to prevent leaks. After installing the new valve seat, reassemble the faucet and turn on the water supply. Check for leaks and ensure that the handle operates smoothly. If leaks persist, double-check the installation and ensure that the valve seat is properly seated and tightened.
Preventive measures can significantly reduce the likelihood of a stuck bathroom faucet handle. Regularly cleaning the faucet and surrounding areas can help prevent mineral buildup. Periodically lubricating the faucet's internal components with a silicone-based lubricant can keep them moving smoothly. Consider installing a water softener, especially in areas with hard water, to reduce the amount of minerals that accumulate in the faucet. Finally, addressing minor issues promptly, such as small leaks or stiff handles, can prevent them from escalating into more significant problems.

How To Remove Moen Bathroom Faucet Handle In 2 Steps

How To Remove A Stuck Frozen Tight Hard Turn Pfister Bathroom Faucet Handle

Help Removing Bathroom Faucet Handle Doityourself Com Community Forums

How To Remove A Stuck Faucet Handle Bangingtoolbox

American Standard Tub Faucet Handle Stuck On Stem Doityourself Com Community Forums

Bathroom Faucet Handle Sticking And Hard To Turn Easy Fix Delta

How To Remove And Install A Bathroom Faucet

Stuck Or Hard To Turn Pfister Faucet Handle Easy 0 Repair

How To Change The Handle Rotation On A Faucet

Bathroom Handle Stiff Or Difficult To Operate
Related Posts


