Bathroom Sink Drain Stopper Won't Stay Closed: Troubleshooting and Solutions
A common household frustration is a bathroom sink drain stopper that refuses to remain in the closed position. This malfunction prevents the sink from holding water, rendering it useless for tasks such as shaving, washing delicate items, or soaking. The reasons behind this issue are varied, ranging from simple adjustments to more complex mechanical failures. Understanding the potential causes and systematically addressing them can often resolve the problem without the need for a professional plumber. This article provides a comprehensive guide to troubleshooting a bathroom sink drain stopper that won't stay closed, offering step-by-step instructions and practical solutions.
Identifying the Common Culprits
Several factors can contribute to a drain stopper's inability to seal properly. The most frequent causes include issues with the lift rod mechanism, debris accumulation, and misalignment of the stopper itself. A thorough understanding of these potential problems is crucial for efficient diagnosis and effective repair.
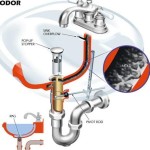
The lift rod mechanism is the primary control system for most pop-up drain stoppers. It consists of a rod that extends vertically from behind the faucet, connected to a clevis and a horizontal pivot rod located beneath the sink. When the lift rod is raised or lowered, it rotates the pivot rod, which in turn raises or lowers the stopper. If the lift rod is bent, disconnected, or improperly adjusted, it will not exert the necessary force to fully close the stopper. This can also happen if the clevis is loose, or not properly attached to the Horizontal pivot rod.
Debris accumulation is another significant contributor to stopper malfunction. Hair, soap scum, toothpaste residue, and other materials can accumulate around the stopper and within the drainpipe, preventing the stopper from seating properly and creating a watertight seal. This debris can also interfere with the movement of the pivot rod and other components of the lift rod mechanism.
Misalignment of the stopper itself can also prevent a proper seal. Over time, the stopper can become dislodged or tilted within the drain opening, preventing it from sitting flush against the drain flange. This misalignment can be caused by physical impact, corrosion, or wear and tear of the stopper's components. Some stoppers have parts that are used to create the seal, that may have degraded or fallen off preventing it from sealing the drain.
Step-by-Step Troubleshooting and Repair Guide
Before attempting any repairs, it is essential to gather the necessary tools and materials. These typically include a screwdriver (both flathead and Phillips head), pliers, adjustable wrench, a container to catch water, a flashlight, and cleaning supplies such as a brush or cloth. Safety glasses and gloves are also recommended to protect against splashing water and potential contaminants.
The first step is to inspect the lift rod mechanism. Locate the lift rod behind the faucet and examine its condition. Check for any bends, kinks, or disconnections. If the rod is bent, gently straighten it using pliers. If it is disconnected, reattach it to the clevis mechanism below the sink. Ensure that the clevis is securely fastened to the pivot rod. Adjust the height and orientation of the lift rod by loosening the screw on the clevis and repositioning the rod as needed. This adjustment will control how far the stopper closes when the lift rod is lowered.
Next, inspect the pivot rod and its connection to the stopper. Locate the pivot rod beneath the sink, typically behind the drainpipe. Check for any looseness or corrosion. Tighten the nut that secures the pivot rod to the drainpipe using an adjustable wrench. Be careful not to overtighten, as this could damage the pipe. If the pivot rod is heavily corroded or damaged, it may need to be replaced. The pivot rod is usually a metal rod that has a ball on the end, that connects to the stopper and when pulled to one side closes the stopper. Check to see that it is still in good condition and properly attached to the stopper.
To address debris accumulation, it is necessary to remove the stopper. The method for removing the stopper varies depending on the type of stopper. Some stoppers can be simply lifted out of the drain opening. Others may require unscrewing or twisting. Consult the manufacturer's instructions or search online for specific instructions for your type of stopper. Once the stopper is removed, clean it thoroughly with a brush and cleaning solution to remove any accumulated debris. Inspect the drain opening for any remaining debris and remove it using a brush or cloth. A bent wire can be useful for reaching debris that is hard to get to.
After cleaning the stopper and drain opening, reinsert the stopper and test its functionality. Ensure that the stopper sits flush against the drain flange and creates a watertight seal. If the stopper still does not stay closed, adjust the position of the pivot rod and lift rod until the stopper operates smoothly and seals properly. A small adjustment to the height of the lift rod may be all that is needed to correct the issue.
If the problem persists after these initial steps, a more detailed inspection of the drainpipe may be necessary. Disconnect the drainpipe from the sink and inspect it for any obstructions. Use a plumber's snake or a stiff wire to remove any blockages. Flush the drainpipe with water to ensure that it is clear. Reassemble the drainpipe and test the stopper again. If the drainpipe is damaged or corroded, it may need to be replaced.
Addressing Stopper Alignment and Replacement
If the stopper appears to be misaligned, carefully examine its position within the drain opening. Some stoppers have adjustable components that allow for fine-tuning of their alignment. Consult the manufacturer's instructions for specific adjustment procedures. If the stopper is significantly damaged or corroded, it may need to be replaced. Replacing a stopper is a relatively simple task that can often be accomplished without professional assistance.
When purchasing a replacement stopper, ensure that it is compatible with your sink drain. Take measurements of the drain opening and the existing stopper to ensure a proper fit. Replacement stoppers are available in a variety of materials, including metal, plastic, and rubber. Choose a material that is durable and resistant to corrosion. Follow the manufacturer's instructions for installing the new stopper. If the replacement stopper doesn't seal the drain, make sure you have the right size and that it is compatible with your drain. Sometimes a universal stopper won't seal as well as replacing with an OEM replacement.
In some cases, the drain flange itself may be damaged or corroded, preventing the stopper from sealing properly. The drain flange is the metal ring that surrounds the drain opening. If the flange is damaged, it may need to be replaced. Replacing the drain flange is a more complex task that may require professional assistance.
Another issue could be with the seal on the stopper itself. Over time the rubber, or plastic rings may have deteriorated and no longer seal the drain. In this case replacing the stopper itself will be the best solution. In some cases, a replacement stopper may have a better design making it able to seal the drain better than the original stopper. This is more common when using universal stoppers.
Proper maintenance can help prevent future problems with the drain stopper. Regularly clean the stopper and drain opening to remove any accumulated debris. Avoid pouring harsh chemicals down the drain, as these can damage the stopper and drainpipe. Periodically inspect the lift rod mechanism and pivot rod for any signs of wear or corrosion. Lubricate the moving parts with a silicone-based lubricant to ensure smooth operation. By following these simple maintenance tips, it is possible to extend the life of your drain stopper and prevent future frustrations.
Sometimes the type of sink will determine the correct type of stopper to use. A vessel sink will need a different type of drain, that will also use a different type of stopper than a normal sink. Make sure that you are replacing the drain and stopper with the correct versions. If you are unsure, then contact a professional that can help to determine the correct replacement parts.

How To Fix A Bathroom Sink Drain Stopper 4 Easy Solutions

How To Fix A Bathtub Or Sink Pop Up Stopper
I Closed My Sink Drain Stopper And Now It Won T Open Again Is There Any Way That Can Repair This Without Hiring A Plumber Quora

How To Fix Sink Stopper That Will Not Stay Up

How To Fix Sink Stopper That Will Not Stay Up

How To Adjust A Bathroom Sink Pop Up Drain 4 Scenarios

How To Fix A Bathroom Sink Drain Stopper 4 Easy Solutions

Bathroom Sink Popup And Stopper Problems

My Pop Up Drain Is Not Draining Water

How To Fix A Bathroom Sink Drain Stopper 4 Easy Solutions


