Converting A Dresser Into A Bathroom Vanity: A Comprehensive Guide
Repurposing existing furniture is an increasingly popular approach to home improvement, offering sustainable, cost-effective, and personalized design solutions. Converting a dresser into a bathroom vanity is a particularly rewarding project, breathing new life into a vintage piece while adding character and functionality to a bathroom space. This article provides a detailed exploration of the process, encompassing planning, preparation, modification, and installation steps to ensure a successful transformation.
Planning and Preparation: Laying the Groundwork for Success
The initial phase of this project is crucial and encompasses thorough planning and meticulous preparation. This stage determines the success of the project and the aesthetic and functional suitability of the final product.
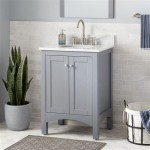
Dresser Selection: The selection of the dresser is paramount. Consider the existing bathroom's dimensions and style when choosing a dresser. Measure the available space carefully, ensuring that the dresser’s footprint aligns with the intended location. Ideally, the dresser should be constructed from solid wood, offering durability and stability against moisture exposure. Evaluate the dresser's height; a standard bathroom vanity height ranges from 30 to 36 inches. Account for the sink's depth and countertop thickness when determining the optimal dresser height. Inspecting the dresser for structural integrity, including solid joints and absence of significant wood rot or insect damage, is essential. If the dresser has drawers that are difficult to open or close correctly, this is an indicator that more adjustments will be required. Consider the style to ensure it fits the bathroom's existing style. A modern bathroom will require a sleeker dresser than a more classical one.
Sink Selection: Selecting the right sink is equally important. The type of sink significantly impacts the modifications required to the dresser. Common options include:
- Vessel Sink: Sits atop the countertop, requiring only a hole for the drain.
- Undermount Sink: Installed beneath the countertop, necessitating precise countertop cutout and robust support.
- Drop-in Sink: Fits into a pre-cut hole in the countertop, with a rim resting on the surface.
Tool and Material Acquisition: Compiling the necessary tools and materials is crucial for a smooth execution. Essential tools include:
- Measuring tape
- Pencil
- Safety glasses
- Dust mask
- Drill with various drill bits
- Jigsaw
- Sander
- Paintbrushes or rollers
- Caulk gun
- Level
- Sealer (for wood protection)
- Paint or stain
- Plumbing fittings (P-trap, supply lines)
- Adhesive caulk
- Wood screws
- Sandpaper (various grits)
- Countertop material (if replacing the existing top)
Creating a Detailed Plan: A comprehensive plan is indispensable. Include precise measurements of the dresser, sink, and plumbing locations. Sketch a detailed diagram illustrating where cuts need to be made for the sink and plumbing. Determine which drawers or sections of the dresser will need to be modified or removed to accommodate the plumbing. Plan the order of operations, factoring in drying times for sealers and paints. This plan should serve as a roadmap throughout the project, minimizing errors and rework.
Dresser Modification: Adapting the Dresser for Plumbing and Sink Installation
This phase entails the physical alteration of the dresser to accommodate the sink and plumbing infrastructure. Accurate execution is critical to the vanity’s functionality and aesthetics.
Countertop Preparation: The countertop is the surface that supports the sink and interacts directly with water. Several options exist:
- Retaining the Existing Top: If the existing top is suitable, thoroughly clean and sand it. Apply a high-quality sealant to protect against moisture damage.
- Replacing the Top: If the existing top is damaged, consider replacing it with a new material such as granite, marble, quartz, or a solid surface composite. Accurate measurements are essential for cutting the new countertop to size.
- Creating a Custom Top: Construction-grade plywood can be used as a stable base. This plywood can be covered with tile, epoxy or painted. The possibilities are vast, only requiring the builder to be meticulous in planning.
Sink Cutout: This is a crucial step requiring precision and care. Begin by carefully marking the sink’s outline on the countertop, using the sink’s template as a guide. For undermount sinks, the cutout must be precise to ensure a seamless fit. Use a jigsaw to carefully cut along the marked line. For drop-in sinks, ensure the cutout is slightly smaller than the sink's rim to allow it to rest securely. After cutting, smooth the edges with sandpaper. For vessel sinks, a much smaller hole for the drain is needed. This hole is equally important to cut correctly for the drain to fit properly.
Plumbing Modifications: The plumbing infrastructure requires specific modifications within the dresser's interior.
- Drawer Removal/Modification: Determine which drawers need to be removed or modified to accommodate the drainpipe and water supply lines. If possible, retain as many drawers as possible for storage. Cut or notch the back of the drawers to allow for the plumbing to pass through. Reinforce the drawer sides and bottoms with wood glue and screws to maintain their structural integrity.
- Creating Plumbing Access: If necessary, cut access holes in the back or sides of the dresser to connect to the existing plumbing lines. Ensure these holes are appropriately sized and positioned for easy access during installation and maintenance.
Reinforcement and Stabilization: After making cutouts and modifications, reinforce the dresser's structure to ensure it remains stable and durable. Add bracing to the interior, especially around the sink area, to distribute the weight evenly. Ensure the dresser is level and stable on the floor. Reinforcement is particularly important when using heavy sinks or countertops.
Finishing and Installation: Bringing the Vanity to Life
The final phase involves surface finishing, plumbing connections, and secure installation of the repurposed vanity.
Surface Finishing: The surface finishing stage enhances the dresser's aesthetics and provides a protective barrier against moisture.
- Sanding and Priming: Thoroughly sand all surfaces to create a smooth base for painting or staining. Apply a primer to promote adhesion and provide a uniform color.
- Painting or Staining: Choose a moisture-resistant paint or stain that complements the bathroom's décor. Apply multiple thin coats, allowing each coat to dry completely before applying the next. Consider using a clear coat sealant for added protection.
- Hardware Installation: Install new hardware, such as knobs and pulls, to enhance the vanity's aesthetic appeal. Choose hardware that matches the bathroom's style and complements the dresser’s finish.
Plumbing Connections: Connecting the plumbing is a critical step requiring precision and adherence to local building codes.
- Installing the Sink: Carefully install the sink according to the manufacturer's instructions. Ensure the sink is properly secured to the countertop using adhesive caulk. For undermount sinks, use appropriate mounting hardware to ensure a tight and waterproof seal.
- Connecting the Plumbing: Connect the drainpipe, supply lines, and faucet according to standard plumbing practices. Use Teflon tape on threaded connections to prevent leaks. Ensure all connections are tight and leak-free.
- Testing for Leaks: After connecting the plumbing, thoroughly test for leaks by running water into the sink and checking all connections. Address any leaks immediately to prevent water damage.
Vanity Installation: Securely install the vanity in its designated location.
- Leveling: Ensure the vanity is perfectly level. Use shims to adjust the height if necessary.
- Securing: Secure the vanity to the wall studs using screws to prevent it from tipping. This is especially important if the vanity is freestanding.
- Caulking: Apply a bead of caulk along the back edge of the vanity where it meets the wall to prevent water from seeping behind it.
Final Touches: After installation, add any final touches to complete the project.
- Cleaning: Thoroughly clean the vanity and surrounding area.
- Organization: Organize the drawers and cabinets to maximize storage space.
- Decorative Elements: Add decorative elements, such as towels, soap dispensers, and plants, to personalize the space.

How To Convert An Old Dresser Into A Bathroom Vanity Reinvented Delaware

How To Make A Dresser Into Vanity Tutorial An Oregon Cottage

Flipping Houses Home Renovation In Silicon Valley

Turn A Vintage Dresser Into Bathroom Vanity

Stunning Bathroom Tour Dresser Into Double Vanity

How To Convert A Dresser Into Bathroom Vanity The Little By Home

Dresser Into Bathroom Vanity Vessel Sink

How To Turn A Dresser Into Bathroom Vanity Oven Cleaner Wood Bleaching

How To Convert An Old Dresser Into A Bathroom Vanity Reinvented Delaware
/103058794-9279662b921c41259cb908f3cb19acd9.jpg?strip=all "How To Turn An Old Dresser Into A Beautiful Bathroom Vanity")
How To Turn An Old Dresser Into A Beautiful Bathroom Vanity
Related Posts