DIY Bathroom Sink Unit: A Comprehensive Guide
Creating a custom bathroom sink unit offers a unique opportunity to personalize a space, improve functionality, and potentially reduce renovation costs. This article outlines a step-by-step approach to designing and building a DIY bathroom sink unit, covering planning, material selection, construction, and installation. Considerations include space constraints, plumbing limitations, and desired aesthetic outcomes.
Planning and Design Phase
The initial stage of any DIY project involves meticulous planning. This is especially crucial for bathroom sink units due to the integration with existing plumbing and drainage systems. The first step is to accurately measure the available space. Consider the width, depth, and height of the area where the sink unit will be placed. Note any obstructions, such as pipes, electrical outlets, or door swings. These measurements will dictate the maximum dimensions of the unit.
Next, determine the desired functionality and style of the sink unit. Consider factors such as storage needs. Will the unit primarily serve as a support for the sink, or will it also incorporate drawers, shelves, or cabinets for storing toiletries and bathroom essentials? The style should complement the overall aesthetic of the bathroom. Options range from minimalist modern designs to rustic farmhouse styles. Sketching out different design options, either manually or using design software, can help visualize the final product and identify potential challenges early on.
Once a design is finalized, create a detailed plan that includes precise measurements for all components. This plan should specify the dimensions of the cabinet carcass, drawer fronts, shelves, and any other features. It should also indicate the placement of the sink and faucet, as well as the location of plumbing connections. A well-defined plan serves as a blueprint throughout the construction process, ensuring accuracy and minimizing errors.
A critical aspect of the planning phase is considering the existing plumbing. Determine the location of the water supply lines and the drainpipe. If these are not in the ideal location for the new sink unit, modifications may be necessary. Consulting with a licensed plumber is recommended before making any changes to the plumbing system to ensure compliance with local building codes and prevent potential damage.
Material Selection
The choice of materials significantly impacts the durability, appearance, and cost of the bathroom sink unit. Common materials include solid wood, plywood, MDF (Medium-Density Fiberboard), and various types of countertops. Solid wood offers a natural aesthetic and is highly durable, but it can be more expensive than other options. Plywood is a cost-effective alternative that provides good strength and stability. MDF is a smooth, paintable surface but is less resistant to moisture than solid wood or plywood. When selecting wood, consider the type of wood and its resistance to moisture. Hardwoods like oak and maple are more durable than softwoods like pine.
Countertop options include natural stone, such as granite or marble, as well as engineered stone, such as quartz. These materials are durable, water-resistant, and aesthetically pleasing, but they can be expensive. Laminate countertops are a more affordable option that offers a wide range of colors and patterns. Solid surface countertops, such as Corian, are seamless and non-porous, making them easy to clean and maintain. The selection of countertop material will affect the sink mounting style. Some countertops are suitable for undermount sinks, while others are better suited for drop-in or vessel sinks. Consider the weight of the countertop material and ensure that the cabinet structure is strong enough to support it.
In addition to the primary materials, consider hardware, such as hinges, drawer slides, and knobs or pulls. Choose high-quality hardware that is designed for use in bathrooms to resist corrosion and provide smooth operation. Select appropriate fasteners, such as screws and nails, based on the type of materials being joined. Use waterproof adhesives to prevent moisture damage and ensure a strong, durable bond.
Construction Process
With the planning and material selection completed, the construction phase can begin. Start by cutting all the components to the dimensions specified in the plan. Use accurate measuring tools and power tools to ensure precise cuts. If using plywood or MDF, consider using a circular saw with a fine-tooth blade to minimize splintering. Assemble the cabinet carcass using screws, nails, and adhesive. Ensure that the joints are square and that the cabinet is stable. Clamps can be used to hold the components together while the adhesive dries.
Install any shelves or drawers according to the design. Drawer slides should be mounted accurately to ensure smooth and reliable operation. Drawer boxes can be constructed using dovetail joints, rabbet joints, or butt joints, depending on the desired level of craftsmanship and available tools. Attach drawer fronts to the drawer boxes, ensuring that they are aligned and flush with the cabinet frame. Install hinges on the cabinet doors and attach the doors to the cabinet frame. Adjust the hinges to ensure that the doors swing smoothly and close properly. Finish the cabinet by sanding all surfaces smooth and applying a primer and paint or stain. Use a waterproof sealant to protect the wood from moisture damage.
The countertop installation process depends on the type of countertop and sink. For drop-in sinks, cut a hole in the countertop according to the sink manufacturer's specifications. Apply a bead of sealant around the edge of the hole and drop the sink into place. Secure the sink with clips or brackets. For undermount sinks, attach the sink to the underside of the countertop using epoxy or silicone adhesive. Support the sink with clamps or props while the adhesive cures. For vessel sinks, simply place the sink on top of the countertop and connect the drain.
Once the countertop is installed, drill holes for the faucet and any other accessories. Install the faucet and connect the water supply lines. Connect the drain to the sink and the drainpipe. Check for leaks and tighten any connections as needed. Apply sealant around the edges of the countertop where it meets the wall to prevent water damage.
Plumbing and Installation Considerations
Integrating the DIY sink unit with the existing plumbing requires careful consideration. The first step is to shut off the water supply to the bathroom before making any connections. Use shut-off valves to control the water flow. If shut-off valves are not present, the main water supply to the house may need to be shut off.
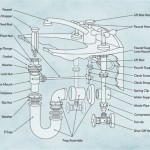
When connecting the water supply lines, use flexible supply lines that are specifically designed for use with faucets. These lines are easy to connect and provide a watertight seal. Ensure that the supply lines are long enough to reach the water supply valves without being stretched or kinked. Connect the drain using PVC pipes and fittings. Use PVC primer and cement to create a watertight seal. Ensure that the drainpipe has a slight slope to allow water to flow freely. Install a P-trap to prevent sewer gases from entering the bathroom.
If the drainpipe is not in the ideal location, it may need to be moved. This is a complex task that should be performed by a licensed plumber to ensure compliance with building codes. When installing the sink unit, ensure that it is level and stable. Shim the unit as needed to compensate for uneven floors. Secure the unit to the wall using screws or brackets. This will prevent the unit from tipping over and provide additional stability. Finally, inspect all connections for leaks. Turn on the water supply and check for any drips or leaks. Tighten any connections as needed until all leaks are eliminated.
Proper ventilation is essential in bathrooms to prevent moisture buildup and mold growth. Ensure that the bathroom has adequate ventilation, either through a window or an exhaust fan. Regularly clean and maintain the sink unit to prevent dirt and grime from accumulating. Use a mild detergent and a soft cloth to clean the surfaces. Avoid using abrasive cleaners, as these can scratch or damage the finish.
:max_bytes(150000):strip_icc()/build-something-diy-vanity-594402125f9b58d58ae21158.jpg?strip=all "16 Diy Bathroom Vanity Plans You Can Build Today")
16 Diy Bathroom Vanity Plans You Can Build Today

How To Diy A Bathroom Vanity Unit Wood Create

20 Clever Pedestal Sink Storage Design Ideas Diy Recently Muebles Para Baños Pequeños De Baño Rusticos

How To Diy A Bathroom Vanity Unit Wood Create

It Only Takes Seven Steps To Build A Bathroom Vanity

Homemade Vanity From 2x6 Boards Diy Bathroom Beautiful Cabinets

How To Diy A Bathroom Vanity Unit Wood Create

800mm Bathroom Vanity Unit Freestanding 80cm Sink Cabinet Basin Oak Effect Storage Classic Diy At B Q
/103058794-9279662b921c41259cb908f3cb19acd9.jpg?strip=all "How To Turn An Old Dresser Into A Beautiful Bathroom Vanity")
How To Turn An Old Dresser Into A Beautiful Bathroom Vanity

Large Double Racked Basin Unit Vanity Sink Bathroom