How To Clean A Broan Bathroom Exhaust Fan
A Broan bathroom exhaust fan is a vital component of a well-ventilated bathroom. It helps to remove excess moisture, preventing mold and mildew growth, and eliminating unpleasant odors. However, over time, dust, lint, and other debris can accumulate on the fan and its components, reducing its efficiency and potentially shortening its lifespan. Regular cleaning is essential to maintaining its performance and ensuring a healthy bathroom environment. This article provides a comprehensive guide on how to clean a Broan bathroom exhaust fan effectively and safely.
Before beginning any cleaning procedure, safety must be prioritized. Turn off the power to the exhaust fan at the circuit breaker. This prevents accidental electrical shock during the cleaning process. Confirm the power is off by attempting to turn on the fan switch. If the fan does not activate, the power is successfully disconnected. Gather the necessary cleaning supplies. These include a screwdriver (usually a Phillips head), a vacuum cleaner with a brush attachment, a soft-bristled brush (such as an old toothbrush), a damp cloth or sponge, mild dish soap, and safety glasses.
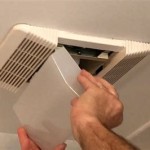
Once the power is off and the supplies are gathered, the next step is to remove the fan cover. The method for removing the cover varies depending on the specific Broan model. Most covers are held in place by either spring clips or screws. For spring clip models, gently pull down on the cover. You may need to wiggle it slightly to disengage the clips. If the cover is secured with screws, use the screwdriver to carefully remove them. Store the screws in a safe place to prevent them from being lost. Once the cover is detached, carefully lower it, being mindful of any accumulated dust or debris that might fall.
Removing and Cleaning the Fan Motor and Blower Wheel
After the cover is removed, the next step involves accessing and cleaning the fan motor and blower wheel. Some Broan models have a motor assembly that can be completely removed, while others require cleaning in place. Examine the unit to determine if the motor assembly can be detached. Typically, there are electrical connectors and mounting screws holding the motor assembly in place. If the motor assembly is removable, carefully disconnect the electrical connectors. Ensure the connectors are unplugged gently, avoiding any damage to the wires or connectors themselves. Use the screwdriver to remove the mounting screws. Support the motor assembly with one hand while removing the last screw to prevent it from falling.
With the motor assembly removed (or if it cannot be removed), the cleaning process can begin. Using the vacuum cleaner with the brush attachment, thoroughly vacuum the blower wheel to remove loose dust and debris. Pay close attention to the blades of the blower wheel, as these tend to accumulate significant amounts of dust. For stubborn dirt or grime, use the soft-bristled brush to gently scrub the blower wheel. If the motor assembly is removable, it might be beneficial to perform this step outdoors or in a well-ventilated area to minimize the spread of dust. If the motor assembly cannot be removed, exercise caution to prevent dust from falling into the bathroom.
Once the blower wheel is cleaned, focus on the fan motor itself. Again, use the vacuum cleaner with the brush attachment to remove any dust from the motor housing. Avoid getting the motor wet. If necessary, a slightly damp cloth can be used to wipe the exterior of the motor, but ensure it is thoroughly dried afterwards. If the motor has vents, use the soft-bristled brush to clean them, ensuring proper airflow.
Cleaning the Fan Housing
After cleaning the motor and blower wheel, attention should be directed to cleaning the fan housing. The fan housing is the structure in the ceiling that contains the fan motor and blower wheel. Over time, this area can accumulate dust and debris, which can impede airflow and reduce the fan's efficiency. Start by using the vacuum cleaner with the brush attachment to remove loose dust and debris from the interior of the housing. Pay particular attention to corners and crevices where dust tends to accumulate. A flexible vacuum hose can be helpful for reaching difficult areas.
For areas with stubborn dirt or grime, a damp cloth or sponge can be used. Moisten a cloth or sponge with a solution of mild dish soap and water. Wring out the excess water to prevent drips. Gently wipe the interior surfaces of the fan housing, removing any dirt or grime. Avoid using abrasive cleaners, as these can damage the surface of the housing. After wiping the housing, use a clean, dry cloth to thoroughly dry all surfaces. This prevents the growth of mold and mildew.
Inspect the ductwork connection while the housing is accessible. Ensure that the ductwork is securely attached to the fan housing and that there are no visible obstructions. If the ductwork is accessible, consider vacuuming it out to remove any accumulated dust or debris. A clogged duct can significantly reduce the fan's efficiency and increase the risk of overheating.
Reassembling and Testing the Fan
After all the components are cleaned, the fan needs to be reassembled. If the motor assembly was removed, carefully reattach it to the fan housing using the mounting screws. Ensure the motor is securely mounted and that the blower wheel is properly aligned. Reconnect the electrical connectors, ensuring they are securely plugged in. Refer to any diagrams or notes taken during disassembly to ensure the connectors are properly oriented.
Before replacing the fan cover, it is beneficial to test the fan to ensure it is functioning correctly. Turn the power back on at the circuit breaker. Turn on the fan switch and observe the fan's operation. Listen for any unusual noises, such as squealing or grinding, which could indicate a problem with the motor or blower wheel. Ensure that the fan is moving air effectively. If the fan does not operate properly, turn off the power at the circuit breaker and recheck all connections and mounting points.
If the fan is operating correctly, the final step is to clean and reinstall the fan cover. Wash the cover with warm, soapy water to remove any accumulated dust and grime. Rinse the cover thoroughly with clean water and allow it to dry completely. Once the cover is dry, carefully reattach it to the fan housing. If the cover is held in place by spring clips, align the clips with the slots in the housing and gently push the cover into place. If the cover is secured with screws, align the screw holes and tighten the screws until the cover is securely attached. Avoid overtightening the screws, as this could damage the cover or the housing.
After the cover is reinstalled, turn the power back on at the circuit breaker and test the fan one last time to ensure it is functioning correctly. Observe the fan's operation and listen for any unusual noises. Ensure that the fan is moving air effectively. Regular cleaning, performed at least every six months, will help to maintain the fan's performance and extend its lifespan. More frequent cleaning may be necessary in bathrooms that are heavily used or prone to dust accumulation. By following these steps, a Broan bathroom exhaust fan can be kept in optimal condition, ensuring a healthy and comfortable bathroom environment.
The information provided is a general guide and may not apply to all Broan exhaust fan models. Always consult the manufacturer's instructions for specific cleaning recommendations. If unsure about any aspect of the cleaning process, consult a qualified electrician or HVAC technician.

How To Clean Replace Light Broan Model 678 Exhaust Fan

How To Clean A Bathroom Exhaust Vent Fan 2025 Today S Homeowner

Clean Your Bathroom Exhaust Fan In Minutes 3 Easy Ways To Dirty Vent Fans Yourself Diy

How To Clean A Broan Bathroom Exhaust Fan Model Qtxe110flt Steamy Remedy Hopefully

How To Disassemble Nutone 9093wh Bathroom Fan Clean And Replace

Exhaust Fan How Can I Remove Open Up This Broan Bathroom Vent Heater Home Improvement Stack Exchange

How To Remove And Re Install Bathroom Exhaust Vent Fan For Cleaning Broan Nutone

How To Clean A Bathroom Fan Diy Family Handyman

How To Clean Your Bath Fan Diy Home Repairs

Surfaceshield Antibacterial Roomside Fan
Related Posts