How to Install a Bathroom Vent Fan: A Comprehensive Guide
Proper ventilation in a bathroom is crucial for preventing moisture buildup, which can lead to mold growth, damaged paint, and structural issues. A bathroom vent fan effectively removes steam and humidity, contributing to a healthier and more comfortable environment. This article provides a detailed, step-by-step guide on how to install a bathroom vent fan, encompassing planning, preparation, and the installation process itself. Adherence to local building codes and safety regulations is paramount throughout the entire project.
Prior to commencing the installation, a thorough assessment of the bathroom and attic space (if applicable) is necessary. The size of the bathroom dictates the required CFM (cubic feet per minute) rating of the fan. A general rule of thumb is to choose a fan that provides at least 1 CFM per square foot of bathroom space. For example, a 50-square-foot bathroom would require a fan with a minimum CFM rating of 50. Additionally, consider the noise level of the fan, measured in sones. A lower sone rating indicates a quieter fan. It is important to select a fan that meets both ventilation and noise level preferences.
Gathering all necessary tools and materials before starting the installation process is essential for efficiency and safety. The required tools typically include: a drill with various drill bits, a drywall saw or utility knife, wire strippers, wire connectors, a level, a measuring tape, safety glasses, work gloves, and a ladder (if needed). Materials typically include: the new bathroom vent fan, vent ducting (rigid or flexible), duct clamps, electrical wiring (matching the existing gauge), a junction box (if necessary), and screws or nails for securing the fan housing and ducting.
Selecting the Right Vent Fan and Determining Ducting Route
Choosing the appropriate vent fan goes beyond just CFM and sone ratings. Consider features such as integrated lights, humidity sensors, and timers. A fan with a humidity sensor automatically activates when moisture levels rise, ensuring optimal ventilation. A timer allows the fan to run for a set period after the light switch is turned off, further removing residual moisture. These added features can significantly enhance the functionality and convenience of the vent fan.
Determining the optimal ducting route is crucial for efficient ventilation. The shortest and straightest path from the fan to the exterior is ideal. Avoid sharp bends or excessive duct length, as these can significantly reduce airflow. If the ducting must run through an unconditioned space such as an attic, it is imperative to insulate the ducting to prevent condensation and energy loss. Consider the location of existing obstructions such as pipes, wiring, and structural members when planning the ducting route.
The chosen exhaust point should be away from windows, doors, and air intakes to prevent recirculation of moist air. A roof vent is often the preferred option, as it provides direct and unobstructed exhaust. However, a wall vent can also be used if a roof vent is not feasible. Regardless of the chosen exhaust point, ensure that it is properly sealed and weatherproofed to prevent water intrusion. Consider the prevailing wind direction when selecting the location of the exhaust vent.
Preparing the Installation Site: Electrical and Structural Considerations
Before any work begins, it is paramount to disconnect the power to the bathroom circuit at the breaker box. This is a critical safety precaution that must not be overlooked. Use a non-contact voltage tester to verify that the power is indeed off before proceeding. This ensures that there is no risk of electrical shock during the installation process. Treat all electrical wires as if they are live until confirmed otherwise.
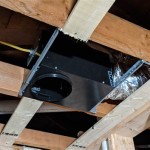
If replacing an existing fan, carefully remove the old unit. Disconnect the electrical wiring, taking note of the wire connections (black to black, white to white, green or bare copper to ground). Unscrew or unclip the old fan housing from the ceiling joists. If installing a new fan in a location where one did not previously exist, a hole must be cut in the ceiling. Use a drywall saw or utility knife to carefully cut along the outline of the fan housing, ensuring that the cut is precise and clean.
Assess the structural integrity of the ceiling joists in the area where the fan will be installed. The fan housing must be securely supported to prevent sagging or vibration. If necessary, add additional bracing between the joists to provide a stable mounting platform. Ensure that the fan housing is level and flush with the ceiling surface. This contributes to both the aesthetic appearance and the proper functioning of the fan.
Connecting the Ducting and Electrical Wiring
Once the fan housing is securely mounted, connect the ducting to the fan's exhaust port. Use duct clamps to secure the ducting to the port, ensuring a tight and airtight seal. If using flexible ducting, stretch it out to its full length to minimize airflow restriction. Avoid kinking or compressing the ducting. If using rigid ducting, use metal tape at the joints to create an airtight seal.
Connect the electrical wiring to the fan according to the manufacturer's instructions. Typically, this involves connecting the black wire (hot) to the black wire, the white wire (neutral) to the white wire, and the green or bare copper wire (ground) to the ground terminal. Use wire connectors to securely join the wires together. Ensure that all wire connections are tight and properly insulated. If the existing wiring is damaged or deteriorated, it should be replaced.
Carefully tuck the wiring into the fan housing or a separate junction box. Avoid exposing the wiring to excessive heat or moisture. Ensure that the wiring does not interfere with the fan's operation. Secure the fan's grille or cover to the housing, ensuring that it is properly aligned and securely fastened. Double-check all connections and wiring before restoring power to the circuit.
After completing the installation, turn the power back on at the breaker box. Test the fan to ensure that it is functioning properly. Check for any unusual noises or vibrations. Verify that the fan is effectively removing moisture from the bathroom. Inspect the ducting and exhaust vent to ensure that there are no leaks or obstructions. If any problems are encountered, troubleshoot the connections and wiring to identify and resolve the issue.
Proper insulation around the fan housing and ducting is essential for energy efficiency and preventing condensation. Use fiberglass or spray foam insulation to fill any gaps between the fan housing and the ceiling joists. Insulate the ducting, especially in unconditioned spaces, to prevent heat loss and condensation buildup. This will help to maintain a comfortable bathroom temperature and prevent mold growth.
Regular maintenance of the bathroom vent fan is crucial for ensuring its continued performance and longevity. Clean the fan grille periodically to remove dust and debris. Inspect the ducting for any obstructions or damage. Lubricate the fan motor as needed to prevent squeaking or seizing. By following these maintenance tips, the bathroom vent fan will provide years of reliable service.

Install A New Bathroom Vent Fan Light

Installing A Bathroom Fan Fine Homebuilding

Bathroom Fan Installation How To Install A And Tips Check More At Http Www Showerremodels Or Vent

How To Replace And Install A Bathroom Exhaust Fan From Start Finish For Beginners Easy Diy

Quick Tip 23 Fixing A Drip At The Bathroom Fan Misterfix It Com

How To Install A Bathroom Roof Vent Family Handyman

How To Install A Bathroom Exhaust Fan

How To Install A Bathroom Vent Fan This Old House 52 Off

Air Sealing Bathroom And Kitchen Exhaust Fans Building America Solution Center

How To Install A Bathroom Fan Homeserve Usa
Related Posts