How To Build A Bathroom Vanity From a Dresser
Repurposing a dresser into a bathroom vanity is a cost-effective and creative way to add a unique touch to a bathroom. This project requires some basic carpentry skills and tools but offers a rewarding outcome.
Assessing the Dresser and Planning
The first step involves carefully evaluating the selected dresser. The dresser's dimensions should be appropriate for the bathroom space, leaving adequate room for movement. The dresser's construction must be sturdy enough to support a sink and countertop. Water resistance is a crucial factor; solid wood dressers are preferable, while those made of particleboard might require additional waterproofing. Consider the desired sink type (vessel, undermount, or drop-in) as it will dictate modifications to the dresser top. Accurate measurements of the dresser's width, depth, and height are essential for planning subsequent steps.
Preparing the Dresser
Begin by removing all drawers and hardware from the dresser. Thoroughly clean the dresser inside and out. If the existing finish is damaged or unsuitable, sanding and repainting or refinishing might be necessary for both aesthetic and protective purposes. If using a dresser made of a material susceptible to water damage, such as particleboard, apply a waterproof sealant to all surfaces, especially the interior and underside of the top. This will help protect the dresser from moisture and extend its lifespan in the humid bathroom environment.
Modifying the Dresser for Plumbing
Depending on the chosen sink type, modifications to the dresser top are necessary. For vessel sinks, only a hole for the drain pipe is required. Undermount sinks necessitate cutting a precise opening to match the sink's dimensions. Drop-in sinks require a cutout slightly smaller than the sink's rim. Mark the desired cutout on the dresser top using a template or the sink itself. Use a jigsaw to carefully cut the opening, ensuring a snug fit for the sink. Drill holes for the faucet and supply lines according to the sink and faucet specifications.
Installing the Sink and Plumbing
Before installing the sink, test-fit it in the prepared opening to ensure a proper fit. Apply a bead of silicone sealant around the edge of the cutout to create a watertight seal. Place the sink into the opening and secure it according to the manufacturer's instructions. Connect the drain assembly and the faucet to the water supply lines. Check all connections for leaks using a bucket of water to simulate normal usage. Address any leaks immediately to prevent water damage.
Adding the Countertop (Optional)
If the original dresser top is unsuitable or damaged, a new countertop can be installed. Measure the dresser's dimensions carefully and choose a countertop material that complements the bathroom's style and is resistant to moisture. Common materials include granite, marble, quartz, and laminate. The countertop can be cut to size by a professional or with a wet saw if equipped. Once cut, apply a bead of silicone sealant to the top of the dresser and carefully position the countertop. Secure it in place with clamps or weights until the sealant dries.
Finishing Touches and Installation
After the sink and countertop are installed, replace the dresser hardware with new knobs or pulls that complement the bathroom's aesthetic. Consider adding backsplash to protect the wall behind the vanity from water splashes. Carefully move the finished vanity to the desired location in the bathroom. Connect the plumbing to the existing water supply and drain lines. Secure the vanity to the wall using appropriate fasteners to ensure stability. Apply caulk around the base of the vanity where it meets the floor to seal any gaps and prevent water from seeping underneath.
Choosing the Right Sink and Faucet
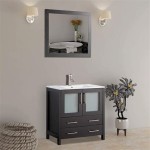
The selection of the sink and faucet significantly impacts the vanity’s functionality and aesthetic. Consider the bathroom's overall style and the available space when choosing a sink. Vessel sinks sit atop the counter and offer a dramatic look, while undermount sinks create a seamless transition and are easier to clean. Drop-in sinks are a more traditional option and relatively easy to install. The faucet should complement the sink and provide adequate water pressure and flow. Ensure the chosen faucet is compatible with the sink's configuration and the bathroom's plumbing.
Plumbing Considerations and Precautions
Working with plumbing requires careful attention to detail to prevent leaks and water damage. If significant plumbing modifications are necessary, consulting a licensed plumber is recommended, especially if local building codes require permits. Ensure all connections are tight and secure. Use plumber’s tape on threaded connections to create a watertight seal. Double-check all connections for leaks after installation, and address any issues promptly. Understand the location of the shutoff valves for the water supply lines in case of emergencies. Proper ventilation is crucial in a bathroom to prevent moisture buildup, which can lead to mold and mildew growth.

How To Make A Dresser Into Vanity Tutorial An Oregon Cottage

A Pro Renovator S 6 Tips For Turning Dresser Into Bathroom Vanity

Repurposed Dresser Converted To Bathroom Vanity Reinvented Delaware

Mid Century Dresser Into Vanity Bright Green Door
/103058794-9279662b921c41259cb908f3cb19acd9.jpg?strip=all "How To Turn An Old Dresser Into A Beautiful Bathroom Vanity")
How To Turn An Old Dresser Into A Beautiful Bathroom Vanity

Flipping Houses Home Renovation In Silicon Valley

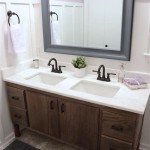
Stunning Bathroom Tour Dresser Into Double Vanity

How To Convert A Dresser Into Bathroom Vanity The Little By Home

Turn A Vintage Dresser Into Bathroom Vanity

Repurposed Dresser Converted To Bathroom Vanity Reinvented Delaware