How To Calculate Tiles For Bathroom Wall
Accurately calculating the number of tiles required for a bathroom wall project is essential for efficient budgeting, material procurement, and minimal waste. Underestimating can lead to project delays and inconsistent tile lots, while overestimating results in unnecessary expense and storage problems. This article provides a comprehensive guide to calculating tile needs, considering various factors from wall dimensions to pattern complexities.
1. Measuring Wall Dimensions
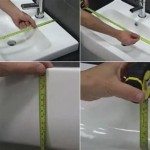
The initial step involves meticulously measuring the area of the walls to be tiled. Measurements should be taken in feet or inches, depending on the precision desired and the unit of measurement used by the tile supplier. Use a reliable measuring tape and ensure it is held taut to avoid inaccuracies.
Measure the length of each wall section that will be tiled. Repeat the measurement to verify accuracy. Note any variations in length, especially in older homes where walls might not be perfectly straight.
Measure the height of each wall section, from the floor to the point where the tiling will stop. Again, repeat the measurement to confirm accuracy. Pay close attention to variations in height, particularly near the ceiling or floor, where unevenness is common.
Multiply the length and height of each wall section to calculate its area. For instance, a wall that is 8 feet long and 4 feet high has an area of 32 square feet (8 ft x 4 ft = 32 sq ft). Repeat this calculation for each wall section to be tiled.
Sum the areas of all the wall sections to determine the total area to be tiled. This total area is a crucial figure for subsequent calculations.
When calculating for areas around windows or doors, measure their dimensions separately. Multiply the width and height of each window or door opening to determine its area. Subtract the total area of all windows and doors from the total wall area calculated earlier. This yields the net area that requires tiling.
If there are complex shapes, such as niches or angled walls, divide them into simpler geometric shapes like rectangles or triangles. Calculate the area of each simpler shape and then sum them to find the total area of the complex shape. Ensure accuracy by taking multiple measurements and verifying them.
2. Determining Tile Size and Calculating Tiles Per Area
The size of the chosen tile significantly influences the number of tiles required. Larger tiles cover more area per unit, reducing the number of tiles needed, while smaller tiles offer more design flexibility but require a higher quantity.
Measure the length and width of a single tile. If the tile is square, only one measurement is needed. Ensure the measurements are in the same units as the wall area (feet or inches).
Calculate the area of a single tile by multiplying its length and width. For example, a tile that is 1 foot long and 0.5 feet wide has an area of 0.5 square feet (1 ft x 0.5 ft = 0.5 sq ft).
Divide the total wall area (net area after subtracting windows and doors) by the area of a single tile. This calculation determines the number of tiles required to cover the entire wall area. For example, if the total wall area is 30 square feet and each tile has an area of 0.5 square feet, then 60 tiles are needed (30 sq ft / 0.5 sq ft = 60 tiles).
If the calculated number of tiles is not a whole number, round up to the nearest whole number. It is always better to have a few extra tiles than to fall short.
Consider the grout lines between tiles. Grout lines add to the overall area covered by the tiles. While the impact is minimal for large tiles, it becomes significant for smaller tiles. To account for grout lines, add the grout width to the length and width of the tile before calculating its area and the number of tiles required. For instance, if the tile is 12 inches by 12 inches and the grout line is 1/8 inch, the adjusted tile dimensions are 12.125 inches by 12.125 inches.
3. Accounting for Wastage and Cuts
Wastage is an inevitable part of any tiling project. Tiles often need to be cut to fit around corners, pipes, or other fixtures. Some tiles may also break during cutting or installation. It is crucial to factor in wastage to avoid running out of tiles mid-project.
A standard recommendation is to add 10% to 15% extra tiles to account for wastage. For complex patterns or intricate cuts, increasing the wastage allowance to 20% or even 25% is prudent.
To calculate the wastage allowance, multiply the number of tiles needed (calculated in the previous step) by the wastage percentage. For example, if 60 tiles are needed and a 10% wastage allowance is applied, add 6 tiles (60 tiles x 0.10 = 6 tiles). The total number of tiles to order would then be 66 tiles.
For diagonal tile patterns, wastage tends to be higher due to the increased number of cuts required. In such cases, a wastage allowance of 15% to 25% is advisable.
If intricate patterns are involved, such as mosaics or complex geometric designs, consider the pattern's complexity when determining the wastage allowance. Consult with a tiling professional or the tile supplier for advice on appropriate wastage percentages for specific patterns.
Consider future repairs when determining the final tile quantity. Keeping a few extra tiles from the same lot ensures that replacements are available if tiles are damaged in the future. Store these extra tiles in a safe and dry place.
4. Additional Considerations: Trim Pieces and Accents
Beyond the primary field tiles, trim pieces and accent tiles often play a crucial role in the overall aesthetic and functionality of a tiled bathroom wall. These elements require separate calculations and considerations.
Trim pieces, such as bullnose tiles or edge pieces, are used to finish the edges of tiled areas, providing a clean and professional look. Measure the total linear footage of all exposed edges where trim pieces will be used.
Divide the total linear footage by the length of a single trim piece to determine the number of trim pieces needed. Account for wastage in trim pieces as well, especially when dealing with corners or mitered cuts.
Accent tiles, such as decorative borders or feature strips, add visual interest to the tiled wall. Determine the total length of the area where accent tiles will be installed. If the accent tiles are individual pieces, calculate the number of pieces required based on their individual length and the total length of the accent area. If the accent tiles come in sheets, calculate the number of sheets needed to cover the accent area.
Listellos, which are decorative border tiles, are often used to create horizontal or vertical accents. Calculate the linear footage of listello needed and divide by the length of each listello to determine the quantity required.
Consider the layout of accent tiles and trim pieces. Plan the placement of these elements carefully to minimize cuts and wastage. Create a detailed layout diagram to visualize the final design and ensure accurate calculations.
Always order trim pieces and accent tiles from the same supplier as the field tiles to ensure color consistency and compatibility. Variations in color or size can detract from the overall appearance of the tiled wall.
When installing trim pieces around corners, pre-fabricated corner pieces can simplify the installation process and provide a neater finish. Calculate the number of corner pieces needed based on the number of outside and inside corners in the tiled area.
5. Using Online Calculators and Professional Advice
While manual calculations provide a fundamental understanding of the tiling process, online calculators and professional advice can enhance accuracy and efficiency.
Numerous online tile calculators are available that simplify the calculation process. These calculators typically require inputting wall dimensions, tile size, grout width, and wastage percentage. They then automatically calculate the number of tiles needed.
Cross-reference the results from an online calculator with manual calculations to verify their accuracy. Input the same data into multiple calculators and compare the results. Be aware that some calculators may not account for all factors, such as complex patterns or trim pieces.
Consulting with a professional tile installer or a knowledgeable salesperson at a tile store can provide valuable insights and guidance. These professionals can assess the project's specific requirements and offer recommendations on tile quantity, layout, and wastage allowance.
Provide the professional with detailed measurements of the wall area, including the dimensions of windows, doors, and any complex shapes. Share the chosen tile size, pattern, and grout width. Inquire about any potential challenges or considerations specific to the project.
Obtain a written estimate from the professional outlining the total cost of the project, including the cost of tiles, trim pieces, accent tiles, and installation labor. Review the estimate carefully to ensure that all necessary materials are included and that the quantities are accurate.
Leverage the experience and expertise of tiling professionals to avoid costly mistakes and ensure a successful tiling project. Their advice can be particularly valuable for complex installations or when working with unconventional tile materials.

Calculating Wall Tiles The Definitive Guide A Civil Engineer

How Much Tile Do You Need To Remodel A Bathroom

Calculating Wall Tiles The Definitive Guide A Civil Engineer

How To Calculate Wall Tiles Calculating The Number Of Required For A Bathroom Param Visions

Wall Tile Quantity Tiles Cost Estimation For Bathroom How To Calculate Sand Cement

How To Calculate The Amount Of Tile You Need For Your Room Modeladvisor Com

How To Calculate Tile Needed For Your Bathroom Mercury Mosaics

How To Calculate Bathroom Tiles Wall Calculation

Calculating Wall Tiles The Definitive Guide A Civil Engineer

How To Wall Tiling Step 3 Calculating The Number Of Tiles That You Require