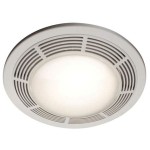
How to Change a Bathroom Fan Light
A bathroom fan light serves a dual purpose, providing illumination while simultaneously ventilating moisture and odors. Over time, the light bulb within the fixture will inevitably burn out and require replacement. The process of changing a bathroom fan light is a relatively straightforward task that most homeowners can accomplish with basic tools and a little patience. This article provides a detailed guide on how to safely and effectively replace a bathroom fan light bulb or the entire lighting fixture.
Before commencing any electrical work, safety should be the primary concern. Neglecting safety precautions can lead to electric shock or other injuries. Therefore, this document emphasizes crucial safety measures throughout each step of the process.
Safety First: Disconnecting the Power
The single most important step when working on any electrical appliance, including a bathroom fan light, is to disconnect the power supply. This eliminates the risk of electric shock. The power should be turned off at the circuit breaker that controls the bathroom. The circuit breaker is typically located in the main electrical panel of the house.
To identify the correct circuit breaker, consult the circuit breaker directory, which is usually affixed to the inside of the electrical panel door. If the directory is unclear or nonexistent, a circuit tester can be used. Plug the circuit tester into a bathroom outlet, and then systematically turn off each circuit breaker until the tester indicates that the power is off in the bathroom. Clearly label the circuit breaker that controls the bathroom to avoid confusion in the future.
After switching off the circuit breaker, it is advisable to double-check that the power is indeed off at the bathroom fan light. A non-contact voltage tester can be used for this purpose. This device will emit a visual or audible signal when it detects the presence of voltage. Hold the tester near the wires of the light fixture. If the tester indicates that voltage is present, the correct circuit breaker has not been switched off. If no voltage is detected, it is safe to proceed with the replacement.
Replacing the Light Bulb
The simplest scenario involves simply replacing a burnt-out light bulb. In many cases, the bathroom fan light uses a standard incandescent, halogen, or LED bulb. The type of bulb required is often indicated on a sticker inside the fixture or in the product manual. Using the correct type and wattage of bulb is crucial to prevent overheating or damage to the fixture.
Before removing the old bulb, allow it to cool down completely. A hot bulb can cause burns. Once the bulb is cool, gently unscrew it from the socket. If the bulb is broken, exercise caution to avoid cutting oneself on the broken glass. Using gloves and pliers can help with this task. Dispose of the old bulb properly, following local regulations for recycling or disposal of light bulbs.
Install the new bulb by carefully screwing it into the socket. Ensure that the bulb is securely tightened, but avoid over-tightening, which could damage the socket. Once the new bulb is installed, turn the circuit breaker back on and test the light. If the light does not turn on, double-check that the bulb is properly seated in the socket and that the circuit breaker is fully engaged.
Some bathroom fan lights use specialty bulbs or have a cover that needs to be removed before the bulb can be accessed. The cover is typically held in place by screws, clips, or tabs. Consult the manufacturer's instructions for specific details on how to remove the cover without damaging it.
Replacing the Entire Bathroom Fan Light Fixture
Occasionally, the entire bathroom fan light fixture may need to be replaced due to damage, malfunction, or simply to upgrade to a more modern or energy-efficient model. This process involves a few more steps than simply replacing the bulb, but it is still manageable for most homeowners.
Begin by disconnecting the power to the bathroom at the circuit breaker, as described earlier. Verify that the power is off using a non-contact voltage tester. Once the power is confirmed to be off, remove the existing light fixture. This usually involves removing a cover or lens, followed by unscrewing the fixture from the ceiling or wall.
Carefully disconnect the wires connecting the fixture to the electrical wiring in the ceiling or wall. These wires are typically connected using wire connectors, also known as wire nuts. Unscrew the wire connectors to detach the wires. It is important to note the color of each wire and its corresponding connection before disconnecting them. Typically, black wires are connected to black wires (hot), white wires are connected to white wires (neutral), and green or bare copper wires are connected to green or bare copper wires (ground). Taking a photograph of the wiring configuration before disconnecting the wires can be helpful for reassembly.
Install the new bathroom fan light fixture according to the manufacturer's instructions. This typically involves mounting the fixture to the ceiling or wall, connecting the wires using wire connectors, and then securing the cover or lens. The wiring connections should match the original configuration, with black connected to black, white to white, and green or bare copper to green or bare copper.
Ensure that all wire connections are secure and that no bare wire is exposed. Secure the wire connectors tightly to prevent them from coming loose. Once the fixture is installed and the wiring is complete, turn the circuit breaker back on and test the light and fan functions. If either the light or the fan does not work, double-check the wiring connections and the circuit breaker.
When selecting a new bathroom fan light fixture, consider the size of the bathroom and the ventilation requirements. A fixture with a higher CFM (cubic feet per minute) rating will provide better ventilation for larger bathrooms. Also, consider the lighting requirements. LED fixtures are more energy-efficient and have a longer lifespan than traditional incandescent or halogen fixtures.
In some cases, the existing wiring may not be compatible with the new fixture. If the wires are damaged or corroded, they should be replaced by a qualified electrician. Attempting to repair damaged wiring without proper knowledge and experience can be dangerous.
Troubleshooting Common Issues
After replacing the bathroom fan light, several things can go wrong. Correct diagnosis is crucial for addressing any issues. Some common problems and their potential solutions are outlined below.
If the light does not turn on after replacing the bulb, the bulb may be defective. Try installing a different bulb to rule out this possibility. Also, check the socket for any corrosion or damage. If the socket is corroded, it may need to be cleaned or replaced.
If the light turns on but is dim or flickers, the wiring may be loose or the voltage may be fluctuating. Check the wire connections at the fixture and at the circuit breaker panel. If the voltage is fluctuating, consult an electrician to diagnose and repair the problem.
If the fan does not turn on, the motor may be defective or the fan blades may be obstructed. Check the fan blades for any debris or obstructions. If the motor is defective, the entire fixture may need to be replaced.
If the circuit breaker trips after turning on the light or fan, there may be a short circuit in the wiring. Turn off the circuit breaker and carefully inspect the wiring for any damage or exposed wires. Repair or replace any damaged wiring before turning the circuit breaker back on. If the circuit breaker continues to trip, consult an electrician to diagnose and repair the problem.
If the new fixture makes excessive noise, the fan blades may be unbalanced or the motor may be vibrating. Check the fan blades for any damage or warping. If the motor is vibrating, try tightening the mounting screws that secure the fixture to the ceiling or wall.
If the bathroom fan light replacement appears too complex or daunting, it is always best to consult a qualified electrician. An electrician has the expertise and tools to safely and effectively handle any electrical work, ensuring that the job is done correctly and in compliance with local electrical codes. Hiring a professional can provide peace of mind and prevent potential safety hazards.

How To Remove The Light Cover On A Bathroom Fan

How To Change A Light Bulb In Bathroom Ventilation Exhaust Fan Step By Instructions

Changing Bulb In Exhaust Fan At Lake View Apartments

How To Replace The Ceiling Exhaust Fan And Light In Bathroom

Install A New Bathroom Vent Fan Light The San Fernando Valley Sun

Replace Light Cover Or Bulb Nutone Bathroom Vent

How To Replace A Bathroom Fan Light Doityourself Com

How To Change Light Bulb On Nutone Shower Fan

How To Change The Light Bulb In Your Nutone Bathroom Fan

How To Replace A Bathroom Light With Fan Combo
Related Posts