How to Clear a Pipe Under Bathroom Sink Drains
A clogged bathroom sink drain is a common household problem, often stemming from the accumulation of hair, soap scum, toothpaste, and other debris. While minor clogs might resolve themselves, persistent blockages necessitate intervention. Addressing the issue promptly prevents potential water damage and unsanitary conditions. This article outlines the essential steps involved in clearing a pipe under bathroom sink drains, providing a comprehensive guide for homeowners seeking a practical solution.
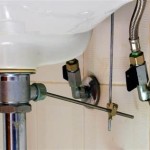
Before initiating any work, prioritize safety. Wear rubber gloves to protect hands from bacteria and chemicals. Place a bucket or container beneath the drainpipe (specifically, the P-trap) to catch any water and debris that may spill during the process. Adequate lighting is crucial for visibility. If natural light is insufficient, use a flashlight or work lamp to illuminate the area under the sink.
Furthermore, understanding the drain system's components is beneficial. The drainpipe typically consists of the tailpiece (the pipe directly below the sink), the P-trap (a U-shaped section designed to trap debris and prevent sewer gases from entering the house), and the drainpipe extension that connects to the wall drain. Identifying these parts will aid in effectively diagnosing and resolving the clog.
Key Point 1: Disassembling and Cleaning the P-Trap
The P-trap is the most likely location for a clog. Disassembling and cleaning it is often the first and most effective step in clearing a blocked drain. Begin by carefully loosening the slip nuts that connect the P-trap to the tailpiece and the drainpipe extension. These nuts are typically hand-tightened, but they may require gentle persuasion with pliers if they are stuck. Avoid excessive force, as this could damage the plastic or metal components.
Once the slip nuts are loosened, carefully detach the P-trap. Position a bucket underneath to collect any residual water and debris. It is advisable to have a second bucket or container readily available, as the initial bucket might overflow depending on the severity of the clog. Examine the detached P-trap visually. The presence of accumulated hair, soap scum, or other foreign objects confirms the location of the blockage.
Remove the debris manually. Using gloved hands or a bent wire hanger, carefully extract the accumulated material from the P-trap. Thoroughly rinse the P-trap with water to remove any remaining residue. A garden hose can be effective for this purpose. Ensure that all debris is completely removed before reassembling the P-trap.
Reassembly requires careful attention to detail. Align the P-trap with the tailpiece and drainpipe extension. Secure the slip nuts, tightening them by hand until snug. Avoid overtightening, as this could cause the nuts to crack or the pipes to deform, leading to leaks. After reassembly, run water into the sink to check for any leaks. If leaks are present, slightly tighten the slip nuts until the leaks cease. If leaks persist, the nuts or the P-trap itself might be damaged and require replacement.
Key Point 2: Using a Drain Snake or Auger
If disassembling and cleaning the P-trap does not resolve the clog, a drain snake or auger may be necessary. These tools are designed to reach further into the drainpipe and dislodge stubborn blockages. There are different types of drain snakes available, ranging from simple manual models to more sophisticated power augers. For most bathroom sink clogs, a manual drain snake is sufficient.
Insert the drain snake into the drain opening. Carefully feed the snake down the drainpipe, rotating the handle as you go. The rotating action helps the snake navigate bends in the pipe and break up or dislodge the clog. Apply gentle pressure to advance the snake past any obstructions. Avoid using excessive force, as this could damage the drainpipe.
When you encounter resistance, continue rotating the snake to break up the clog. You may feel the snake snag on the blockage. Continue rotating and applying gentle pressure until the snake passes through the clog. Once the snake has passed through the obstruction, slowly retract it from the drainpipe. As you retract the snake, any debris it has collected will come out with it. Dispose of the debris properly.
After removing the drain snake, flush the drainpipe with hot water. This will help to clear any remaining debris and ensure that the clog is completely removed. Run the water for several minutes to confirm that the drain is flowing freely. If the drain is still slow or clogged, repeat the process with the drain snake. Multiple attempts may be necessary to completely clear a stubborn blockage.
For recurring clogs, consider using a drain screen or strainer to prevent hair and other debris from entering the drainpipe. These devices are inexpensive and can significantly reduce the frequency of clogs.
Key Point 3: Chemical Drain Cleaners: Considerations and Alternatives
Chemical drain cleaners are widely available and are often marketed as a quick and easy solution for clogged drains. However, their use should be approached with caution. Chemical drain cleaners can be highly corrosive and can damage drainpipes, particularly older pipes made of plastic or metal. They also pose a significant risk of chemical burns if they come into contact with skin or eyes. Furthermore, the fumes emitted by some chemical drain cleaners can be harmful if inhaled.
While chemical drain cleaners can sometimes be effective in dissolving clogs, they are generally not recommended as a first course of action. Safer and more environmentally friendly alternatives are available. Before resorting to chemical drain cleaners, consider using a mixture of baking soda and vinegar. Pour one cup of baking soda down the drain, followed by one cup of vinegar. Let the mixture fizz for about 30 minutes, then flush the drain with hot water. This combination can often dissolve minor clogs without the harmful effects of chemical drain cleaners.
Another alternative is to use boiling water. Pour a pot of boiling water down the drain. The hot water can help to dissolve grease and soap scum, which are common causes of clogs. However, use caution when pouring boiling water down plastic pipes, as the heat can damage them. If you have plastic pipes, use hot tap water instead of boiling water. If the sink is porcelain, run warm water before pouring boiling water to minimize the risk of cracking. This method is best for clogs caused by grease or soap scum, and less effective for clogs caused by hair.
If chemical drain cleaners are used, follow the manufacturer's instructions carefully. Wear rubber gloves and eye protection to protect yourself from chemical burns. Ensure that the area is well-ventilated to avoid inhaling harmful fumes. Never mix different types of chemical drain cleaners, as this can create dangerous gases. If chemical drain cleaners fail to clear the clog, avoid using a plunger immediately afterward, as this can cause the chemicals to splash back up and potentially cause injury. Allow ample time for the chemicals to dissipate before attempting other methods.
It is important to note that persistently clogged drains may indicate a more serious problem within the plumbing system. If simple solutions such as cleaning the P-trap, using a drain snake, or employing natural drain cleaners do not resolve the issue, it may be necessary to consult a professional plumber. A plumber can diagnose the underlying cause of the clog and recommend appropriate solutions, such as drain cleaning or pipe repair.
Preventative measures are crucial for minimizing the occurrence of clogged drains. Regularly flush the drain with hot water to prevent the accumulation of grease and soap scum. Use a drain screen or strainer to catch hair and other debris. Avoid pouring grease or oil down the drain. These simple steps can significantly reduce the frequency of clogs and extend the lifespan of the plumbing system.
In summary, clearing a pipe under a bathroom sink drain often involves a systematic approach. Starting with the least invasive methods, such as disassembling and cleaning the P-trap, and progressing to more advanced techniques like using a drain snake, homeowners can often resolve minor clogs effectively. While chemical drain cleaners may offer a quick fix, their potential risks and environmental impact warrant careful consideration. Prioritizing safety, employing preventative measures, and seeking professional assistance when necessary will ultimately contribute to a well-maintained plumbing system and a trouble-free bathroom experience.

Diy Plumbing Blog How To Clean A Drain Trap

3 Ways To Clean A Bathroom Sink Drain Wikihow

How To Clear Blocked Pipes Heating Plumbing B Q

How To Unclog A Bathroom Sink Hana S Happy Home

How To Clear A Clogged Drain Reviews By Wirecutter

5 Ways To Clean A Drain Pipe Wikihow

5 Natural Ways To Unclog A Bathroom Sink Hiller How

Best Ways To Clean Your Bathroom Sink Drain Yourself

4 Ways To Seal A Sink Drain Pipe

Replace A Trap And Add Cleanout Fine Homebuilding
Related Posts


