How To Install A New Bathroom Faucet and Drain Hose
Replacing a bathroom faucet and drain hose can significantly improve the aesthetics and functionality of a bathroom. While it may seem daunting, installing a new faucet and drain hose is a manageable DIY project with the proper tools, preparation, and understanding of the steps involved. This article details the process, providing a comprehensive guide to ensure a successful installation.
Preparation and Safety Precautions
Before beginning the installation, meticulous preparation is essential. This includes gathering the necessary tools and materials, as well as taking appropriate safety precautions. Neglecting these initial steps can lead to complications and potential injuries.
Tools and Materials Required:
- New bathroom faucet and drain hose assembly
- Basin wrench
- Adjustable wrench
- Plumber's putty
- Thread sealant tape (Teflon tape)
- Channel-lock pliers
- Bucket or container
- Sponge or cloths
- Flashlight
- Safety glasses
- Gloves
Safety Precautions:
- Turn off the water supply: Locate the shut-off valves under the sink for both hot and cold water. Turn them clockwise until completely closed. If shut-off valves are not present or malfunctioning, locate the main water shut-off valve for the house and turn it off.
- Relieve water pressure: After turning off the water supply, turn on the existing faucet to relieve any remaining pressure in the pipes. Allow the water to drain completely.
- Protect the surrounding area: Place a cloth or towel under the sink to protect the cabinet and floor from spills during the removal and installation process.
- Wear safety glasses and gloves: Safety glasses protect the eyes from debris, and gloves protect the hands from sharp edges and potential contaminants.
With the necessary tools gathered and safety precautions observed, the removal of the old faucet and drain hose can commence. This step requires careful disconnection of the existing plumbing connections.
Removing the Old Faucet and Drain Hose
The removal process involves disconnecting the water supply lines, detaching the drain assembly, and finally, removing the old faucet. Each step requires careful attention to avoid damaging the surrounding plumbing.
Disconnecting the Water Supply Lines:
Place a bucket or container under the supply lines to catch any remaining water. Use an adjustable wrench to loosen the nuts connecting the water supply lines to the faucet tailpieces. Turn the nuts counterclockwise. If the nuts are corroded or difficult to loosen, penetrating oil can be applied. Carefully detach the supply lines from the faucet.
Detaching the Drain Assembly:
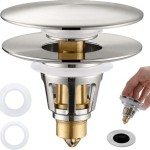
The drain assembly typically consists of a pop-up drain stopper, a drain flange, a tailpiece, and a P-trap. Begin by loosening the slip nut connecting the tailpiece to the P-trap. Use channel-lock pliers if necessary to gain a secure grip. Once the slip nut is loosened, detach the tailpiece from the P-trap. Next, loosen the nut connecting the pop-up drain linkage to the tailpiece. Detach the pop-up drain linkage. Finally, loosen the nut securing the drain flange to the sink and remove the old drain flange and stopper from the sink basin.
Removing the Old Faucet:
Access the underside of the sink and locate the mounting hardware securing the old faucet. This often consists of mounting nuts or clips. Use a basin wrench to loosen the mounting nuts. A basin wrench is specifically designed for reaching tight spaces under the sink. Once the mounting hardware is loosened, carefully remove the old faucet from the top of the sink. Clean the sink surface thoroughly to remove any old putty or debris. A putty knife or scraper can be used for this purpose.
With the old faucet and drain hose removed, the installation of the new components can begin. Ensuring a clean and properly prepared surface is crucial for a leak-free installation.
Installing the New Faucet and Drain Hose
The installation process involves setting the new faucet, connecting the water supply lines, installing the new drain assembly, and verifying the connections for leaks. Each step needs to be executed with precision to ensure optimal performance and prevent water damage.
Setting the New Faucet:
Apply a bead of plumber's putty around the base of the new faucet. This will create a watertight seal between the faucet and the sink. Carefully insert the faucet into the faucet holes in the sink. From underneath the sink, secure the faucet with the mounting hardware provided by the manufacturer. Tighten the mounting nuts or clips using a basin wrench, ensuring the faucet is firmly in place and does not wobble.
Connecting the Water Supply Lines:
Inspect the new faucet tailpieces and ensure they are clean and undamaged. Wrap the threads of the tailpieces with thread sealant tape (Teflon tape) to create a watertight seal. Connect the water supply lines to the faucet tailpieces. Tighten the nuts using an adjustable wrench, ensuring they are snug but not overtightened, which can damage the threads. If new supply lines are needed, ensure they are the correct length and type compatible with the faucet and the existing plumbing.
Installing the New Drain Assembly:
Apply a bead of plumber's putty around the underside of the new drain flange. Insert the drain flange into the drain opening in the sink. From underneath the sink, attach the drain tailpiece to the drain flange. Tighten the nut securely. Connect the pop-up drain linkage to the tailpiece, following the manufacturer's instructions. Ensure the pop-up drain stopper operates smoothly. Attach the P-trap to the tailpiece, tightening the slip nuts securely. Ensure all connections are aligned properly to prevent leaks.
Verifying Connections and Checking for Leaks:
After completing the installation, slowly turn on the water supply valves under the sink. Check all connections for leaks, including the faucet base, water supply line connections, drain flange, tailpiece connections, and P-trap connections. If leaks are detected, tighten the connections further with the appropriate wrench. If leaks persist, disassemble the connection and reapply plumber's putty or thread sealant tape. Once all leaks are resolved, run the water for several minutes to flush out any debris from the pipes. Check the drain for proper drainage and ensure the pop-up drain stopper operates correctly.
A successful faucet and drain hose installation relies on careful execution of each step, paying close attention to detail and ensuring all connections are properly sealed. With the installation complete and verified for leaks, the new bathroom faucet and drain are ready for use.

Step By Tutorial How To Install A New Bathroom Sink Faucet Maggie Mcgaugh

How To Replace A Bathroom Faucet Removal And Installation

How To Replace A Bathroom Faucet Removal And Installation

How To Replace A Bathroom Faucet Removal And Installation

Replacing A Bathroom Faucet Fine Homebuilding

How To Install A Vessel Sink Faucet

How To Replace A Bathroom Faucet Home Repair Tutor

How To Remove And Install A Bathroom Faucet

Bathroom Sink Plumbing Installation Diy Montreal

How To Connect A Bathroom Sink Drain
Related Posts


