How To Lay Linoleum Flooring In Bathroom
Linoleum flooring is a durable, water-resistant option that is often chosen for bathrooms. It offers a classic look and is relatively easy to install, making it a popular DIY project. However, proper preparation and installation techniques are crucial for achieving a professional and long-lasting finish. This article will guide you through the steps of laying linoleum flooring in a bathroom.
Step 1: Prepare The Subfloor
The success of your linoleum flooring installation hinges on a solid and level subfloor. If the subfloor is uneven, it can lead to cracks and unevenness in the linoleum. Here's how to prepare your subfloor:
- Remove Existing Flooring: If you're replacing existing flooring, remove it completely. This includes removing staples, nails, and any adhesive residue.
- Clean and Inspect: Thoroughly clean the subfloor to remove dirt, debris, and any remaining adhesive. Inspect for any damaged or warped sections.
- Repair Damage: Repair any damaged sections of the subfloor using plywood or other appropriate materials. Make sure any repairs are flush with the surrounding subfloor.
- Leveling: If the subfloor is uneven, you may need to level it using a self-leveling compound or a concrete patching compound. Follow the manufacturer's instructions for these products.
- Moisture Barrier: Install a moisture barrier over the subfloor, especially if it's concrete. This will prevent moisture from migrating up and damaging the linoleum.
Step 2: Acclimate the Linoleum
Linoleum flooring is susceptible to temperature and humidity changes. It's crucial to acclimate the linoleum to the room's environment before installation. This allows the material to expand or contract to match the room's conditions, preventing warping or buckling after installation:
- Unroll and Lay: Unroll the linoleum rolls in the room where they will be installed. Leave them flat for at least 24 hours, preferably 48 hours. This gives the linoleum time to adjust to the room's temperature and humidity.
Step 3: Measure and Cut the Linoleum
Once the subfloor is prepared and the linoleum acclimated, it's time to measure and cut the linoleum pieces. This requires careful planning and accurate measurements.
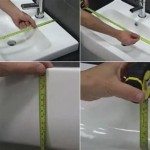
- Measure the Room: Measure the length and width of the bathroom, taking into account any existing fixtures or obstructions.
- Layout Plan: Create a layout plan to determine the best placement of the linoleum sheets. Consider the grain direction and pattern to achieve a visually pleasing effect.
- Cut the Sheets: Use a sharp utility knife or a linoleum cutter to cut the linoleum sheets according to your layout plan. Make sure to cut the linoleum on a flat surface and use a straight edge for precise cuts.
- Test Fit: Before applying adhesive, test fit the linoleum pieces to ensure they fit perfectly. Make any necessary adjustments as needed.
Step 4: Apply Adhesive
The type of adhesive required depends on the type of linoleum and the subfloor. Consult the linoleum manufacturer's instructions for the recommended adhesive. Apply the adhesive evenly to the subfloor, ensuring it covers the entire surface.
- Spread the Adhesive: Use a notched trowel to spread the adhesive evenly across the subfloor. The size of the notches on the trowel will vary depending on the type of adhesive and the thickness of the linoleum.
Step 5: Install the Linoleum
After applying the adhesive, carefully install the linoleum sheets, starting from the farthest corner of the room.
- Position the First Sheet: Align the first sheet of linoleum with the layout plan and press it firmly into the adhesive. Use a roller or a heavy object to ensure even contact between the linoleum and the adhesive.
- Install Subsequent Sheets: Install subsequent sheets of linoleum, aligning the edges with the previous sheet. Make sure the seams are tight and even. Use a roller or a heavy object to press down on each sheet as you install it.
- Trim Edges: Once all the sheets are in place, trim any excess linoleum along the edges of the room using a sharp utility knife.
Step 6: Install Transition Strips
If you are transitioning between different flooring types, install transition strips to provide a smooth and seamless transition. These strips are available in various materials and styles to match your flooring.
- Measure and Cut: Measure the length of the transition strip and cut it to the desired size.
- Attach the Strip: Use adhesive or screws to attach the transition strip to the subfloor. Ensure the strip is securely attached to both flooring types.
Step 7: Seal the Linoleum
The final step is to seal the linoleum to protect it from stains, spills, and wear and tear. This helps to maintain the flooring's appearance and longevity.
- Clean the Floor: Before applying sealant, clean the linoleum floor thoroughly to remove any dirt, debris, or adhesive residue.
- Apply the Sealant: Apply the sealant evenly to the linoleum floor using a roller or mop. Allow the sealant to dry completely before applying a second coat, if necessary.

How To Lay Vinyl Floor In A Bathroom Dove Cottage

How To Lay Vinyl Floor In A Bathroom Dove Cottage

How To Install Sheet Vinyl Floor Decor Adventures

Diy How To Lay Vinyl Or Lino Flooring

How To Lay Sheet Vinyl Flooring

Bathroom Flooring Linoleum To Luxury Sheet Vinyl Dear Shari

How To Install Vinyl Sheet Flooring A Erfly House

How To Install Vinyl Sheet Flooring A Erfly House

How To Install Sheet Vinyl Floor Decor Adventures

How To Install Sheet Vinyl Around A Toilet
Related Posts