How to Redo an Old Tile Bathroom
Remodeling an older bathroom can be a significant undertaking, but it offers the opportunity to update the space, improve functionality, and increase the overall value of a property. One of the most prominent features in many older bathrooms is the tile, and its condition and style can significantly impact the room's appearance. Redoing old tile requires careful planning, execution, and adherence to best practices to ensure a successful and long-lasting result. This article provides a guide to the process, covering key considerations and practical steps involved in updating an old tile bathroom.
Assessing the Existing Tile and Substrate
The first step in redoing an old tile bathroom is a thorough assessment of the existing tile and its underlying substrate. This evaluation will determine the scope of the project, the materials needed, and the potential challenges that may arise. The assessment should cover several key areas:
Tile Condition: Inspect each tile for cracks, chips, stains, and loose grout. Document the extent of the damage to determine whether a simple repair is sufficient or a full replacement is necessary. Consider the age and material of the tile, as older tiles may be more difficult to match if only partial replacement is desired. Pay attention to whether the existing tile contains asbestos. If there's cause to suspect asbestos materials, professional abatement is required.
Grout Condition: Evaluate the condition of the grout. Look for crumbling, discoloration, or signs of mildew and mold growth. Grout that is significantly damaged or deteriorated will need to be addressed, whether through cleaning, repair, or complete removal and replacement.
Substrate Condition: The substrate, which is the material beneath the tile, is crucial for the tile's stability and longevity. Check for signs of water damage, such as discoloration, swelling, or softness. Tap on the tile surface to listen for hollow sounds, which can indicate that the tile has lost adhesion to the substrate. Common substrate materials include cement board, plywood, and plaster. Ensure the substrate is level, structurally sound, and free from any moisture issues.
Water Damage Assessment: Water damage is a common problem in older bathrooms, often stemming from leaky fixtures, inadequate ventilation, or failed waterproofing. Carefully inspect areas around the shower, tub, toilet, and sink for signs of water damage. Address any underlying plumbing issues or structural damage before proceeding with the tile work. Ignoring water damage can lead to significant problems down the road, including mold growth, structural decay, and costly repairs.
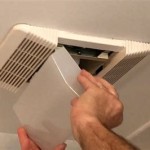
Ventilation: Assess the bathroom's ventilation system. Inadequate ventilation can contribute to moisture buildup, which can damage the tile, grout, and substrate. Ensure the bathroom has a working exhaust fan that is properly sized for the space. Consider upgrading the ventilation system if necessary.
Once the assessment is complete, a detailed plan should be developed outlining the scope of the project, the materials needed, and the steps involved. This plan should also include a budget and a timeline for completion.
Preparing for Tile Removal or Refinishing
Depending on the assessment, the next steps may involve either removing the existing tile for replacement or refinishing the existing tile. Each approach requires specific preparation to ensure a successful outcome.
Preparation for Tile Removal:
Safety Precautions: Wear appropriate safety gear, including safety glasses, a dust mask, and gloves. Tile removal can generate a significant amount of dust and debris, and some tiles may contain hazardous materials.
Protecting Surrounding Areas: Cover the surrounding areas, such as the tub, toilet, and vanity, with plastic sheeting to protect them from dust and debris. Use painter's tape to secure the sheeting and prevent it from shifting during the removal process.
Removing Fixtures: Remove any fixtures that may interfere with the tile removal process, such as toilet, vanity, or medicine cabinet. Shut off the water supply to the toilet and sink before disconnecting them.
Softening the Grout: Soften the grout with a grout removal tool or a grout removal solvent. This will make it easier to remove the tile without damaging the substrate. Allow the solvent to sit for the recommended amount of time before proceeding.
Preparation for Tile Refinishing:
Cleaning the Tile: Thoroughly clean the existing tile with a strong degreaser and a scrub brush. Remove any dirt, grease, soap scum, and mildew. Rinse the tile with clean water and allow it to dry completely.
Repairing Damaged Areas: Repair any chips, cracks, or other damage to the tile surface. Use a tile repair kit or epoxy filler to fill in the damaged areas. Allow the repair material to dry completely and then sand it smooth.
Etching the Tile: Etch the tile surface with an etching solution to create a rough surface that the refinishing coating can adhere to. Follow the manufacturer's instructions for applying the etching solution and rinsing it off.
Masking Off Areas: Mask off any areas that you do not want to be refinished, such as the grout lines, surrounding walls, and fixtures. Use painter's tape and plastic sheeting to create a clean and precise edge.
Installing New Tile or Refinishing Existing Tile
Once the preparation is complete, the installation of new tile or refinishing process can begin. Each approach requires specific techniques and materials to achieve the desired results.
Installing New Tile:
Preparing the Substrate: Ensure the substrate is clean, level, and free of any debris. Apply a layer of thin-set mortar to the substrate using a notched trowel. The size of the notches on the trowel will depend on the size and type of tile being installed.
Laying the Tile: Carefully lay the tile onto the mortar, pressing it firmly into place. Use tile spacers to maintain consistent grout lines between the tiles. Use a level to ensure the tile is flat and even.
Cutting the Tile: Cut the tile to fit around corners, pipes, and other obstacles. Use a tile cutter or a wet saw to make precise cuts. Wear safety glasses when cutting tile.
Grouting the Tile: Allow the mortar to dry completely before grouting the tile. Remove the tile spacers and apply grout to the grout lines using a grout float. Work the grout into the grout lines and then wipe off the excess grout with a damp sponge.
Sealing the Grout: Allow the grout to cure completely before sealing it. Apply a grout sealer to the grout lines to protect them from moisture and stains. Reapply the sealer every year or two to maintain its effectiveness.
Refinishing Existing Tile:
Applying the Primer: Apply a primer to the prepared tile surface. The primer will help the refinishing coating adhere to the tile and provide a smooth, even finish. Allow the primer to dry completely.
Applying the Refinishing Coating: Apply the refinishing coating to the primed tile surface using a sprayer or a roller. Apply several thin coats of coating, allowing each coat to dry completely before applying the next. Follow the manufacturer's instructions for applying the coating.
Curing the Coating: Allow the refinishing coating to cure completely before using the bathroom. The curing time will vary depending on the type of coating used. Follow the manufacturer's instructions for curing the coating.
Applying a Topcoat: Apply a topcoat to the refinished tile surface to protect it from scratches and stains. The topcoat will also make the tile easier to clean. Follow the manufacturer's instructions for applying the topcoat.
Ultimately, redoing an old tile bathroom involves a series of steps requiring attention to detail. From the initial assessment of the existing tile and substrate to the final installation or refinishing, each stage contributes to the overall success of the project. Whether opting for tile replacement or refinishing, adherence to safety precautions and manufacturer guidelines is crucial for achieving a durable and aesthetically pleasing result.

8 Ways To Update Your Vintage Tile Bathroom Building Bluebird

Laura S Green B W Tile Bathroom Remodel In Progress Retro Renovation

How To Update A Vintage Bathroom When The Tile Is Pristine Annie Elliott Design

How To Decorate A Bathroom 9 New Ideas Bob Vila

Stencil And Save Upcycling Old Bathroom Tiles With Stencils Tile Diy Remodel

How To Decorate A Bathroom 9 New Ideas Bob Vila

How To Upgrade Bathroom Tile Without Replacing

8 Ways To Spruce Up An Older Bathroom Without Remodeling

How To Update Your 1950s Bathroom 2024 Thistlewood Farm

Make An Old Bath Fresh And Fun
Related Posts