How to Remodel a Small Half Bathroom Vanity
Remodeling a small half bathroom vanity can significantly improve the room's functionality and aesthetics, even within a limited space. The process involves careful planning, selection of appropriate materials, and precise execution. This guide offers a detailed overview of the key steps involved in remodeling a small half bathroom vanity, ensuring a successful and satisfying outcome.
Planning and Preparation
Before initiating any demolition or construction, a thorough planning phase is crucial. This stage involves assessing the existing space, defining the desired outcome, selecting the new vanity and associated fixtures, and preparing the work area. A well-defined plan minimizes unexpected issues and ensures a smoother remodeling process.
The initial step is to measure the existing space precisely. Record the length, width, and height dimensions of the area where the vanity will be installed. Note the location of plumbing lines and electrical outlets. These measurements are critical when selecting the new vanity, ensuring it fits properly and accommodates existing utilities. Consider photographing the existing vanity and plumbing setup for reference during reinstallation.
Next, define the desired outcome of the remodeling project. Consider the style of the new vanity, the type of countertop material, and the desired finish for the hardware. Research different vanity styles, such as pedestal sinks, wall-mounted vanities, or cabinet-style vanities, to determine which best suits the space and personal preferences. Browse online retailers, home improvement stores, and design magazines for inspiration.
Selection of the new vanity is a critical decision. Choose a vanity that is appropriately sized for the available space and meets the desired aesthetic. Consider the storage needs when selecting a vanity. Opt for vanities with drawers and shelves to maximize storage space in a small bathroom. When choosing a countertop, consider materials like granite, quartz, marble, or laminate. These materials offer varying degrees of durability, maintenance requirements, and aesthetic appeal. Select a faucet and sink that complement the vanity’s style and function. Consider the faucet's finish and flow rate, as these factors can impact the overall look and water usage.
Before starting the demolition, gather all necessary tools and materials. Essential tools include a wrench, screwdriver, pliers, a level, a measuring tape, a drill, a stud finder, and safety glasses. Materials will include the new vanity, countertop, sink, faucet, plumbing connections, caulk, and any necessary shims or supports. Ensure that all materials are on hand before commencing the project to avoid delays.
Prepare the work area by protecting surrounding surfaces. Cover the floor with a drop cloth to prevent damage from debris. Turn off the water supply to the bathroom and disconnect any electrical circuits that may be affected by the remodeling. Remove any items from the bathroom that may be damaged or interfere with the work area.
Demolition and Removal of the Old Vanity
The demolition phase involves removing the existing vanity, disconnecting plumbing lines, and preparing the space for the new vanity. This step requires careful attention to detail to avoid damaging existing plumbing or electrical systems. Safety precautions are paramount during this process.
Begin by disconnecting the water supply lines to the existing faucet. Locate the shut-off valves under the sink and turn them clockwise to close. If the valves are old or corroded, it may be necessary to shut off the main water supply to the house. Use a wrench to disconnect the supply lines from the faucet. Have a bucket and towels ready to catch any residual water in the lines.
Next, disconnect the drainpipe from the sink. Loosen the slip nuts that connect the drainpipe to the sink and the P-trap. Carefully remove the drainpipe, being mindful of any standing water in the P-trap. Place the drainpipe in a bucket to prevent leaks.
Once the plumbing is disconnected, detach the old vanity from the wall. Use a screwdriver or drill to remove any screws or nails that secure the vanity to the studs. If the vanity is caulked to the wall, use a utility knife to score along the caulk lines before attempting to remove it. Carefully lift the vanity away from the wall and remove it from the bathroom. Dispose of the old vanity responsibly.
Inspect the wall behind the old vanity for any damage, such as mold, water stains, or cracks. Repair any damage before installing the new vanity. Clean the wall surface thoroughly to remove any dust, dirt, or debris. This ensures proper adhesion for caulk or adhesive during the installation of the new vanity.
Check the plumbing lines and ensure they are in good condition. Replace any corroded or damaged pipes before installing the new vanity. Consider installing new shut-off valves for the water supply lines to ensure reliable operation in the future. Mark the locations of the studs on the wall using a stud finder. This will be necessary for securely attaching the new vanity to the wall.
Installation of the New Vanity
The installation phase involves mounting the new vanity, connecting plumbing lines, installing the countertop, sink, and faucet, and ensuring proper alignment and functionality. Precision and attention to detail are crucial during this stage to ensure a professional-looking and functional result.
Position the new vanity in its designated location. Use a level to ensure that the vanity is perfectly level. If necessary, use shims under the vanity to correct any unevenness. Secure the vanity to the wall studs using screws. Ensure that the screws are long enough to penetrate the studs securely. This provides a stable and secure mount for the vanity.
Install the countertop onto the vanity. If the countertop comes pre-attached, simply ensure that it is properly aligned with the vanity. If the countertop is separate, apply a bead of adhesive to the top of the vanity before placing the countertop. Secure the countertop to the vanity using screws from underneath, if necessary. Clean any excess adhesive from the countertop’s surface.
Install the sink into the countertop. Follow the manufacturer’s instructions for installing the sink. Typically, this involves applying a bead of silicone caulk around the rim of the sink opening and then placing the sink into the opening. Secure the sink to the countertop using clips or brackets, if provided. Allow the caulk to cure completely before using the sink.
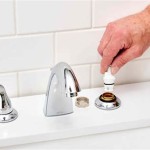
Install the faucet into the sink. Connect the water supply lines to the faucet. Ensure that the connections are tight and leak-free. Connect the drainpipe to the sink’s drain assembly. Tighten the slip nuts securely. Test the faucet and drain for leaks. Check the hot and cold water flow to ensure proper operation.
Apply a bead of caulk along the seams where the vanity meets the wall and the countertop meets the backsplash. This seals the seams and prevents water from seeping behind the vanity. Smooth the caulk lines with a wet finger for a clean and professional finish. Clean up any excess caulk from the surrounding surfaces. Ensure all connections are secure and leak-free. Double-check all plumbing connections for leaks. Turn on the water supply slowly and check for any signs of leaks. Tighten any connections as needed. Inspect the faucet and drain for proper operation. Ensure that the faucet flows properly and the drain drains quickly without any clogs.
Once the installation is complete, clean the entire area thoroughly. Remove any debris, dust, or fingerprints from the vanity, countertop, sink, and faucet. Polish the surfaces with a clean cloth to enhance their appearance. Ensure that all tools and materials are stored away properly.

Half Bath A Small Bathroom Remodel On Budget

30 Half Bathroom And Powder Room Ideas You Ll Want To Steal

Half Bath Remodel Bathroom Decor Small Bathrooms

Half Bathroom Decor Ideas For Small Spaces

Half Bath A Small Bathroom Remodel On Budget

Half Bath Remodel Reveal The Handyman S Daughter
:strip_icc()/DESIGNMINDYGAYERDESIGNPHOTOVANESSALENTINE-a131c894143a4dafa200256bd96f256f.jpg?strip=all "20 Fresh Powder Room Makeover Ideas")
20 Fresh Powder Room Makeover Ideas

12 Half Bath Remodel Ideas For Any Budget Pods Blog

Our Affordable Half Bath Revamp More By Meach 2024 In Bathroom Decor Small Remodel

Half Bath Remodel Reveal The Handyman S Daughter
Related Posts