How to Remodel a Bathroom Sink Cabinet
Remodeling a bathroom sink cabinet is a common home improvement project that can significantly enhance the aesthetic appeal and functionality of a bathroom. It's a task that can range from a simple cosmetic upgrade to a complete replacement, depending on the desired outcome and the condition of the existing cabinet. This article provides a comprehensive guide on how to remodel a bathroom sink cabinet, covering essential planning steps, necessary tools and materials, detailed execution, and troubleshooting tips.
Before embarking on the project, a thorough assessment of the existing cabinet and the overall bathroom space is crucial. This assessment will determine the scope of the remodeling project, the budget required, and the potential challenges that might be encountered. Consider the current style of the bathroom, the available space, and the desired functionality of the new cabinet. The goal is to create a functional and visually appealing space that aligns with the overall design of the bathroom.
Planning is arguably the most critical phase of any remodeling project. This includes determining the style and type of cabinet, selecting the materials, and creating a detailed budget. A well-defined plan helps ensure that the project stays on track and within budget, minimizing unexpected expenses and delays.
Planning and Preparation
The first step in planning is to decide on the type of sink cabinet that will best suit the bathroom. There are several options available, including vanity cabinets, pedestal sinks with added storage, and floating vanities.
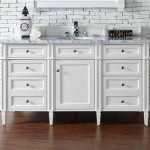
Vanity cabinets are the most common type, offering ample storage space beneath the sink. They come in various styles, sizes, and materials, allowing for considerable customization. Consider whether a single or double vanity is needed based on space and usage requirements. The style of the vanity should complement the overall aesthetic of the bathroom, whether it be modern, traditional, or contemporary.
Pedestal sinks with added storage are a good option for smaller bathrooms where space is limited. These sinks typically have a small footprint but can be paired with wall-mounted cabinets or shelves to provide additional storage. This combination offers a minimalist look while still providing essential storage solutions.
Floating vanities are a modern option that creates a sense of spaciousness. They are mounted to the wall, leaving the floor underneath open, which makes cleaning easier and can make a small bathroom feel larger. These vanities often have a sleek, minimalist design and can be customized with various finishes and hardware.
Material selection is another crucial aspect of planning. Common materials for bathroom sink cabinets include wood, MDF (Medium-Density Fiberboard), plywood, and laminate. Each material has its own advantages and disadvantages in terms of cost, durability, and aesthetic appeal.
Wood is a classic choice, offering a natural look and durability. However, wood is susceptible to moisture damage, so it's important to choose a water-resistant wood or apply a protective sealant. Common wood types for bathroom cabinets include oak, maple, and cherry.
MDF is a cost-effective option that is less expensive than wood. It is a composite material made from wood fibers and resin, which makes it relatively resistant to warping and cracking. However, MDF is more prone to water damage than wood and should be properly sealed.
Plywood is another durable option that is more water-resistant than MDF. It is made from layers of wood veneer glued together, which makes it strong and stable. Plywood is a good choice for cabinets that will be exposed to moisture.
Laminate is a synthetic material that is applied to a substrate, such as MDF or plywood. It is available in a wide range of colors and patterns and is relatively inexpensive. Laminate is water-resistant and easy to clean, making it a practical choice for bathroom cabinets.
Creating a detailed budget is essential for managing the cost of the remodeling project. The budget should include the cost of the cabinet, sink, faucet, hardware, paint or stain, and any necessary tools or materials. It's also important to factor in potential unexpected expenses, such as plumbing repairs or structural issues. Obtain quotes from different suppliers and contractors to ensure that the budget is realistic and accurate.
Once the planning phase is complete, gather all the necessary tools and materials. Having everything on hand before starting the project will save time and minimize disruptions.
Tools and Materials
The tools and materials required for remodeling a bathroom sink cabinet will vary depending on the scope of the project. For a simple cosmetic upgrade, the list may be shorter than for a complete cabinet replacement. Here's a comprehensive list of commonly needed items:
Basic Tools:
- Screwdrivers (Phillips and flathead)
- Wrench set
- Pliers
- Tape measure
- Level
- Pencil
- Safety glasses
- Gloves
- Dust mask
Demolition Tools (if necessary):
- Utility knife
- Hammer
- Pry bar
- Stud finder
Installation Tools:
- Drill with drill bits
- Caulk gun
- Putty knife
- Sander
- Paintbrushes or rollers
Materials:
- New sink cabinet
- Sink
- Faucet
- Drain assembly
- Supply lines
- P-trap
- Caulk
- Wood filler (if necessary)
- Paint or stain
- Primer (if painting)
- Sandpaper
- Screws
- Shims
- Towel bar and cabinet hardware (optional)
Before beginning any demolition work, it is crucial to turn off the water supply to the sink. Locate the shut-off valves under the sink and turn them clockwise until they are completely closed. If there are no shut-off valves, turn off the main water supply to the house. Once the water is turned off, disconnect the supply lines from the faucet.
Next, disconnect the drain assembly. Place a bucket under the P-trap to catch any remaining water. Loosen the slip nuts that connect the P-trap to the drainpipe and the tailpiece of the sink. Carefully remove the P-trap and the tailpiece.
If the old cabinet is being removed, use a utility knife to cut through any caulk that is sealing the cabinet to the wall or floor. Use a screwdriver or drill to remove any screws that are holding the cabinet in place. Carefully pry the cabinet away from the wall, using a pry bar if necessary. Be careful not to damage the wall during the removal process.
Once the old cabinet is removed, inspect the area for any damage or issues that need to be addressed. Repair any damaged drywall and clean the area thoroughly. This is also a good time to address any plumbing issues, such as leaky pipes or corroded fittings.
Installation and Finishing
The installation process will vary depending on the type of sink cabinet being installed. However, there are some general steps that apply to most installations. Begin by unpacking the new sink cabinet and inspecting it for any damage. Read the manufacturer's instructions carefully before proceeding.
Position the new cabinet in the desired location and use shims to level it. Use a level to ensure that the cabinet is perfectly level in both directions. Once the cabinet is level, secure it to the wall using screws. Use a stud finder to locate the wall studs and drive the screws into the studs for maximum stability.
Install the sink into the cabinet according to the manufacturer's instructions. Apply a bead of caulk around the rim of the sink to create a watertight seal. Connect the drain assembly to the sink and tighten the connections securely. Connect the supply lines to the faucet and tighten the connections securely. Ensure that all connections are watertight to prevent leaks.
After installation, inspect the cabinet for any imperfections or areas that need to be touched up. Fill any holes or cracks with wood filler and sand them smooth. Apply primer to the cabinet if it is being painted. Apply the desired paint or stain to the cabinet, following the manufacturer's instructions. Allow the paint or stain to dry completely before applying a second coat, if necessary.
Install any desired hardware, such as towel bars, cabinet knobs, or pulls. These hardware items can add a decorative touch and enhance the functionality of the cabinet. Once all the finishing touches are complete, clean the area thoroughly and inspect the installation to ensure that everything is functioning properly.
Connecting the plumbing is a crucial step in the installation process. Ensure that all connections are tight and leak-free. Turn on the water supply slowly and check for any leaks. Tighten any connections that are leaking. If necessary, use Teflon tape to seal the threads of the connections.
Once the plumbing is connected, test the sink to ensure that it is draining properly. Run water into the sink and check for any leaks or clogs. If the sink is draining slowly, check the P-trap for obstructions. Remove any debris that is clogging the drain. If the problem persists, consult a plumber.
Several potential problems can arise during a bathroom sink cabinet remodeling project. One common issue is difficulty removing the old cabinet. This can be due to stubborn caulk, rusted screws, or structural issues. Use a utility knife to carefully cut through the caulk. Use a penetrating oil to loosen rusted screws. If necessary, use a pry bar to carefully pry the cabinet away from the wall.
Another common problem is plumbing leaks. Ensure that all connections are tight and leak-free. Use Teflon tape to seal the threads of the connections. If a leak persists, consult a plumber.
If the cabinet is not level, use shims to level it. Place the shims under the cabinet until it is perfectly level. Secure the shims in place with screws or adhesive.
If the new cabinet does not fit properly, it may be necessary to make adjustments to the surrounding walls or floor. This may involve cutting or patching drywall, or leveling the floor. If the project is beyond comfort level, consult a professional contractor.

Leanne Wright Diva Of Diy Small Bathroom Remodel Makeover Bathrooms

Diy Master Bath Remodel Part 2 Modern Double Bathroom Vanity Pneumatic Addict

How To Remodel A Bathroom Paint Vanity

Diy Easy Bathroom Makeover Transformation Faux Marble Framed Mirror No Paint The Ann

Bathroom Vanity Ideas For Remodeling Lowe S

Bathroom Vanity Styles To Fit Your Space Forbes Home

The Ingredients To A Contemporary Bathroom Vanity Style Kauffman Blog

Paint Bathroom Vanity Countertop Sink So Easy A Piece Of Rainbow

Diy Double Bathroom Vanity Addicted 2

Tips For Guest Bathroom Remodel To Please Guests Increase Home Value
Related Posts
