How to Remove a 3-Hole Bathroom Faucet
Replacing a 3-hole bathroom faucet is a common home improvement project that can be tackled by most homeowners with basic plumbing skills. This guide provides a step-by-step process for removing a 3-hole bathroom faucet safely and efficiently, equipping you with the knowledge to confidently tackle this task.
1. Gather Your Materials
Before you begin, ensure you have the following materials and tools readily available:
- Adjustable wrench
- Channel-lock pliers
- Phillips head screwdriver
- Flathead screwdriver
- Basin wrench
- Plumber's tape
- Bucket
- Towels
- Safety glasses
- Gloves
Having all the necessary tools at hand will streamline the process and prevent any unexpected delays.
2. Turn Off the Water Supply
The first step is to shut off the water supply to the faucet. Locate the shut-off valves for the hot and cold water lines supplying the faucet. Typically, these valves are positioned beneath the sink or on the wall behind the faucet. Turn both valves clockwise until they are completely closed.
To ensure the water is completely turned off, open the faucet handles and let any remaining water drain out. This is crucial for preventing water damage during the removal process.
3. Disconnect the Drain Lines
With the water supply shut off, proceed to disconnect the drain lines connected to the faucet. These lines typically consist of a pop-up drain assembly or a stopper.
To disconnect the pop-up drain assembly, locate the lift rod connected to the pop-up drain. The lift rod may be attached to the faucet or the drain. Use a flathead screwdriver to unscrew the lift rod from its attachment point. Once disconnected, remove the pop-up drain assembly from the drain hole.
For a stopper-type drain, simply pull the stopper from the drain hole.
4. Remove the Faucet Handles
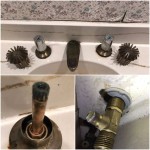
Next, remove the faucet handles. Most 3-hole bathroom faucets have two handles, one for hot water and one for cold water. To remove the handles, locate the small set screws located beneath or on the side of each handle. Use a Phillips head screwdriver to loosen and remove the set screws. Once the set screws are removed, gently pull off the handles.
5. Remove the Escutcheons
The escutcheons are the decorative plates that cover the faucet's mounting holes on the sink. To remove the escutcheons, use a flathead screwdriver to pry them off gently. Be cautious not to scratch the sink finish.
6. Disconnect the Supply Lines
Now, disconnect the supply lines that connect the faucet to the hot and cold water valves. These supply lines are typically made of braided stainless steel or flexible plastic.
Locate the union nuts that connect the supply lines to the faucet. Use an adjustable wrench to hold the faucet body and another adjustable wrench to loosen and remove the union nuts. It may be necessary to use channel-lock pliers if the nuts are stubborn.
7. Remove the Faucet Body
With the supply lines disconnected, the faucet body can now be removed.
If the faucet has a mounting nut on the underside of the sink, use a basin wrench to loosen and remove the nut. If the faucet is mounted from above, simply lift the faucet straight up.
Take care not to damage the sink or surrounding area during this step. Use a towel or cloth to protect the sink.

How To Replace 3 Hole Bathroom Sink Faucet

How To Remove And Install A Bathroom Faucet

How To Install A Widespread Faucet The Home Depot

How To Remove And Install A Bathroom Faucet

How Do You Change A 3 Hole Faucet To 1 At Home With Ashley

How To Remove And Install A Bathroom Faucet

How Do You Change A 3 Hole Faucet To 1 At Home With Ashley

How To Replace A Bathroom Faucet Removal And Installation

How To Replace A Bathroom Faucet Home Repair Tutor

How Do You Change A 3 Hole Faucet To 1 At Home With Ashley
Related Posts


