How To Remove a Bathroom Sink Cartridge
Removing a bathroom sink cartridge is a common plumbing task often required when a faucet begins to leak or experiences restricted water flow. The cartridge, a critical component within the faucet, regulates the mixing and flow of hot and cold water. Over time, mineral deposits and wear can cause the cartridge to malfunction, necessitating its removal for cleaning, repair, or replacement. This article provides a detailed guide on how to safely and effectively remove a bathroom sink cartridge, covering necessary tools, a step-by-step process, and troubleshooting tips.
Before initiating any plumbing repair, it is paramount to prioritize safety. The first step involves shutting off the water supply to the faucet. This is typically achieved by locating the shut-off valves underneath the sink. These valves, one for hot water and one for cold water, are designed to halt the flow of water to the faucet. Turn each valve clockwise until it is completely closed. It is advisable to test the faucet after closing the valves to confirm that the water supply has been successfully cut off. If the water continues to flow, the main water supply to the house may need to be shut off, which is generally located near the water meter or where the water line enters the property.
After shutting off the water supply, the next step is to relieve any residual water pressure in the lines. Place a bucket or towel under the faucet to catch any remaining water. Open the faucet handles to allow any trapped water to drain out. This step minimizes the risk of water spillage during the cartridge removal process.
Identifying the Faucet Type and Cartridge
Bathroom faucets come in various designs, each utilizing a specific type of cartridge. The most common types include compression cartridges, ball cartridges, ceramic disc cartridges, and single-lever cartridges. Identifying the type of faucet is crucial because the removal process varies depending on the design. Compression faucets typically have separate hot and cold water handles and use rubber washers and valve seats to control water flow. Ball faucets feature a single handle and a ball-shaped component with slots and seals. Ceramic disc faucets also employ a single handle, but use ceramic discs to regulate water flow. Single-lever faucets, as the name suggests, have a single lever that controls both water flow and temperature.
The manufacturer's instructions or a model number can provide insights into the faucet type. If no such information is accessible, a visual inspection of the faucet and its handle configuration can often help determine the type. Once the faucet type is identified, researching the specific cartridge removal process for that type will greatly simplify the task.
Gathering the necessary tools is essential for a smooth and efficient cartridge removal process. The following tools are generally required:
- Screwdrivers (both flathead and Phillips head)
- Adjustable wrench or pliers
- Penetrating oil
- Cartridge puller (optional, but highly recommended)
- Allen wrench (size may vary depending on the faucet)
- Clean cloth or rag
- New replacement cartridge (if replacing the old one)
Having all the necessary tools within reach before commencing the work minimizes interruptions and ensures a more streamlined process.
Step-by-Step Cartridge Removal Process
The cartridge removal process varies depending on the faucet type, but the following steps provide a general guideline. Note that specific details may differ based on the faucet's design.
The first step involves removing the faucet handle. Most faucet handles are held in place by a set screw, which is typically located under a decorative cap on the handle itself. Use a small flathead screwdriver or an Allen wrench to remove the set screw. Once the set screw is removed, carefully pull the handle off the faucet body. If the handle is stuck, gently wiggle it back and forth while pulling upwards. Avoid applying excessive force, as this can damage the handle or the faucet body.
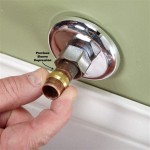
With the handle removed, the next step is to remove any decorative trim or escutcheon that may be covering the cartridge. This trim is often held in place by a threaded nut or a retaining clip. Use an adjustable wrench or pliers to loosen and remove the nut. If there is a retaining clip, use a small screwdriver to carefully pry it off. Take care not to damage the trim or the faucet finish during this process.
Once the trim is removed, the cartridge should be visible. Some cartridges are held in place by a retaining clip or a threaded nut. Remove the retaining clip using a small screwdriver. If there is a threaded nut, use an adjustable wrench to loosen and remove it. If the cartridge is stuck due to mineral deposits or corrosion, apply penetrating oil around the cartridge and let it sit for a few minutes to help loosen it.
After removing any retaining clips or nuts, the cartridge can be pulled out. This can sometimes be challenging, especially if the cartridge is old or has been exposed to hard water. A cartridge puller is a specialized tool designed to grip the cartridge firmly and pull it out without damaging the faucet body. If a cartridge puller is not available, use pliers to grip the cartridge firmly and gently twist and pull it out. Avoid using excessive force, as this can break the cartridge or damage the faucet body. If the cartridge is extremely difficult to remove, try applying more penetrating oil and letting it sit for a longer period.
Once the cartridge is removed, inspect the faucet body for any debris or mineral deposits. Clean the inside of the faucet body with a clean cloth or rag. If there are significant mineral deposits, use a mild cleaning solution to remove them. Rinse the faucet body thoroughly with water to remove any remaining cleaning solution.
If replacing the cartridge, ensure that the new cartridge is the correct type and size for the faucet. Install the new cartridge by inserting it into the faucet body and aligning it correctly. Secure the cartridge in place by reinstalling any retaining clips or threaded nuts that were removed earlier. Ensure that the clips or nuts are securely tightened to prevent leaks.
Reassemble the faucet by reinstalling the decorative trim or escutcheon, followed by the faucet handle. Tighten the set screw on the handle to secure it in place. Once the faucet is reassembled, turn the water supply back on slowly. Check for leaks around the faucet body and the handle. If there are any leaks, tighten the connections further or re-examine the cartridge installation.
Troubleshooting Common Issues
Several common issues can arise during the cartridge removal process. One of the most frequent problems is a stuck cartridge. Mineral deposits and corrosion can cause the cartridge to become firmly lodged in the faucet body. Applying penetrating oil and allowing it to soak for a sufficient amount of time is often effective in loosening the cartridge. Using a cartridge puller can also provide additional leverage and grip to facilitate removal.
Another common issue is difficulty in removing the faucet handle. If the handle is stuck, gently wiggling it back and forth while pulling upwards can help loosen it. Avoid using excessive force, as this can damage the handle or the faucet body. Applying penetrating oil to the handle and set screw can also help loosen them.
Sometimes, the retaining clip or threaded nut that holds the cartridge in place can be difficult to remove due to corrosion or damage. Applying penetrating oil and using the appropriate tools to loosen the clip or nut is crucial. If the clip or nut is severely damaged, it may need to be replaced.
After installing a new cartridge, leaks can sometimes occur. This is often due to improper installation or a damaged O-ring or seal on the cartridge. Ensure that the cartridge is correctly aligned and securely fastened. Inspect the O-rings and seals for any damage and replace them if necessary.
Maintaining a Bathroom Sink Faucet
Regular maintenance can help prolong the life of a bathroom sink faucet and prevent cartridge issues. One of the most important maintenance tasks is to clean the faucet regularly to remove mineral deposits and soap scum. Use a mild cleaning solution and a soft cloth to clean the faucet body and handle. Avoid using abrasive cleaners, as they can damage the faucet finish.
Periodically check the faucet for leaks around the handle and spout. If there are any leaks, address them promptly by tightening the connections or replacing worn parts. Consider installing a water softener to reduce the buildup of mineral deposits in the faucet and cartridge.
By following these steps and tips, removing a bathroom sink cartridge can be a straightforward and manageable task. Prioritizing safety, using the correct tools, and understanding the specific type of faucet are key to a successful outcome. Regular maintenance will help ensure the longevity and optimal performance of the faucet.

Bathroom Faucet Cartridge Replacement

Bathroom Faucet Cartridge Replacement

Gerber How To Install A Cartridge

Replacing A Faucet Cartridge Elkay S Step By Guide

How To Replace Leaky Cartridges In A Bathroom Faucet Repair

Magnum Cartridge Repair And Replace Single Handle Moen Bathroom Faucet

Fixing Faucets How To Replace A Difficult Tub Faucet Cartridge

Replace Bathroom Faucet Cartridge Doityourself Com Community Forums

Quickly Replace A Leaky Faucet Cartridge Diy Family Handyman

How To Change A Glacier Bay Bathroom Faucet Cartridge Diy Home Repair
Related Posts