How to Replace a Bathroom Ceiling Exhaust Fan with Light
Replacing a bathroom ceiling exhaust fan with light is a common home improvement project that can improve ventilation, lighting, and aesthetics in a bathroom. The process involves removing the old fan, ensuring proper wiring and mounting for the new unit, and connecting the electrical components. Careful planning and adherence to safety precautions are crucial for a successful installation. This article provides a detailed guide to completing this project.
Preparation and Safety Measures
Before initiating any electrical work, safety must be prioritized. The first step is to turn off the power to the bathroom circuit at the main electrical panel. Locate the appropriate circuit breaker and switch it to the "off" position. To confirm that the power is completely disconnected, use a non-contact voltage tester to check the wires connected to the existing exhaust fan. This device will indicate the presence of any remaining voltage, ensuring that the work area is safe. This step is non-negotiable and should be performed meticulously to prevent electrical shock.
Gathering the necessary tools and materials is the next preparatory step. The specific tools required may include a screwdriver set (both Phillips and flathead), wire strippers, wire connectors (wire nuts), a utility knife, a drill (possibly with various drill bits), pliers, a measuring tape, safety glasses, work gloves, and a ladder or step stool. In addition to the tools, the new exhaust fan with light fixture should be readily available, along with any necessary mounting hardware, such as screws or brackets. Duct tape might be needed to reseal the duct connection. Having all these items organized and within easy reach saves time and minimizes disruption during the installation process. A helper can be particularly useful during the installation to hold the fan unit while connections are being made.
Inspect the new exhaust fan and light fixture to ensure it is the correct size and type for the bathroom. Check the specifications to confirm that the fan's airflow rate (measured in cubic feet per minute or CFM) is adequate for the bathroom's size. A general rule of thumb is to have at least 1 CFM per square foot of bathroom area. Also, verify that the light fixture's wattage and type are suitable for the desired lighting level. Additionally, review the manufacturer's instructions included with the new fan. These instructions often contain specific details and diagrams that are essential for proper installation. Familiarizing oneself with these instructions beforehand can prevent errors and ensure that the installation proceeds smoothly.
Removing the Old Exhaust Fan
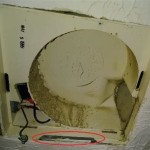
With the power safely disconnected and the necessary tools and materials assembled, the removal of the old exhaust fan can commence. Start by removing the fan cover. These are typically held in place by spring clips or screws. Carefully detach the cover without damaging the surrounding ceiling. Once the cover is removed, the internal components of the old fan will be accessible.
Next, disconnect the electrical wiring to the old fan. This typically involves unscrewing wire connectors (wire nuts) or releasing push-in wire terminals. Before disconnecting any wires, it is advisable to take a photograph or make a detailed diagram of the wiring configuration. This will serve as a valuable reference when connecting the new fan, helping to ensure that the wires are connected correctly. Once the wiring is disconnected, carefully detach the old fan unit from its housing. This may involve unscrewing mounting screws or releasing retaining clips.
After the electrical connections are detached, carefully lower the fan housing. Be mindful of any ductwork connected to the fan. The ductwork usually vents to an outside vent. Disconnect the duct from the fan housing, using a utility knife to cut any duct tape securing the connection. After the tape is cut, carefully pull the duct from the fan housing. Depending on the age and condition of the existing ductwork, it may be necessary to replace it. If damaged or deteriorated, it is recommended to replace the duct with new, appropriately sized flexible ducting. This will improve the efficiency of the exhaust fan and prevent moisture and mold buildup in the duct system.
Installing the New Exhaust Fan
The installation of the new exhaust fan begins with preparing the existing opening in the ceiling. Depending on the size and design of the new fan, it may be necessary to modify the opening. If the new fan is larger than the old one, use a drywall saw to carefully enlarge the opening to the required dimensions. If the new fan is smaller, it may be necessary to add shims or wood strips to the ceiling to provide a secure mounting surface. Ensure that the opening is clean and free of debris before proceeding.
Next, install the new fan housing according to the manufacturer's instructions. The housing is typically secured to the ceiling joists using screws or mounting brackets. Ensure that the housing is level and securely fastened to prevent vibrations and noise during operation. If the existing joists are not properly aligned or spaced, it may be necessary to add additional supports to ensure a stable mounting surface. A level is essential for ensuring proper alignment.
Connect the ductwork to the new fan housing. Secure the duct using duct tape or metal foil tape to create an airtight seal. Proper sealing of the ductwork is crucial for maximizing the fan's efficiency and preventing air leaks. Ensure that the duct is properly routed to the outside vent and that there are no kinks or obstructions that could restrict airflow. If necessary, use clamps to secure the duct to the fan housing and the vent. After connecting the ductwork, proceed to the electrical connections.
Electrical Connections
Referring to the photograph or diagram created during the removal of the old fan, connect the electrical wiring to the new fan. Use wire connectors (wire nuts) to securely join the wires. Typically, there will be three wires: a black (hot) wire, a white (neutral) wire, and a green or bare copper (ground) wire. Connect the corresponding wires from the fan to the wires in the electrical box. Ensure that the wire connectors are properly tightened to prevent loose connections, which can cause electrical hazards.
If the new fan has a separate light fixture, there may be additional wiring connections to make. Consult the manufacturer's instructions to determine the correct wiring configuration. Some fans have separate switches for the fan and the light, while others have a single switch that controls both. Connect the wiring according to the desired switching arrangement. Double-check all wiring connections to ensure that they are secure and properly insulated.
After all the wiring connections are completed, carefully tuck the wires into the electrical box. Ensure that the wires are not pinched or strained in any way. Position the fan unit in the housing and secure it according to the manufacturer's instructions. This may involve tightening screws or snapping the unit into place. Once the fan unit is securely mounted, install the fan cover. Align the cover with the housing and secure it with the appropriate fasteners. Ensure that the cover is properly seated and that there are no gaps or loose edges. A properly installed cover prevents dust and debris from entering the fan and protects the internal components.
Testing and Final Steps
Once the installation is complete, restore power to the bathroom circuit at the main electrical panel. Switch the circuit breaker back to the "on" position. Test the fan to ensure that it is operating correctly. Check that the fan blades are spinning smoothly and that there are no unusual noises or vibrations. If the fan is not working, double-check the wiring connections and the circuit breaker.
Test the light fixture to ensure that it is functioning properly. If the light is not working, check the light bulb and the wiring connections. If the fan has a separate switch for the light, verify that both switches are working correctly. Adjust the light fixture to the desired position and ensure that the light is evenly distributed throughout the bathroom.
Inspect the installation to ensure that all components are securely mounted and that there are no exposed wires or loose connections. Clean up any debris or tools left over from the installation. Properly dispose of any old parts or materials. Ensure that the bathroom is clean and tidy before considering the project complete.

How To Install A Bathroom Fan Step By Guide Bob Vila

How To Install A Bathroom Fan With Bluetooth Speakers Fixthisbuildthat

Installing An Exhaust Fan During A Bathroom Remodel Energy Vanguard

How To Open This Bathroom Exhaust Fan Replace Light Bulb Doityourself Com Community Forums

How To Update And Replace A Bathroom Exhaust Fan Cover Add Lighting Remodelah

Bathroom Exhaust Fans The Complete Guide By Fanco

One Project At A Time Diy Blog 184 How To Replace Bathroom Exhaust Fan

Bathroom Exhaust Fan Guide

Your Complete Guide To Bathroom Exhaust Fans Universal

All About Bathroom Exhaust Fans Ideas Advice Lamps Plus
Related Posts


