How to Install a Bathroom Ventilation Fan
A bathroom exhaust fan plays a crucial role in maintaining a healthy and comfortable environment. It removes moisture, odors, and pollutants, preventing mold growth, mildew, and other issues. Installing a new ventilation fan can be a relatively straightforward DIY project, requiring basic tools and some electrical knowledge. This guide will walk you through the process step-by-step, equipping you with the necessary information to successfully install a new bathroom fan.
1. Planning and Preparation
Before starting the installation, it's essential to plan the project carefully. The following steps ensure a smooth and successful installation:
a. Choose the Right Fan: Consider the size of your bathroom, the amount of moisture generated, and the noise level of the fan. Look for a fan with a high cubic feet per minute (CFM) rating for optimal ventilation.
b. Determine the Location: The fan should be positioned in the center of the bathroom ceiling for optimal air circulation. Ensure the location is suitable for the fan's size and has ample space for wiring and ductwork.
c. Gather Materials and Tools: You'll need a new ventilation fan with a mounting bracket, electrical wiring, a duct and duct connector, a junction box, screws, and a screwdriver. Additional tools include a stud finder, a level, a tape measure, a drill, a wire stripper, and a wire connector.
d. Turn Off Power: Before working with electrical wiring, it's vital to shut off the power supply to the bathroom circuit. Locate the circuit breaker controlling the bathroom lights and fan and turn it off.
2. Removing the Old Fan
The first step is to remove the old ventilation fan. This process usually involves the following steps:
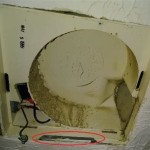
a. Unscrew the Cover: Carefully detach the fan cover by unscrewing the screws holding it in place.
b. Disconnect the Wiring: Disconnect the electrical wires connecting the old fan to the junction box. Note the wire colors and their connections for accurate re-wiring later.
c. Remove the Old Fan: Remove the old fan from its mounting bracket. Disconnect the ductwork from the fan outlet.
d. Remove the Mounting Bracket: Disconnect the mounting bracket from the ceiling using a screwdriver or wrench. Carefully remove any debris or old insulation from the ceiling area.
3. Installing the New Fan
Once the old fan is removed, you can proceed to install the new ventilation fan:
a. Mount the Bracket: Attach the new fan's mounting bracket to the ceiling using the provided screws. Ensure that the bracket is level and secure.
b. Connect the Ductwork: Connect the fan's outlet to the duct connector. Secure the connection with clamps or screws. If you're using a new duct, attach it to the fan outlet and vent it to the outside.
c. Wire the Fan: Connect the new fan's electrical wires to the junction box, matching the colors of the wires to their previous connections.
d. Secure the Fan: Carefully position the new fan onto the mounting bracket and tighten screws. Ensure the fan sits securely and is properly aligned on the bracket.
e. Test the Fan: Carefully turn on the power supply to the bathroom circuit. Test the new fan by switching it on and off to ensure it operates properly and without any noise or vibrations.
4. Finishing Touches
After installing the new fan, consider the following steps for a professional finish:
a. Clean Up: Remove any leftover debris from the installation area and vacuum the ceiling for a clean look.
b. Install the Cover: Secure the fan cover onto the fan housing using the screws provided. Make sure the cover fits snugly and aligns properly with the fan housing.
c. Inspect and Re-Test: Double-check all connections and ensure the fan is functioning correctly. If you encounter any problems, turn off the power and troubleshoot the issue before proceeding further.
Installing a new bathroom ventilation fan is a relatively straightforward DIY project that can improve the air quality and overall health of your bathroom. By following these steps carefully and taking necessary safety precautions, you can successfully complete the installation and enjoy the benefits of a properly functioning exhaust fan.

How To Install A Bathroom Fan Step By Guide Bob Vila

Install A New Bathroom Vent Fan Light

How To Correctly Install Replace Rv Vent Fan

Installing A Bathroom Fan Fine Homebuilding

How To Install A Bathroom Fan Diy Family Handyman

Remove Install A Bathroom Fan Grille In 1 Min

How To Install A Bathroom Fan Homeserve Usa

Average Cost To Install A Bathroom Fan Forbes Home

How To Install A Bath Exhaust Fan Diy

Tips For Installing Or Replacing A Bathroom Fan Forbes Home
Related Posts


