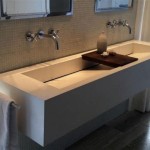
How to Seal Wood for a Bathroom Countertop
A wooden bathroom countertop can bring a touch of natural beauty and warmth to your space. However, the bathroom environment presents unique challenges for wood, such as moisture, humidity, and the potential for spills. To ensure the longevity and aesthetic appeal of your wood countertop, proper sealing is crucial. This article will guide you through the process of effectively sealing wood for bathroom countertops, highlighting key steps and considerations.
Choosing the Right Sealant
The first step in sealing a wood countertop for a bathroom is selecting the appropriate sealant. Various types of sealants are available, each with its advantages and disadvantages. Here are some common choices:
- Polyurethane: Known for its durability and water resistance, polyurethane is a popular choice for bathroom countertops. It forms a hard, protective layer that can withstand spills and moisture. However, polyurethane can be difficult to apply and may yellow over time.
- Epoxy: Epoxy sealants offer excellent durability and water resistance, making them ideal for high-traffic areas like bathrooms. They are also resistant to stains and chemicals. However, epoxy can be challenging to work with due to its quick curing time.
- Oil-Based Finishes: Oil-based finishes, such as tung oil or Danish oil, penetrate the wood and provide a natural, water-resistant barrier. While less durable than polyurethane or epoxy, they offer a softer, more rustic look. However, they may require more frequent reapplication.
- Water-Based Finishes: Water-based finishes are less toxic and easier to apply than oil-based finishes. While they provide some protection, they are generally less durable and resistant to water than other options.
When choosing a sealant, consider the following factors:
- Level of Protection: Determine the level of protection needed based on the countertop's use and the severity of potential exposure to water and moisture.
- Finish: Decide on the desired finish – glossy, matte, or semi-gloss – to complement the overall bathroom style.
- Durability: Choose a sealant that offers sufficient durability to withstand daily wear and tear.
- Ease of Application: Select a sealant that is easy to apply and produces consistent results.
Preparing the Wood Countertop
Before applying any sealant, it's essential to properly prepare the wood countertop to ensure optimal adhesion and long-lasting results. Follow these steps:
- Clean the Surface: Thoroughly clean the countertop using a mild detergent and water. Remove any dirt, dust, grease, or residue that could interfere with the sealant.
- Sand the Wood: Sand the countertop with progressively finer grit sandpaper, starting with a coarser grit to remove any imperfections and ending with a fine grit to create a smooth surface. This process helps the sealant adhere better.
- Dust Removal: After sanding, use a tack cloth or a vacuum cleaner with a brush attachment to remove all dust particles. Any remaining dust can compromise the sealant's adhesion.
Applying the Sealant
Once the countertop is prepared, it's time to apply the sealant. The specific application process may vary depending on the type of sealant chosen. Generally, follow these steps:
- Apply a Thin Coat: Use a brush, roller, or cloth applicator to apply a thin, even coat of sealant to the countertop. Avoid applying too much sealant, as it can lead to uneven drying and cracking.
- Spread the Sealant: Spread the sealant evenly across the surface, ensuring all areas are covered. Work in sections to ensure consistent application.
- Remove Excess Sealant: Immediately remove any drips or excess sealant with a clean cloth. Excess sealant can create an uneven finish and may take longer to dry.
- Allow Drying Time: Allow the sealant to dry completely according to the manufacturer's instructions. Drying time can vary depending on the type of sealant, temperature, and humidity.
- Apply Additional Coats: For added protection, apply additional coats of sealant. Allow each coat to dry completely before applying the next.
Maintaining a Sealed Wood Countertop
After sealing your wood countertop, it's crucial to maintain it properly to preserve its beauty and longevity. Follow these tips:
- Clean Regularly: Regularly clean the countertop with a mild cleaner and a soft cloth. Avoid using harsh chemicals or abrasive cleaners that can damage the sealant.
- Address Spills Promptly: Wipe up spills immediately to prevent stains or damage to the wood. Use a damp cloth to clean up spills, avoiding soaking the countertop.
- Reapply Sealant: Over time, the sealant may wear down, especially in high-traffic areas. Reapply sealant as needed to maintain its effectiveness.
By following these steps and maintaining your sealed wood countertop, you can enjoy its beauty and durability for years to come. Regular cleaning, prompt spill management, and timely reapplication of sealant will ensure that your wood bathroom countertop remains a functional and stylish addition to your bathroom.

How To Build Protect A Wood Vanity Top Houseful Of Handmade

How To Build Protect A Wood Vanity Top Houseful Of Handmade

How To Build Protect A Wood Vanity Top Houseful Of Handmade

How Do Wooden Countertops Really Hold Up Exquisitely Unremarkable

The Foolproof Guide To Diy Wood Countertops For A Bathroom

Diy Wood Bathroom Countertop An Easy Way To Change Your Vanity In 1 Weekend Noting Grace

How To Build Protect A Wood Vanity Top Houseful Of Handmade

How To Finish A Wood Bathroom Countertop And Vanity South House Designs

Diy Wood Bathroom Countertop An Easy Way To Change Your Vanity In 1 Weekend Noting Grace

Finish For A Bathroom Vanity The Wood Whisperer
Related Posts