How To Snake A Bathroom Sink
A clogged bathroom sink is a common household plumbing problem. Hair, soap scum, toothpaste, and other debris can accumulate over time and restrict or completely block the drain. While chemical drain cleaners are often marketed as a quick fix, they can damage pipes and pose environmental risks. A more reliable and safer solution is to snake the drain, a process that involves using a flexible tool called a drain snake (also known as a plumbing snake or auger) to break up or retrieve the blockage.
This article provides a comprehensive guide on how to snake a bathroom sink, covering the necessary tools, preparation steps, the snaking procedure itself, and preventative measures to minimize future clogs. Understanding these steps will empower individuals to address minor plumbing issues independently, saving time and money on professional plumbing services.
Gathering Necessary Tools and Materials
Before beginning, it is crucial to assemble the required tools and materials for the job. Having everything readily available will streamline the process and ensure efficiency. The essential items are:
Drain Snake/Plumbing Auger: The drain snake is the primary tool for clearing the clog. A small to medium-sized snake, typically around 25 feet in length, is suitable for bathroom sink drains. There are different types of drain snakes available, including manual crank snakes, powered snakes, and toilet augers. For a bathroom sink, a manual crank snake is generally sufficient.
Adjustable Wrench: An adjustable wrench is needed to loosen and tighten plumbing connections, particularly the slip nuts on the P-trap and drain pipes.
Bucket: A bucket is essential for catching water and debris that may spill during the disassembling process. Place the bucket directly under the P-trap before disconnecting any pipes.
Gloves: Wearing gloves will protect hands from dirt, grime, and potential bacteria present in the drain system. Rubber or disposable gloves are recommended.
Pliers: Pliers can be useful for gripping and maneuvering small parts, such as drain stoppers or linkage.
Screwdriver (Phillips and Flathead): A screwdriver might be required to remove drain stoppers or access drain components.
Flashlight: A flashlight is helpful for illuminating the drain opening and inspecting pipes for damage or obstructions.
Old Rags or Towels: Rags or towels will be needed to clean up spills and wipe down tools.
Preparing the Work Area and Assessing the Clog
Proper preparation is essential for a successful drain-snaking procedure. This involves creating a safe and organized work environment and attempting to identify the location and severity of the clog.
Clear the Area: Remove any items from under the sink cabinet to provide ample workspace. This includes cleaning supplies, personal care products, and any other obstructions.
Protect the Surroundings: Place towels or drop cloths on the floor around the sink to protect the flooring from spills or scratches.
Initial Assessment: Before disassembling any plumbing, try running water into the sink to observe the drainage rate. This will help determine the severity of the clog and its approximate location. If water is draining very slowly or not at all, the clog is likely located within the drainpipe or P-trap.
Remove the Drain Stopper: The drain stopper is often a primary source of clogs. Depending on the type of stopper, there might be a lever located behind the faucet or a lift-and-turn mechanism. Carefully remove the stopper and clean any visible debris from it. Inspect the stopper's mechanism for accumulated hair and grime.
Inspect the Drain Opening: Use a flashlight to inspect the drain opening for any visible obstructions, such as hairballs or large debris. If possible, remove any visible debris using pliers or a small hook.
The Snaking Procedure: Step-by-Step Instructions
The following steps outline the process of snaking a bathroom sink drain to remove the clog:
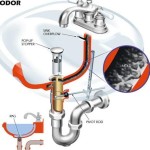
Access the Drainpipe: If the clog is not readily accessible through the drain opening, it might be necessary to disconnect the P-trap, the curved section of pipe located under the sink. Place the bucket under the P-trap to catch any water that may be trapped inside. Loosen the slip nuts on both ends of the P-trap using the adjustable wrench. Carefully remove the P-trap and inspect it for any accumulated debris. Clean out any visible obstructions.
Insert the Drain Snake: With the P-trap removed, insert the end of the drain snake into the drainpipe that leads into the wall. Extend the snake slowly and carefully, rotating the crank handle to help it navigate the bends in the pipe. If resistance is encountered, do not force the snake. Instead, gently rotate the crank handle back and forth while applying slight pressure to work the snake past the obstruction.
Break Up or Retrieve the Clog: Once the drain snake encounters the clog, continue rotating the crank handle to break up the obstruction or to snag it. If attempting to snag the clog, carefully retract the snake while continuing to rotate the crank handle. This will help to catch the clog on the end of the snake.
Remove the Snake and Clean the Clog: Carefully remove the drain snake from the drainpipe. Inspect the end of the snake for any attached debris. Clean the debris off the snake and dispose of it properly. If the clog was successfully removed, repeat the process to ensure that the drainpipe is completely clear.
Flush the Drainpipe: After snaking the drain, flush the drainpipe with hot water to help dislodge any remaining debris. Run hot water into the drain for several minutes to ensure that the water flows freely.
Reassemble the Plumbing: Once the drainpipe is clear, reassemble the P-trap. Ensure that the slip nuts are tightened securely, but avoid over-tightening, which can damage the pipes. Reinstall the drain stopper, making sure that it functions properly.
Test the Drain: Run water into the sink to test the drain. Observe the drainage rate and check for any leaks around the P-trap or drain connections. If the water drains freely and there are no leaks, the snaking procedure was successful.
Additional Considerations:
If the initial attempt to snake the drain is unsuccessful, consider trying a different type of drain snake or consulting a professional plumber. A more stubborn clog might require specialized tools or expertise.
If the drain is still clogged after snaking, there might be a blockage further down the drainpipe or in the main sewer line. In this case, it is best to contact a professional plumber.
Preventative Measures to Minimize Future Clogs
Preventing clogs is always preferable to dealing with them after they occur. Implementing a few simple preventative measures can significantly reduce the likelihood of future bathroom sink clogs.
Use a Drain Screen: Install a drain screen or strainer in the sink drain to catch hair, soap scum, and other debris before they enter the drainpipe. Clean the drain screen regularly to prevent it from becoming clogged itself.
Avoid Pouring Grease Down the Drain: Never pour grease or oil down the drain. Grease can solidify in the pipes and create a sticky residue that attracts other debris, leading to clogs.
Flush the Drain Regularly: Flush the drain with hot water regularly, especially after using the sink for activities that tend to generate debris, such as shaving or brushing teeth. Hot water helps to dissolve soap scum and other residue that can accumulate in the pipes.
Baking Soda and Vinegar Flush: Periodically flush the drain with a mixture of baking soda and vinegar. Pour one cup of baking soda down the drain, followed by one cup of vinegar. Let the mixture fizz for 30 minutes, then flush with hot water. This natural solution can help to break down grease and other organic matter that may be accumulating in the pipes.
Regular Cleaning of the Drain Stopper: Clean the drain stopper regularly to remove accumulated hair and debris. This will help to prevent clogs from forming in the drainpipe.
Avoid Dropping Solid Objects: Be careful not to drop solid objects, such as jewelry or small toys, down the drain. These objects can easily become lodged in the pipes and cause a clog.
Professional Drain Cleaning: Consider scheduling regular professional drain cleaning services to remove accumulated debris and prevent clogs from forming. Professional plumbers have specialized tools and expertise to clear even the most stubborn clogs.
By following these preventative measures, individuals can significantly reduce the risk of recurring bathroom sink clogs and maintain a healthy plumbing system.

How To Unclog A Bathroom Sink With Snake

How To Unclog A Sink The Right Way

Why Isn T My Plumber Snake Working Ben Franklin Plumbing

How To Use A Plumbing Snake And When It S Necessary Wm Buffington Company

How To Snake A Bathroom Drain Ace Hardware

How To Snake Your Bathroom Sink

How To Unclog A Sink The Right Way

How To Unclog A Drain With Snake

How To Unclog A Bathroom Sink The Home Depot

How To Use Drain Snake Unclog A Bathroom Sink
Related Posts


