How to Take Bathroom Sink Pipes Apart
Disassembling the pipes beneath a bathroom sink is a common plumbing task that can be tackled by most homeowners. While it may seem daunting, with the right tools and understanding of the process, it's a relatively straightforward undertaking. This article provides a step-by-step guide on how to dismantle the pipes beneath a bathroom sink, offering tips for safe and efficient removal.
1. Gather the Necessary Tools
Before you begin, gather the following tools to ensure a smooth and successful disassembly process:
- Adjustable wrench
- Channel-lock pliers
- Basin wrench
- Pipe wrench
- Bucket
- Rag or towel
- Safety glasses
- Gloves
A basin wrench is a specialized tool designed to reach and loosen nuts in tight spaces, making it particularly useful for accessing nuts beneath the sink. While adjustable wrenches and channel-lock pliers can be used in certain situations, a basin wrench significantly simplifies the process.
2. Turn Off the Water Supply
Safety is paramount when working with plumbing. Before you begin dismantling the pipes, shut off the water supply to the sink. The water supply valve is typically located on the wall behind the sink or underneath it. Turn the valve clockwise to completely shut off the water flow. Once the valve is closed, turn on the faucet to ensure no water comes out.
3. Drain the Pipes
To minimize water spillage during disassembly, drain the water remaining in the pipes. Open the drain stopper and allow the water to flow into the sink bowl. If the water accumulates too slowly, you can use a small bucket to collect the water from the overflow drain in the sink bowl.
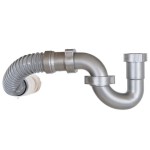
4. Disconnect the Drain Trap
The drain trap is the curved pipe that connects the sink drain to the main drain pipe. It prevents sewer gases from entering the home. To remove the trap, locate the slip nuts on either side of the trap. The slip nuts are typically made of metal and are readily visible. Using the adjustable wrench or channel-lock pliers, firmly grasp the slip nut and turn it counterclockwise. This will loosen the nut, allowing you to detach the trap from the drain pipe.
Be cautious when loosening the slip nuts. Overtightening can cause damage to the pipes. If the nuts are particularly stubborn, a pipe wrench can be used, but exercise caution to avoid scratching or damaging the pipes.
5. Disconnect the Tailpiece
The tailpiece is the short vertical pipe that connects the drain trap to the sink drain. It typically has a slip nut at the bottom, connecting it to the drain trap, and another slip nut at the top, connecting it to the drain pipe.
To remove the tailpiece, loosen the slip nut at the bottom of the tailpiece. This will disconnect the tailpiece from the drain trap. Once the tailpiece is disconnected, loosen the slip nut at the top of the tailpiece, separating it from the sink drain.
6. Disconnect the Supply Lines
The supply lines are the pipes that carry water to the sink faucet. There are typically two supply lines: one for hot water and one for cold water. The supply lines are connected to the faucet with compression nuts.
To disconnect the supply lines, use the adjustable wrench or channel-lock pliers to grasp the compression nuts and turn them counterclockwise. This will loosen the nuts, allowing you to detach the supply lines from the faucet.
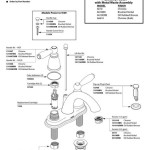
7. Remove the Faucet
The faucet is mounted to the sink with a mounting nut underneath the sink. To remove the faucet, use the basin wrench to access and loosen the mounting nut.
The basin wrench has a long arm that extends down through the faucet hole in the sink, allowing you to reach and loosen the mounting nut. Once the mounting nut is loosened, gently lift the faucet up and off the sink.
8. Clean the Pipes and Fittings
Once you have successfully removed the pipes and fittings, it is important to clean any debris or sediment that has accumulated. Use a small brush or a rag to clean the inside of the pipes.
If you are replacing old pipes, it is a good practice to inspect them carefully for any signs of corrosion or damage. If any pipes or fittings show signs of deterioration, it is best to replace them with new ones.

How To Unclog A Sink The Right Way

How To Replace A Sink Stopper Quick And Simple Home Repair

How To Take Apart And Clean Sink Drain

5 Natural Ways To Unclog A Bathroom Sink Hiller How

Diy Plumbing Blog How To Clean A Drain Trap

How To Retrieve An Item Dropped Down The Sink Drain Bathroom Plumbing Replace

The Do S And Dont Of Rescuing Something You Dropped Down Sink Drain

Bathroom Sink Drain Leaking Around Threads Premier Plumbing Inc

How To Get Jewelry Out Of The Bathroom Sink Trap

How To Fix A Slow Bathroom Sink Drain
Related Posts