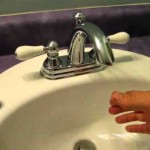
Removing a Bathroom Sink Mixer Tap: A Step-by-Step Guide
Replacing a bathroom sink mixer tap, also known as a faucet, is a common plumbing task that homeowners may undertake. Whether upgrading the aesthetics of the bathroom, repairing a leaky tap, or simply replacing a worn-out fixture, understanding the process of removing the existing tap is crucial. This article provides a comprehensive, step-by-step guide to safely and effectively removing a bathroom sink mixer tap. The steps detailed below are generally applicable to most standard mixer tap installations; however, it's always advisable to consult the manufacturer's instructions for your specific tap model, if available.
Before commencing work, it’s essential to gather the necessary tools and materials. These typically include:
- Adjustable wrench or spanner
- Basin wrench (also known as a faucet wrench)
- Pliers
- Screwdriver (both flathead and Phillips head may be required)
- Bucket or container
- Old towels or cloths
- Penetrating oil (optional, for stubborn connections)
- New tap (if replacing)
- Plumber's tape (Teflon tape)
- Work gloves
- Safety glasses
Ensuring that all necessary items are readily available before starting will streamline the process and minimize potential disruptions.
Key Point 1: Isolating the Water Supply and Preparing the Work Area
The first and arguably most important step is to isolate the water supply to the tap. Failure to do so will result in significant water leakage once the connections are loosened. Most bathroom sinks have individual shut-off valves located beneath the sink, on the supply lines that connect to the tap. These valves are usually small handles or knobs that need to be turned clockwise to shut off the water flow. Locate both the hot and cold water supply valves and turn them fully to the off position.
Once the valves are closed, test them by turning on the existing tap. If water continues to flow, the valves may not be functioning correctly, or there might be a separate main shut-off valve supplying water to the bathroom. In this case, locate the main shut-off valve for the bathroom (or the entire house, if necessary) and turn it off. This valve is typically located near the water meter or where the main water line enters the building.
With the water supply isolated, place a bucket or container beneath the sink to catch any remaining water in the supply lines or tap. Use old towels or cloths to protect the surrounding area from water damage and to provide a comfortable working surface.
Clear the space under the sink by removing any items that might obstruct access to the tap connections. This might include cleaning supplies, personal care products, or other stored items. Adequate workspace is crucial for maneuvering tools and accessing the necessary components.
Put on safety glasses to protect eyes from debris or accidental splashes. Similarly, wearing work gloves can provide a better grip and protect hands from sharp edges or rough surfaces.
Key Point 2: Disconnecting the Water Supply Lines and Waste Connection
After isolating the water supply and preparing the work area, the next step involves disconnecting the water supply lines from the existing tap. These lines typically connect to the tap via flexible hoses or rigid copper pipes. If flexible hoses are used, they usually have threaded connections that can be loosened with an adjustable wrench or spanner. Place the bucket beneath the connections to catch any residual water.
Use the adjustable wrench to carefully loosen the nuts connecting the supply lines to the tap. Turn the wrench counterclockwise to loosen the nuts. If the connections are corroded or stuck, applying a penetrating oil may help to loosen them. Allow the penetrating oil to soak in for 10-15 minutes before attempting to loosen the nuts again.
Once the supply lines are disconnected, carefully examine the threads on the tap and the supply lines for any damage or corrosion. If there is significant corrosion, consider replacing the supply lines along with the tap. Store the disconnected supply lines in a safe place, as they may be needed for the new tap installation, depending on compatibility.
Next, address the waste connection. The waste connection is the pipe that drains water from the sink. Most bathroom sinks have a P-trap, which is a curved pipe that traps debris and prevents sewer gases from entering the bathroom. To disconnect the waste connection, loosen the slip nuts that connect the P-trap to the sink drain and the drainpipe. Place the bucket beneath the P-trap to catch any water or debris that may be trapped inside.
Loosen the slip nuts by hand or with pliers if necessary. Once the nuts are loosened, carefully detach the P-trap from the sink drain and the drainpipe. Be prepared for some water and debris to spill out, so having the bucket in place is essential. Inspect the P-trap for any blockages or damage. If the P-trap is clogged, clean it thoroughly before reassembling it.
Key Point 3: Removing the Tap from the Sink and Preparing for Installation
With the water supply lines and waste connection disconnected, the final step is to remove the tap from the sink. Most mixer taps are secured to the sink with a mounting nut or bracket located beneath the sink. Accessing this nut can be challenging, especially in tight spaces. A basin wrench (faucet wrench) is specifically designed for this purpose. This tool has a long handle and a pivoting head that can grip the mounting nut from various angles.
Position the basin wrench around the mounting nut and adjust the head to securely grip the nut. Turn the wrench counterclockwise to loosen the nut. This process may require some patience and persistence, as the nut can be tightly secured or corroded in place. If the nut is particularly stubborn, applying penetrating oil may help to loosen it.
Once the mounting nut is loosened, carefully remove it completely. There may also be a washer or bracket underneath the nut that needs to be removed. As the nut is loosened, support the tap from above to prevent it from falling and potentially damaging the sink or surrounding surfaces.
With the mounting nut and any accompanying hardware removed, carefully lift the tap from the sink. There may be a rubber or plastic gasket between the tap and the sink to provide a watertight seal. This gasket may be stuck to the sink, so gently pry it loose if necessary. Once the tap is removed, inspect the sink surface for any debris or residue. Clean the area thoroughly with a mild cleaner and a soft cloth.
Before installing the new tap, inspect the supply line connections and the drain opening on the sink. Ensure that they are clean and free of any debris. If the supply lines are old or corroded, consider replacing them with new ones to ensure a reliable connection. Apply plumber's tape (Teflon tape) to the threads of the supply line connections to create a watertight seal.
With the old tap removed and the sink surface prepared, the installation of the new tap can proceed. Follow the manufacturer's instructions for the new tap to ensure proper installation. The process typically involves inserting the tap through the sink opening, securing it with a mounting nut or bracket, connecting the water supply lines, and reassembling the waste connection.
After the new tap is installed, turn on the water supply valves and check for any leaks. Tighten any connections as needed to eliminate leaks. Run the tap for a few minutes to flush out any air or debris from the system. Once you are satisfied that the tap is functioning correctly and there are no leaks, clean up the work area and dispose of any used materials properly.
In summary, removing a bathroom sink mixer tap requires careful planning, the right tools, and a systematic approach. By following these step-by-step instructions, homeowners can safely and effectively remove an old tap and prepare for the installation of a new one. Remember to always prioritize safety and consult with a qualified plumber if you encounter any difficulties or are unsure about any aspect of the process.

How To Easily Replace Basin Taps Step By

Single Lever Mono Basin Flow Cartridge Maintenance And Replacement

How To Install Basin Taps Replacing A Bathroom Sink Tap

Replacing A Bathroom Faucet Fine Homebuilding

How To Change Bathroom Taps Everything You Need Know

How To Replace Bathroom Taps Big

How To Change A Washer On Mixer Tap Living By Homeserve

Diy How To Replace A Bathroom Sink Faucet Remove Install

How To Remove And Install A Bathroom Faucet

Steps For How To Change A Mixer Tap Bathware Direct
Related Posts