Replacing Your Bathroom Exhaust Fan With a Light: A Comprehensive Guide
Bathroom exhaust fans are essential for maintaining indoor air quality and preventing moisture buildup, which can lead to mold growth and structural damage. Often, these fans are combined with a light fixture for added convenience. Replacing an existing bathroom exhaust fan with a model that includes a light, or adding a light to an existing fan, is a common home improvement project that can enhance both functionality and aesthetics. This article provides a detailed guide on how to safely and effectively undertake this task.
Before initiating any electrical work, safety is paramount. Disconnecting the power supply to the bathroom circuit is the first and most crucial step. This can be achieved by locating the corresponding circuit breaker in the electrical panel and switching it to the "off" position. Verify that the power is indeed off by testing the existing fan and light with a non-contact voltage tester. If the tester indicates the presence of voltage, double-check that the correct breaker has been disabled and repeat the testing process. Failing to disconnect the power can result in severe electrical shock or electrocution.
Once the power is off, gather the necessary tools and materials. These typically include a screwdriver set (both Phillips head and flathead), wire strippers, wire connectors (wire nuts), electrical tape, a utility knife, safety glasses, work gloves, a ladder, the new exhaust fan with light fixture, and a drywall saw (if modifications to the ceiling are required). Having all the necessary equipment readily available will streamline the installation process and minimize downtime.
The next step involves removing the old exhaust fan and light fixture. Begin by removing the cover of the existing fan, which is usually held in place by screws or spring clips. Disconnect the electrical wires connected to the old fan. This typically involves unscrewing wire connectors and separating the wires. Carefully observe and document the wiring configuration before disconnecting anything. Taking a photograph or making a sketch of the wire connections will prove invaluable during the installation of the new unit. After disconnecting the wires, detach the fan housing from the ceiling. Most exhaust fans are secured with screws or mounting brackets. Remove these fasteners to release the fan unit.
With the old fan removed, prepare the ceiling opening for the new unit. If the new fan is the same size as the old one, the existing opening may suffice. However, if the new fan is larger or requires a different mounting configuration, modifications to the ceiling may be necessary. Use a drywall saw to carefully enlarge the opening, ensuring that it is the correct size and shape for the new fan housing. Avoid cutting excessively large, as this will create unnecessary gaps and complicate the installation process.
Key Point 1: Wiring Considerations and Best Practices
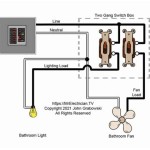
The wiring connection is a critical aspect of installing a new bathroom exhaust fan with a light. Electrical codes mandate that all wiring connections be made inside a junction box. This box provides a safe and enclosed space for splicing wires and protects against accidental contact. Ensure that the junction box is properly secured to the ceiling joist and that it is large enough to accommodate all the necessary wiring.
When connecting the wires, use appropriate wire connectors, such as wire nuts, to create secure and insulated connections. Match the wires according to their function: black to black (hot), white to white (neutral), and green or bare copper to green or bare copper (ground). Twist the wires together tightly before screwing on the wire connector. After securing the wire connector, gently tug on each wire to ensure that the connection is solid. Wrap electrical tape around the wire connectors for added insulation and security.
If the existing wiring is damaged or deteriorated, it is essential to replace it with new wiring. Use appropriately sized wires that are rated for the voltage and amperage of the exhaust fan and light fixture. Consult with a qualified electrician if you are unsure about the proper wiring size or configuration. Improper wiring can lead to electrical hazards, such as short circuits, fires, and electrocution.
Key Point 2: Proper Ventilation and Ductwork Installation
The exhaust fan's primary function is to remove moisture and odors from the bathroom. To achieve this effectively, proper ventilation and ductwork installation are crucial. The exhaust fan should be connected to a duct that vents to the outside of the building. Avoid venting the exhaust fan into the attic or other enclosed spaces, as this can lead to moisture buildup and mold growth.
The ductwork should be made of rigid metal or insulated flexible duct. Rigid metal duct is more durable and provides better airflow than flexible duct. However, flexible duct is easier to install in tight spaces. Insulated ductwork helps to prevent condensation from forming on the outside of the duct, which can lead to water damage.
Ensure that the ductwork is properly sized for the exhaust fan's airflow capacity. Undersized ductwork can restrict airflow and reduce the fan's effectiveness. Consult the exhaust fan's specifications to determine the recommended duct size. Also, minimize the number of bends and turns in the ductwork to reduce airflow resistance. Secure all duct connections with duct tape or metal fasteners to prevent leaks.
When routing the ductwork, avoid obstructing other building components, such as pipes, wires, or structural members. If necessary, use elbows and offsets to navigate around obstacles. Ensure that the ductwork is properly supported to prevent sagging or collapsing. The exhaust vent on the outside of the building should be equipped with a backdraft damper to prevent outside air from entering the bathroom.
Key Point 3: Mounting and Securing the New Fan Unit
Once the wiring and ductwork are properly installed, the new exhaust fan unit can be mounted and secured to the ceiling. Most exhaust fans come with mounting brackets or straps that attach to the ceiling joists. Position the fan unit in the center of the ceiling opening and align the mounting brackets with the joists.
Secure the mounting brackets to the joists with screws or nails. Ensure that the fan unit is level and securely fastened to the ceiling. Use shims if necessary to level the fan unit. If the fan unit is equipped with vibration dampeners, ensure that they are properly installed to minimize noise and vibration.
After the fan unit is securely mounted, connect the ductwork to the fan housing. Use duct tape or metal fasteners to create a tight and airtight seal. Ensure that the ductwork is properly supported to prevent it from pulling on the fan unit. Finally, install the fan cover, which is usually held in place by screws or spring clips.
With the new exhaust fan with light successfully installed, restore power to the bathroom circuit by switching the circuit breaker back to the "on" position. Test the fan and light to ensure that they are functioning correctly. If the fan or light does not work, double-check the wiring connections and the circuit breaker. If the problem persists, consult with a qualified electrician.
Regular maintenance is essential for ensuring the longevity and optimal performance of the bathroom exhaust fan. Clean the fan grill regularly to remove dust and debris that can restrict airflow. Check the ductwork for any blockages or leaks. Replace the light bulb as needed. By following these maintenance tips, the bathroom exhaust fan with light will provide years of reliable service.
Replacing a bathroom exhaust fan with a light is a manageable project for homeowners with basic electrical and mechanical skills. However, it is crucial to prioritize safety and follow all applicable electrical codes. If unsure about any aspect of the installation process, consulting with a qualified electrician is always advisable. Proper installation and maintenance will ensure that the new exhaust fan with light enhances the functionality and comfort of the bathroom while preventing moisture buildup and promoting healthy indoor air quality.

Install A New Bathroom Vent Fan Light The San Fernando Valley Sun

How To Install A Bathroom Fan With Bluetooth Speakers Fixthisbuildthat

Installing An Exhaust Fan During A Bathroom Remodel Greenbuildingadvisor

Broan Nutone Bath Fan Model 765h80l Disassembly Repair Help

How To Update And Replace A Bathroom Exhaust Fan Cover Add Lighting Remodelah

Broan Nutone Invent Series 110 Cfm Ceiling Installation Bathroom Exhaust Fan With Light Energy Star Ae110l The Home Depot

Hampton Bay 160 Cfm Ceiling Mount Room Side Installation Bathroom Exhaust Fan With Adjustable Led Lighting And Night Light Lds Bf3002 The Home Depot

80 Cfm Bathroom Exhaust Fan Built In Led Light Ceiling Mounted

Bath Exhaust Ventilation Fans

Ultra Quiet Bathroom Exhaust Fan With Led Light 90cfm 1 5 Sone Ventilation Square Frosted Plastic Cover Com
Related Posts