How to Fix Bathroom Sink Knobs
Bathroom sink knobs, like any other household fixture, are prone to wear and tear. They might become loose, develop leaks, or fail entirely. Fortunately, many common faucet knob issues can be addressed with basic tools and some DIY knowledge. This article will guide you through the process of diagnosing and fixing some common bathroom sink knob problems.
Identifying the Problem
The first step in fixing bathroom sink knobs is to identify the specific issue. Are the knobs leaking? Are they loose and wobbly? Do they fail to turn on or off the water entirely? Understanding the nature of the problem will help you determine the appropriate course of action.
A leaking faucet can be caused by a variety of factors, including worn-out washers, a loose packing nut, or a broken O-ring. A loose knob might indicate that the set screw holding it in place has come loose or that the stem connecting the knob to the valve is worn. An unresponsive knob could be due to a broken stem, a clogged valve seat, or a malfunctioning cartridge.
Common Fixes for Leaky Knobs
If your bathroom sink knobs are leaking, here are some common fixes to consider:
1. Replacing the Washer
The washer is a small rubber or plastic disc that sits inside the valve stem and creates a seal to prevent water from leaking. Over time, the washer can become worn, cracked, or deformed, leading to leaks. Replacing the washer is a simple and effective solution.
To replace the washer, you will need to turn off the water supply to the faucet. Then, remove the knob, packing nut, and stem. You should see the worn washer at the bottom of the stem. Remove the old washer and install a new one of the same size and material. Reassemble the faucet in reverse order, making sure to tighten the packing nut but not over-tighten it.
2. Tightening the Packing Nut
The packing nut is a brass nut that sits above the valve stem and helps create a seal around the stem to prevent leaks. If the packing nut is loose, it can allow water to leak around the stem.
To tighten the packing nut, you will need to remove the knob and stem. You can then use a wrench or adjustable pliers to tighten the packing nut. Be careful not to over-tighten it, as this could damage the valve stem.
3. Replacing the O-ring
Some faucets have an O-ring between the valve stem and the faucet body. This O-ring helps create a seal to prevent water from leaking. If the O-ring is worn or damaged, it can cause leaks.
Replacing the O-ring typically involves removing the knob, packing nut, and stem. You can then access the O-ring and replace it with a new one of the same size and material. Reassemble the faucet in reverse order.
Fixing Loose Knobs
If your bathroom sink knobs are loose, the following steps can help you resolve the issue:
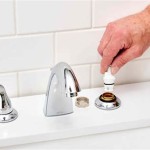
1. Tightening the Set Screw
Most bathroom sink knobs are secured in place with a small set screw located on the side of the knob. This screw can become loose over time, allowing the knob to wobble or even come off entirely.
To tighten the set screw, you will need a small screwdriver that fits the screw head. Simply rotate the screw clockwise until it is snug. Be careful not to over-tighten it, as this could damage the knob or stem.
2. Replacing the Stem
In some cases, the stem connecting the knob to the valve may be worn or broken, causing the knob to become loose. If tightening the set screw does not fix the problem, you may need to replace the stem.
To replace the stem, you will need to turn off the water supply to the faucet and remove the knob, packing nut, and stem. You can then install a new stem of the same type and size. Make sure to reassemble the faucet in reverse order and tighten all the components securely.
Dealing with Unresponsive Knobs
If your bathroom sink knobs are not turning on or off the water, here are some things you can try:
1. Cleaning the Valve Seat
The valve seat is a small disc inside the faucet that helps control the flow of water. If it becomes clogged with debris, it can prevent the valve from opening or closing properly.
To clean the valve seat, you will need to remove the knob, packing nut, and stem. You can then use a small screwdriver or other tool to scrape any debris off the valve seat. Once the seat is clean, reassemble the faucet.
2. Replacing the Cartridge
Some bathroom sink faucets have a cartridge that controls the flow of water. This cartridge can wear out over time, causing the faucet to become unresponsive.
To replace the cartridge, you will need to turn off the water supply to the faucet and remove the knob, packing nut, and stem. You can then access the cartridge and replace it with a new one of the same type and size. Reassemble the faucet in reverse order.
Remember, these are just general guides. Always consult the manufacturer's instructions for your specific faucet model for detailed guidance on troubleshooting and repair.

How Do I Replace Bathroom Sink Faucet Handles Cleaning More

Diy How To Replace A Bathroom Sink Faucet Remove Install

How To Change The Handle Rotation On A Faucet

How To Tighten Faucet Handle Homeserve Usa

How To Fix A Faucet Tighten Kitchen Sink Handle

How To Fix A Stripped Faucet Handle In 10 Minutes Or Less

Bathroom Faucet Handles Loose Wobbly Diy Fix

Bathroom Handle Stiff Or Difficult To Operate

Tighten A Loose Lever On Moen Brantford Faucet Single Handle Bathroom Faucets Handles

How To Fix A Leaking Faucet Without In The Handle Moen
Related Posts