How To Install a Moen Adler Bathroom Faucet
Installing a Moen Adler bathroom faucet is a relatively straightforward process that can be accomplished with basic plumbing knowledge and tools. This article will provide a step-by-step guide to help you successfully install your new faucet.
Gather Your Tools and Materials
Before you begin, gather all the necessary tools and materials. You will need:
- Moen Adler bathroom faucet
- Adjustable wrench
- Channel-lock pliers
- Phillips screwdriver
- Plumber's tape (Teflon tape)
- Basin wrench
- Level
- Optional: Caulking gun and silicone caulk
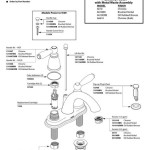
Ensure the faucet kit includes all the necessary parts, such as the faucet body, handle(s), spout, mounting plate, escutcheon, and installation instructions.
Preparation and Installation
Once you have gathered your tools and materials, follow these steps to install your Moen Adler bathroom faucet:
- Turn off the water supply. Locate the shut-off valves for the hot and cold water lines beneath the sink. Turn the valves clockwise until they are completely closed.
- Remove the old faucet. Unscrew the old faucet using a basin wrench or adjustable wrench. Be careful not to damage the sink or surrounding area. If there is a cartridge, remove it by turning it counterclockwise.
- Clean the sink and pipes. Use a damp cloth to clean any debris or dirt accumulated on the sink and around the faucet mounting holes. Remove any old plumber's tape or sealant from the pipes.
- Install the new faucet. Follow the installation instructions provided with your Moen Adler faucet. Generally, this will involve:
- Attaching the faucet body to the mounting plate using the provided screws and tightening them securely.
- Installing the escutcheon around the faucet body to ensure a smooth and finished look.
- Connecting the hot and cold water lines to the faucet body. Apply plumber's tape to the threads of the supply lines before attaching them to prevent leaks.
- Installing the handles and spout according to the manufacturer's instructions.
- Turn on the water supply. Slowly open the shut-off valves for the hot and cold water lines to check for leaks. Tighten any loose connections as needed.
- Test the faucet. Turn on the faucet and check for leaks around the handles, spout, and connections. Adjust the hot and cold water flow to your preference.
Additional Tips and Considerations
Here are some additional tips and considerations for installing your Moen Adler bathroom faucet:
- Read the installation instructions carefully. Each Moen Adler faucet model may have slightly different installation procedures, so it's essential to refer to the specific instructions for your model.
- Use a level. Ensure the faucet is installed level to prevent water from flowing unevenly.
- Use plumber's tape. Apply plumber's tape to the threads of the supply lines and the faucet body to prevent leaks.
- Use silicone caulk. Apply silicone caulk around the base of the faucet to create a watertight seal and prevent water damage.
- Be patient and take your time. Installing a bathroom faucet requires precision and attention to detail. Take your time to complete each step correctly and avoid rushing.
By following these instructions, you will be well on your way to successfully installing your Moen Adler bathroom faucet and enjoying its improved functionality and style.

Moen Adler 4 Inch Centerset Single Handle Bathroom Faucet Replacement Ifixit Repair Guide

How To Install Bathroom Faucet And Drain Moen Adler Collection

How To Install Bathroom Faucet And Drain Moen Adler Collection

How To Install A Bathroom Faucet Moen Adler

How To Install A Bathroom Faucet Moen Adler

How To Install A Bathroom Faucet Moen Adler

Installing A One Handle Posi Temp Shower Valve Pex To

Install Moen Bathroom Sink Faucet And Drain

Bathroom Faucet Cartridge Replacement

Moen Adler Chrome 2 Handle Deck Mount Bathroom Sink Faucet 84603 Rona
Related Posts