Step-By-Step DIY Bathroom Remodel
Embarking on a bathroom remodel can feel daunting, but with careful planning and execution, a DIY approach can be both rewarding and cost-effective. This guide outlines a step-by-step process for renovating a bathroom, covering key aspects from demolition to finishing touches.
1. Planning and Design
Thorough planning is crucial for a successful remodel. Begin by defining the project scope: Is it a cosmetic refresh or a complete overhaul? Establish a realistic budget, considering material costs, tools, and potential professional help for specialized tasks like plumbing or electrical work. Accurate measurements of the space are essential for ordering materials and visualizing the layout. Create a detailed design plan, including fixture placement, color schemes, and storage solutions.
2. Demolition and Removal
Before demolition begins, turn off the water supply to the bathroom and disconnect electrical circuits. Start by removing existing fixtures, including the toilet, sink, vanity, and any existing shower or bathtub. Protect the surrounding areas with drop cloths and wear appropriate safety gear like gloves, goggles, and a dust mask. Safely dispose of demolition debris according to local regulations.
3. Plumbing and Electrical Rough-In
This stage involves updating the plumbing and electrical systems to accommodate the new fixtures. If relocating plumbing fixtures, rerouting pipes might be necessary. Electrical work can include adding new outlets, updating wiring for lighting, and installing ventilation fans. Consult with qualified professionals if extensive plumbing or electrical work is required to ensure compliance with building codes.
4. Installing the Tub or Shower
Whether installing a new tub or shower, ensure proper leveling and secure anchoring. If opting for a tiled shower, consider using a waterproof membrane to prevent water damage. Follow the manufacturer's instructions carefully for installation specifics for your chosen fixtures. Ensure adequate sealant application to prevent leaks.
5. Installing the Subfloor and Flooring
Bathroom flooring requires water-resistant materials. Install a suitable subfloor, such as cement board, before laying the chosen flooring. Popular bathroom flooring options include ceramic tile, vinyl, and engineered hardwood specifically designed for wet areas. Ensure proper adhesive and grout application for tile installations and follow manufacturer recommendations for other flooring types.
6. Wall Finishing
Common bathroom wall finishes include tile, paint, and wall panels. Preparation is key for any finish. If tiling, ensure a smooth, level surface. If painting, use a moisture-resistant primer and paint formulated for bathrooms. Wall panels offer a quick and easy installation, but ensure proper sealing to prevent moisture intrusion.
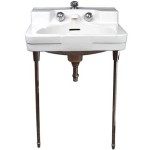
7. Installing the Vanity and Sink
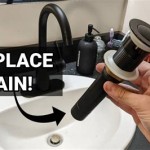
Once the flooring and walls are complete, install the vanity and sink. Ensure proper plumbing connections and secure mounting of the vanity to the wall. Apply sealant around the sink rim to prevent leaks. Connect the faucet and drain assembly according to the manufacturer's instructions.
8. Toilet Installation
Install the toilet according to manufacturer instructions, ensuring a secure wax ring seal to prevent leaks. Connect the water supply line and test for proper flushing and leak-free connections.
9. Lighting and Ventilation
Install lighting fixtures, ensuring proper wiring connections. A functional ventilation fan is crucial for moisture control in the bathroom. Ensure proper venting to the exterior of the building.
10. Finishing Touches
Complete the remodel with finishing touches such as towel bars, toilet paper holders, mirrors, and other accessories. Caulk any gaps or seams around fixtures and trim to create a polished and sealed finish. Thoroughly clean the bathroom to remove any construction debris.
This step-by-step guide provides a comprehensive overview of a DIY bathroom remodel. However, specific steps and requirements may vary depending on the project scope and local building codes. Consulting with qualified professionals for specialized tasks is recommended to ensure a safe and successful bathroom renovation.

Bathroom Remodeling A Step By Guide Budget Dumpster

Bathroom Remodeling A Step By Guide Budget Dumpster

Bathroom Remodeling A Step By Guide Budget Dumpster

Bathroom Remodeling A Step By Guide Budget Dumpster

Bathroom Remodeling A Step By Guide Budget Dumpster

Things To Consider Before Doing A Diy Bathroom Remodel Truhome Inc

Bathroom Demolition A Detailed Step By Guide

Diy Modern Master Bath Remodel Part 6 The Reveal Pneumatic Addict

An 8k Bathroom Reno For Under 4k By Doing It Ourselves Interior Frugalista

Diy Bathroom Remodel 7 Step Guide To Success Dig This Design
Related Posts