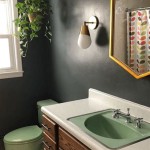
DIY Bathroom Renovation: A Step-by-Step Guide
Renovating a bathroom can be a daunting task, but with proper planning and execution, it can be a rewarding DIY project. A bathroom renovation can significantly enhance the functionality and aesthetics of your home, increasing its value and providing a tranquil space for relaxation. This article will provide a comprehensive step-by-step guide to help you navigate the process of DIY bathroom renovation.
1. Planning and Preparation
The first step in any successful DIY project is meticulous planning. Before diving into the renovation, it's crucial to have a clear vision of the desired outcome. Consider the following:
Budget:
Determine a realistic budget for the renovation, factoring in materials, tools, and potential unexpected costs.Scope:
Define the extent of the renovation, whether it involves replacing fixtures, updating finishes, or a complete overhaul.Style:
Choose a design aesthetic that complements your home's overall style and reflects your personal preferences.Functionality:
Consider the practical aspects of the bathroom, such as storage space, accessibility, and the arrangement of fixtures.Permits:
Check with your local building department for any necessary permits or inspections required for the renovation.
Once the planning stage is complete, it's time to prepare the bathroom for renovation. This includes:
Clear the space:
Remove all furniture, fixtures, and personal belongings from the bathroom.Protect surrounding areas:
Cover floors and walls in adjacent rooms with drop cloths to prevent damage from dust and debris.Turn off utilities:
Disconnect the water supply, shut off the power, and disconnect the gas lines (if applicable) to the bathroom.Safety precautions:
Wear appropriate safety gear, including gloves, goggles, and a dust mask, throughout the renovation process.
2. Demolition and Removal
With the bathroom prepped, the next step is to remove the existing fixtures and finishes. This can be a physically demanding task, so it's essential to have the right tools and approach.
Remove fixtures:
Disconnect and carefully remove the toilet, sink, showerhead, and bathtub. If replacing the shower stall, remove the existing surround and liner.Remove tiles:
Use a hammer and chisel to remove the existing tile flooring and wall coverings. Be mindful of the underlying substrate, as it may need to be repaired or replaced.Remove vanity and cabinets:
Dismantle the existing vanity and cabinets, paying attention to the plumbing and electrical connections.Remove old flooring:
Remove the existing flooring, whether it's linoleum, vinyl, or wood, and dispose of it properly.Clean the area:
Thoroughly clean the bathroom to remove debris and dust before moving on to the next stage.
3. Installation and Finishing
After the demolition phase, it's time to install new fixtures, finishes, and appliances. This step requires precision and attention to detail.
Install new fixtures:
Install the new toilet, sink, showerhead, and bathtub, ensuring proper connections to plumbing and electrical lines.Install flooring:
Choose a flooring material that is water-resistant and durable, such as tile, vinyl, or waterproof laminate. Lay the flooring according to the manufacturer's instructions, ensuring even spacing and proper sealing.Install walls and shower surround:
Install new walls and shower surrounds, ensuring they are waterproof and properly sealed.Install vanity and cabinets:
Install the new vanity and cabinets, ensuring they are level and secured to the walls.Apply finishing touches:
Install trim, molding, and hardware. Apply paint or wallpaper to the walls and ceiling, ensuring proper ventilation and drying time.
It's essential to follow the manufacturer's instructions for each fixture and material to ensure proper installation and longevity.
4. Testing and Clean Up
Once the installation is complete, it's crucial to test all fixtures and systems to ensure they are working properly.
Test plumbing fixtures:
Run water through the sink, tub, and shower, checking for leaks and proper drainage.Test electrical fixtures:
Turn on all lights and electrical outlets, confirming they are functioning correctly.Inspect for leaks:
Carefully inspect all plumbing connections and seals for any signs of leaks.Clean up:
Remove all debris, tools, and protective coverings, ensuring the bathroom is thoroughly cleaned.
It's essential to address any issues or defects promptly to prevent further problems.

Bathroom Remodeling A Step By Guide Budget Dumpster

Bathroom Remodeling A Step By Guide Budget Dumpster

Bathroom Remodeling A Step By Guide Budget Dumpster

Bathroom Remodeling A Step By Guide Budget Dumpster

Bathroom Remodeling A Step By Guide Budget Dumpster

9 Simple Ideas For Bathroom Remodel Over The Weekend

Bathroom Remodeling A Step By Guide Budget Dumpster

Diy Bathroom Renovation In 5 Days How To Remodel Start Finish Part 2

Bathroom Remodeling A Step By Guide Budget Dumpster

Diy Small Bathroom Remodel Bath Renovation Project
