How To Replace a Bathroom Vent Fan Motor in France
Bathroom vent fans are essential components in French homes, particularly in regions with high humidity. These fans remove excess moisture and stale air, preventing mold growth and maintaining air quality. When a vent fan motor fails, it can significantly impact the bathroom environment. Replacing the motor can be a cost-effective alternative to replacing the entire fan unit, provided the housing and other components are still in good condition. This article details the process of replacing a bathroom vent fan motor in France, focusing on safety protocols, required tools, motor selection, and step-by-step instructions.
Before beginning any electrical work in France, it is imperative to adhere to all relevant safety regulations and norms. French electrical standards, often based on European norms, are stringent and designed to prevent electrical accidents. Familiarization with the *NF C 15-100* standard, which governs electrical installations in France, is highly recommended. This standard covers various aspects of electrical safety, including grounding, circuit protection, and wiring methods.
It is crucial to emphasize that any electrical work, including replacing a vent fan motor, should ideally be performed by a qualified electrician in France. This ensures compliance with local regulations and reduces the risk of electric shock or fire. If attempting the replacement as a DIY project, strict adherence to safety precautions is paramount. The electricity to the circuit powering the vent fan must be switched off at the main electrical panel before commencing any work. Double-check that the power is off using a voltage tester before touching any wires or components.
Furthermore, understanding the specific electrical supply in the French home is important. France operates on a 230V/50Hz electrical system. When selecting a replacement motor, ensure it is compatible with this voltage and frequency. Using a motor designed for a different voltage can damage the motor and the electrical system.
Key Point 1: Preparation and Safety
The initial step involves thorough preparation, prioritizing safety above all else. Gather the necessary tools and materials, ensuring they are in good working condition. The following items are typically required:
- Screwdrivers (Phillips and flathead)
- Voltage tester
- Wire strippers/crimpers
- Wire connectors (e.g., Wago connectors are commonly used in France)
- Pliers
- Work gloves
- Safety glasses
- New vent fan motor (matching the specifications of the original)
- Ladder or step stool
- Dust mask
Before starting the physical work, turn off the power to the bathroom vent fan circuit at the main electrical panel (tableau électrique). Locate the correct circuit breaker (disjoncteur) and switch it to the "off" position. It is advisable to label the circuit breaker to prevent accidental reactivation while the work is in progress. Use the voltage tester to confirm that the power to the vent fan is indeed off. Test the wires connected to the fan motor to ensure no voltage is present.
Put on work gloves and safety glasses to protect hands and eyes from debris and potential hazards. If the existing vent fan is dusty or dirty, wear a dust mask to avoid inhaling particles. Position the ladder or step stool securely under the vent fan, ensuring stable footing. Provide adequate lighting in the area to facilitate clear visibility during the replacement process.
Documenting the wiring configuration before disconnecting any wires is highly recommended. Take a photograph or draw a diagram of the existing wiring to ensure correct reconnection later. This step is particularly important if unfamiliar with electrical wiring or if the wiring appears complex.
Key Point 2: Motor Removal and Replacement
With the power off and the work area prepared, the next step is to remove the old vent fan motor and install the new one. This involves carefully detaching the fan grill, accessing the motor housing, disconnecting the wiring, and physically removing the motor.
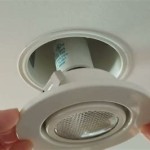
Begin by removing the fan grill or cover. This is typically held in place by screws, clips, or a combination of both. Unscrew or unclip the grill, taking care not to drop it. Once the grill is removed, the internal components of the vent fan, including the motor housing, will be visible.
Locate the motor housing. This is usually a metal or plastic enclosure that houses the motor and fan blade assembly. Depending on the model, the motor housing may be secured to the fan unit with screws, clips, or brackets. Remove any screws or clips holding the motor housing in place. Carefully detach the housing from the fan unit, being mindful of any attached wires.
Before disconnecting any wires, refer to the previously taken photograph or diagram of the wiring configuration. Disconnect the wires connected to the old motor. This is typically done by unscrewing wire connectors or releasing push-in connectors. In France, Wago connectors are commonly used, which require simply pushing a lever to release the wire. Use wire strippers to ensure clean wire ends for reconnection if necessary.
Once the wires are disconnected, remove the old motor from the motor housing. The motor may be held in place by screws, clips, or a friction fit. Remove any fasteners securing the motor and carefully slide it out of the housing. If the motor is stuck, gently wiggle it back and forth to loosen it. Avoid using excessive force, as this could damage the motor housing.
Install the new vent fan motor in the motor housing. Ensure the motor is correctly oriented and that any mounting holes or screws are aligned. Secure the motor in place using the appropriate fasteners. Reconnect the wires to the new motor, matching the wiring configuration from the original motor. Use wire connectors to ensure secure and insulated connections. Wago connectors are a practical option for connecting wires securely and quickly.
Reattach the motor housing to the fan unit, ensuring it is properly secured. Replace any screws or clips that were removed earlier. Double-check that all wires are properly connected and that no bare wires are exposed. Ensure the fan blade spins freely without obstruction.
Key Point 3: Testing and Final Steps
Before reassembling the vent fan completely, it is crucial to test the new motor to ensure it is functioning correctly. This involves temporarily restoring power to the circuit and observing the fan's operation. If the fan operates correctly, the final steps involve reassembling the unit and testing it again under normal conditions.
Carefully restore power to the bathroom vent fan circuit at the main electrical panel (tableau électrique). Switch the circuit breaker (disjoncteur) to the "on" position. Observe the vent fan's operation. The fan should start smoothly and run quietly. Ensure the fan blade is rotating in the correct direction. If the fan does not start, immediately switch off the power and recheck the wiring connections.
If the vent fan operates correctly, switch off the power again at the main electrical panel. Reattach the fan grill or cover. Secure it with screws, clips, or any other fasteners that were removed earlier. Ensure the grill is securely attached and that there are no gaps or loose parts.
Restore power to the bathroom vent fan circuit at the main electrical panel. Observe the vent fan's operation under normal conditions. Check for any unusual noises, vibrations, or odors. Ensure the fan is effectively removing moisture and stale air from the bathroom. Allow the fan to run for an extended period to ensure it is functioning reliably.
If any issues arise during testing, such as the fan not starting, making unusual noises, or not effectively removing moisture, switch off the power immediately. Recheck all wiring connections, ensuring they are secure and properly insulated. Inspect the fan blade for any obstructions or damage. If the problem persists, consult a qualified electrician in France for assistance.
Dispose of the old vent fan motor and any packaging materials responsibly, following local waste disposal regulations in France. Electrical components should be recycled appropriately to minimize environmental impact. Clean the work area thoroughly, removing any debris or tools. Store any unused materials or tools in a safe and organized manner.
Regular maintenance of the bathroom vent fan is essential to ensure its continued performance and longevity. Clean the fan grill and blades periodically to remove dust and debris. Lubricate the motor bearings if necessary, following the manufacturer's instructions. Inspect the wiring connections regularly for any signs of damage or corrosion. By following these maintenance tips, the bathroom vent fan can provide years of reliable service in the French home.

How To Fix A Bathroom Exhaust Fan With That Has Stopped Working And The Light Dimmed Quora

Fiada Bathroom Vent Exhaust Fan Motor Replacement Electric Motors Kit Compatible With Nutone Broan 50cfm 120v 1 Piece Ping From Microsoft Start

Bkr60 Broan Nutone Quickit Bath Fan Replacement Motor And Cover Grille 60 Cfm Abw Appliances

Revent Rvs80 80 Cfm Easy Installation Bathroom Exhaust Fan Guide

Bathroom Vent Fan Motor By Ge 9 99 Pic

Bathroom Exhaust Fan Kits W Aerogrille Continental

Broan Nutone Replacement Fan Motor S97008584 The Home Depot

Motor S1101122 Oem Nutone Ereplacementparts Com

Revent Rvs80 80 Cfm Easy Installation Bathroom Exhaust Fan Guide

How To Clean A Bathroom Exhaust Fan Homeserve Usa
Related Posts