Removing a Grohe Bathroom Faucet Handle
Grohe bathroom faucets are known for their sleek designs and durable construction. However, like all plumbing fixtures, they may require occasional maintenance or repair, often necessitating the removal of the handle. This process can vary slightly depending on the specific model, but the general principles remain consistent. This guide outlines the steps involved in removing a Grohe bathroom faucet handle, providing a comprehensive resource for homeowners.
Identifying the Handle Type
Before attempting removal, it is crucial to identify the type of Grohe handle installed. This will determine the specific tools and techniques required. Common Grohe handle types include lever handles, cross handles, and joystick handles. Each type has a unique attachment mechanism. Examining the handle's base and surrounding area for screws, caps, or other indicators will help determine the correct removal procedure.
Gathering Necessary Tools
Having the right tools on hand simplifies the removal process and minimizes the risk of damage. Typically, the following tools are required: * Allen wrench (various sizes may be needed) * Flathead screwdriver * Phillips head screwdriver * Adjustable wrench * Needle-nose pliers * Flashlight or headlamp
Shutting Off the Water Supply
Before commencing any work on the faucet, it is essential to shut off the water supply. Locate the shut-off valves underneath the sink. Turn these valves clockwise to stop the flow of water to the faucet. Turn the faucet on briefly to release any remaining water pressure in the lines. This prevents unexpected sprays of water during handle removal and protects against potential water damage.
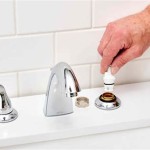
Removing a Lever Handle
Many Grohe faucets utilize lever handles. These are typically secured with a set screw located underneath a decorative cap on the handle. * Locate the small cap on the handle, often marked with a red or blue dot for hot and cold respectively. * Gently pry off the cap using a small flathead screwdriver. * Use the appropriate size Allen wrench to loosen and remove the set screw. * Once the set screw is removed, the handle should pull straight off the faucet body.
Removing a Cross Handle
Cross handles, featuring a four-pronged design, are also common on Grohe faucets. These are often secured with screws concealed beneath decorative caps. * Look for small caps on each side of the handle. * Pry off the caps gently with a small flathead screwdriver. * Using a Phillips head screwdriver, remove the screws beneath the caps. * Once the screws are removed, carefully pull the handle straight off the faucet body.
Removing a Joystick Handle
Joystick handles offer single-lever control for both temperature and flow. Their removal process can be slightly more intricate. * Look for a small set screw, usually located on the underside or side of the handle base. * Use the appropriate size Allen wrench to loosen and remove the set screw. * Some joystick handles may have a retaining clip or ring in addition to the set screw. Use needle-nose pliers to carefully remove any retaining clips. * Once the set screw and any retaining clips are removed, the handle should lift off the faucet body.
Dealing with Stubborn Handles
Occasionally, a handle may become stuck due to mineral buildup or corrosion. If the handle resists removal after loosening the set screw or screws, do not force it. Excessive force can damage the handle or the faucet body. Instead, try the following: * Apply penetrating oil around the base of the handle. Allow it to soak for a few minutes to loosen any corrosion. * Gently tap the handle base with a rubber mallet to break the seal. * Use a handle puller tool, available at most hardware stores, for a more secure grip and even pulling force. This minimizes the risk of damaging the handle finish.
Inspecting the Handle and Cartridge
Once the handle is removed, inspect it for any signs of damage or wear. Also, examine the cartridge, the internal mechanism controlling water flow and temperature, for signs of leaks or mineral buildup. If the cartridge appears damaged or worn, it may need replacing. Consult the Grohe product manual or contact customer support for assistance with cartridge replacement.
Reinstalling the Handle
After completing the necessary repairs or maintenance, reinstall the handle by reversing the removal steps. Ensure all screws and set screws are tightened securely but avoid overtightening, as this can damage the handle or the faucet body. Replace any decorative caps and test the faucet operation to confirm proper function.

Grohe Faucet Handle Keeps Moving The Wrong Way

How To Remove Handles From Grohe Sink Faucets Hunker

Grohe Faucet Handle Keeps Moving The Wrong Way

How To Install Your Grohe Essence Widespread Bathroom Faucet

Grohe Tallinn 8 In Widespread 2 Handle Bathroom Faucet Brushed Nickel Infinityfinish 20583en0 The Home Depot

Grohe Tallinn 4 In Centerset Single Handle Bathroom Faucet Brushed Nickel Infinityfinish 23838en0 The Home Depot

Grohe Ve 4 In Centerset Single Handle Bathroom Faucet Starlight Chrome 23837000 The Home Depot

Single Hole Handle S Size Bathroom Faucet 1 2 Gpm Less Drain

Grohe Ve 4 In Centerset 2 Handle High Spout Bathroom Faucet Starlight Chrome 20582000 The Home Depot
Related Posts