Bathroom Mixer Tap Stiff: Causes, Prevention, and Repair
A stiff bathroom mixer tap can be a frustrating and inconvenient problem. It can range from requiring slightly more force to turn the handle to becoming completely immovable. Understanding the potential causes of this stiffness is crucial for effective prevention and, when necessary, repair. This article will explore the common reasons behind a stiff bathroom mixer tap, methods to prevent the issue from developing, and steps to take when repair becomes necessary.
Identifying the reason for a stiff mixer tap usually involves careful observation and, in some cases, a bit of disassembly. Paying attention to when the stiffness occurs – is it constant, intermittent, or only present when hot or cold water is selected? – can provide valuable clues. Furthermore, knowing the age of the tap and the type of water supply in the area can help narrow down the possible culprits. Addressing the problem promptly is important, as forcing a stiff tap can lead to further damage, potentially requiring a complete tap replacement.
Hard Water and Mineral Buildup
One of the most prevalent causes of stiff bathroom mixer taps is the accumulation of mineral deposits, particularly in areas with hard water. Hard water contains high concentrations of minerals such as calcium and magnesium. Over time, these minerals can precipitate out of the water and form a crusty buildup on the internal components of the tap, including the cartridge, valve, and spout. This buildup restricts the movement of these parts, leading to increased friction and ultimately, a stiff tap. The effect is similar to scale buildup in a kettle or water heater, albeit on a smaller scale.
The mineral deposits can accumulate in different areas of the tap, leading to varying symptoms. If the stiffness is mainly felt when turning the tap on and off, the buildup is likely affecting the cartridge or valve. If the stiffness is more pronounced when adjusting the water temperature, the issue could be affecting the mixing chamber or the connection between the handle and the cartridge. Visual inspection of the tap, especially around the base and spout, may reveal visible mineral deposits, providing further evidence of this issue.
Preventing mineral buildup requires proactive measures. Installing a water softener for the entire house is the most effective long-term solution, reducing the overall mineral content of the water supply. Alternatively, using a water filter specifically designed for removing minerals can help mitigate the problem, although it will only affect the water passing through that filter. Regularly cleaning the exterior of the tap with a descaling solution can also help prevent the buildup of deposits on visible surfaces. Finally, periodically dismantling and cleaning the tap's internal components, as described in the repair section, can help remove existing mineral deposits before they cause significant stiffness.
Corrosion and Rust
Corrosion, especially rust, can also contribute to a stiff bathroom mixer tap. This is more common in older taps made from less corrosion-resistant materials, or taps that have been damaged or exposed to harsh chemicals. Rust forms when iron or steel is exposed to moisture and oxygen, and it can gradually weaken the tap's internal components, causing them to seize or bind. Corrosion can also occur in other metals, such as brass or copper, although it typically manifests as a green or blue discoloration rather than rust.
The presence of rust or corrosion can be identified by visual inspection. Look for reddish-brown stains around the base of the tap, the spout, or the handle. If possible, inspect the internal components of the tap during disassembly for signs of corrosion. The affected areas may appear pitted, discolored, or weakened. In severe cases, the corrosion may have eaten through the metal, causing leaks or structural damage. Taps located in areas with high humidity or exposed to corrosive cleaning products are particularly susceptible to corrosion.
Preventing corrosion involves selecting taps made from corrosion-resistant materials, such as stainless steel or chrome-plated brass. Avoid using harsh cleaning chemicals or abrasive cleaners that can damage the tap's finish and expose the underlying metal to moisture. Regularly drying the tap after use can also help prevent the formation of rust. If corrosion is already present, it may be possible to remove it using a rust remover or a mild abrasive cleaner. However, be careful not to damage the surrounding metal. In severe cases of corrosion, the affected components may need to be replaced.
Cartridge or Valve Failure
The cartridge or valve is the heart of a mixer tap, controlling the flow and temperature of the water. Over time, these components can wear out, become damaged, or become clogged with debris, leading to stiffness or complete failure. Cartridges and valves typically contain rubber seals and O-rings that can degrade over time, causing leaks or increased friction. They can also be damaged by sediment or debris in the water supply, or by excessive force when turning the tap handle.
Signs of cartridge or valve failure include a stiff tap that is difficult to turn, a tap that leaks even when turned off, or a tap that produces inconsistent water temperature. The stiffness may be more pronounced when turning the tap to a specific position or when selecting hot or cold water. In some cases, the tap may make a squealing or grinding noise when turned. Disassembly of the tap is usually required to inspect the cartridge or valve for damage or wear. Look for cracks, tears, or deformities in the rubber seals, or for signs of sediment or debris buildup.
Preventing cartridge or valve failure involves using the tap gently and avoiding excessive force when turning the handle. Regularly cleaning the tap's aerator can help prevent sediment or debris from entering the tap and damaging the cartridge or valve. Installing a water filter can also help remove sediment from the water supply. If the cartridge or valve is showing signs of wear or damage, it should be replaced as soon as possible to prevent further damage to the tap. When replacing a cartridge or valve, ensure that the replacement is compatible with the specific tap model. Using the wrong cartridge or valve can cause leaks or further damage.
Repairing a Stiff Bathroom Mixer Tap
Repairing a stiff bathroom mixer tap often involves disassembling the tap, cleaning or replacing the affected components, and reassembling the tap. Before starting any repairs, it is essential to turn off the water supply to the tap to prevent flooding. This usually involves turning off the shut-off valves located under the sink. Once the water supply is off, the repair process can begin. The specific steps involved will vary depending on the type of tap and the cause of the stiffness, but the following is a general overview of the process.
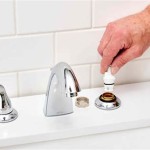
First, carefully remove the tap handle. This usually involves loosening a setscrew located on the side or underneath the handle. The setscrew may be hidden under a decorative cap that needs to be pried off. Once the setscrew is loosened, the handle should slide off. Next, remove any decorative covers or escutcheons that may be concealing the tap's internal components. These covers may be held in place by screws or by a friction fit. Once the covers are removed, the cartridge or valve will be visible. Carefully remove the cartridge or valve, noting its orientation and any associated hardware, such as O-rings or washers. It is helpful to take pictures or make notes to ensure that the tap is reassembled correctly.
Once the cartridge or valve is removed, inspect it for signs of damage or wear. If the cartridge or valve is coated in mineral deposits, it can be cleaned using a descaling solution or a mild abrasive cleaner. Be careful not to damage the rubber seals or other delicate components. If the cartridge or valve is damaged or worn, it should be replaced with a new one. Ensure that the replacement cartridge or valve is compatible with the specific tap model. Before reassembling the tap, clean the housing and any other internal components. This can help remove any remaining mineral deposits or debris. Lubricate the rubber seals with a plumber's grease to ensure a smooth and watertight seal. Reassemble the tap in the reverse order of disassembly, paying attention to the orientation of the cartridge or valve and any associated hardware. Tighten all screws and connections securely, but do not overtighten them. Finally, turn on the water supply and check for leaks. If there are any leaks, tighten the connections further or recheck the installation of the cartridge or valve.
For those uncomfortable with plumbing repairs, consider consulting a qualified plumber. Attempting repairs without the necessary knowledge or tools could result in further damage or injury.

Fixing A Stiff Or Leaking Mixer Tap Cartridge Removal And Disassembly

Fixing A Stiff Or Leaking Mixer Tap Cartridge Removal And Disassembly

Unsticking A Bristan Matrix Mixer Tap

Single Lever Mono Basin Flow Cartridge Maintenance And Replacement

How To Ease Taps That Are Stiff Turn

Replacing A Cartridge In Mixer Tap The

Bathroom Handle Stiff Or Difficult To Operate

Mixer Tap Lubrication Diynot Forums

Stiff Clunky Grating Faucet Kitchen Mixer Tap Fix It For Free

How To Fix A Stiff Faucet Handle Step By
Related Posts